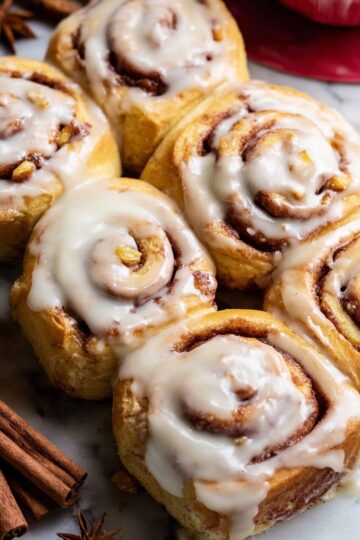
Vegan Pumpkin Scones with Maple Glaze Recipe is one of those treats that makes your kitchen smell like fall in the best way. With its tender, spiced crumb and sweet maple drizzle, it’s just irresistible for cozy mornings or leisurely weekend brunches. I’m excited to share how easily you can whip this up at home.

Jump to:
- Why You'll Love This Recipe
- Ingredients & Why They Work
- Make It Your Way
- Step-by-Step: How I Make Vegan Pumpkin Scones with Maple Glaze Recipe
- Top Tip
- How to Serve Vegan Pumpkin Scones with Maple Glaze Recipe
- Make Ahead and Storage
- Frequently Asked Questions:
- Final Thoughts
- Vegan Pumpkin Scones with Maple Glaze Recipe
Why You'll Love This Recipe
I have made plenty of scone recipes over the years, and this Vegan Pumpkin Scones with Maple Glaze Recipe has quickly become a go-to. The balance of warm pumpkin pie spices and the bright sweetness of maple glaze brings such a comforting and satisfying bite.
- Moist and Tender Texture: Thanks to the pumpkin purée and cold vegan butter, these scones come out perfectly flaky yet moist.
- Simple, Wholesome Ingredients: You don’t need anything fancy, and most pantry staples work great here.
- Delicious Maple Glaze: The glaze adds just the right amount of sweetness and that lovely maple flavor that pairs wonderfully with pumpkin.
- Perfect for Fall—and Beyond: Whether it’s Halloween, Thanksgiving, or just a cozy weekend, these scones hit the spot.
Ingredients & Why They Work
Each ingredient in this Vegan Pumpkin Scones with Maple Glaze Recipe plays a role in building flavor and texture. From the pumpkin purée that brings moisture and that signature pumpkin taste to the pumpkin pie spice blend that warms things up, these scones are a perfect harmony of elements.
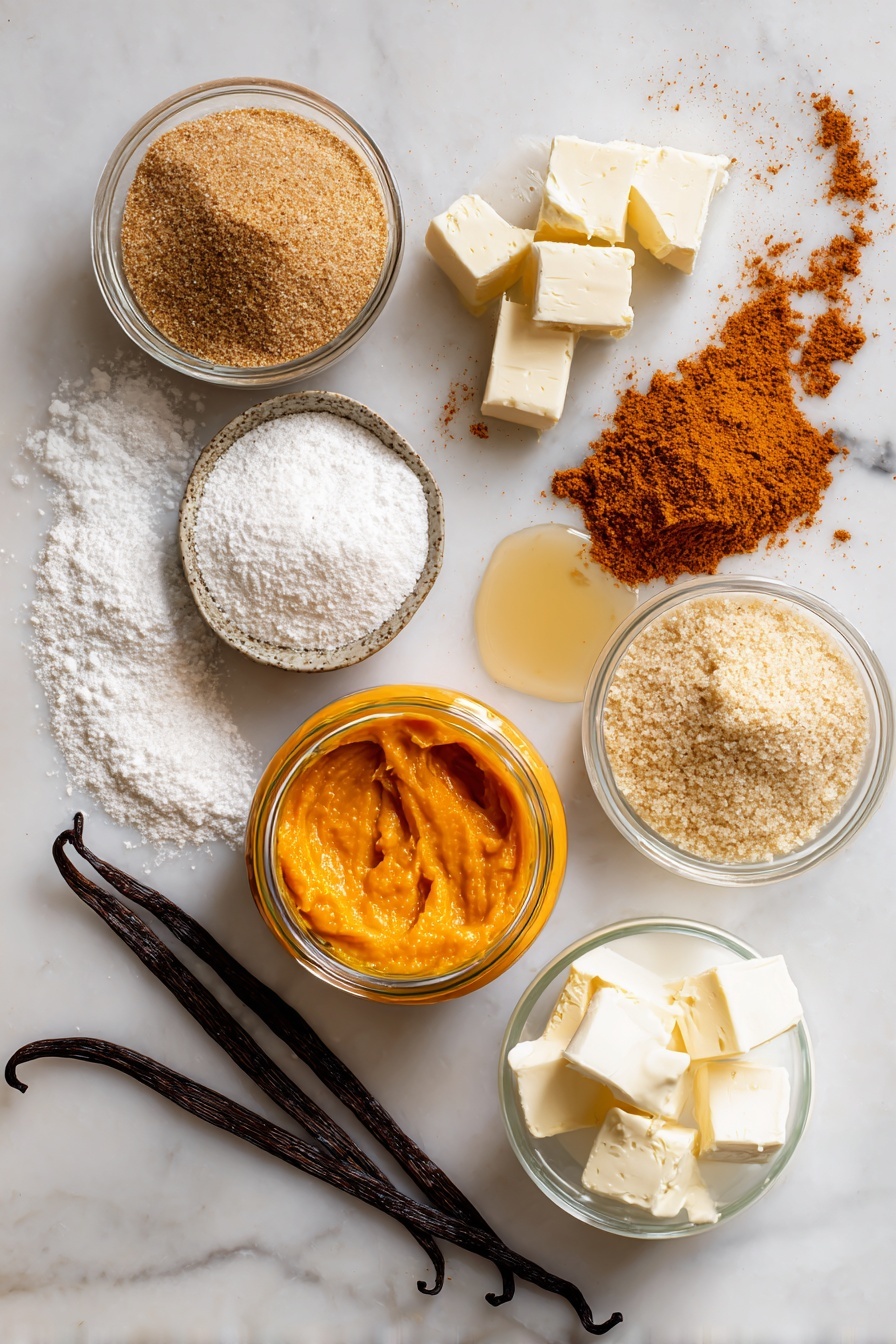
- Pumpkin Purée: Provides moisture along with natural sweetness and that iconic pumpkin flavor. Use canned or homemade, just make sure it’s plain purée.
- Non-Dairy Milk: A small splash keeps the batter moist without weighing it down. I like oat or almond milk for a neutral taste.
- Vanilla Extract: Adds depth and balances the spices beautifully.
- White Vinegar: Reacts with the baking soda to give your scones a lovely rise and tender crumb.
- All-Purpose Flour: The base of the scones, provides structure.
- Light Brown Sugar: Brings mellow sweetness and a bit of moisture to the crumb.
- Baking Powder & Baking Soda: These leaveners work together so your scones puff up just right.
- Kosher Salt: Highlights all the other flavors for balance.
- Pumpkin Pie Spice: Essential for that nostalgic fall spice blend – cinnamon, nutmeg, ginger, and clove come to life here.
- Non-Dairy Butter: The cold butter cut into cubes helps create flaky layers, so keep it chilled and work quickly.
- Powdered Sugar & Maple Syrup (for glaze): Sweet, smooth, and drizzled on top, the glaze completes the flavor perfectly.
Make It Your Way
One of the things I love most is how easy it is to customize this Vegan Pumpkin Scones with Maple Glaze Recipe to suit your taste or occasion — and still come out delicious every time.
- Add-ins: I sometimes toss in vegan chocolate chips or chopped pecans for a little twist, and it works beautifully without complicating things.
- Spice it up: Feel free to adjust the pumpkin pie spice—more cinnamon or a pinch of cardamom can make it your own signature version.
- Sweetener swap: Maple syrup in the glaze can be swapped for agave or brown rice syrup, especially if you want a slightly different sweetness level.
- Dairy-free milk choice: Using coconut milk gives a richer flavor, but almond milk keeps it light and classic—play around with what you enjoy.
Step-by-Step: How I Make Vegan Pumpkin Scones with Maple Glaze Recipe
Step 1: Prep Your Base Mix
Preheat your oven to 400°F and line a baking sheet with parchment paper; this keeps the scones from sticking and makes cleanup easier. In a small bowl, mix together the pumpkin purée, non-dairy milk, vanilla, and white vinegar. This little combo creates the wet base that brings flavor and moisture.
Step 2: Combine the Dry Ingredients
In a big mixing bowl, whisk together the flour, brown sugar, baking powder, baking soda, salt, and pumpkin pie spice. This is where all the spicy warmth and sweetness start to come together.
Step 3: Cut in Cold Vegan Butter
Add your cold, cubed vegan butter to your dry ingredients. Using your fingers or a fork, gently work the cubes into the flour mixture until it looks like coarse crumbs. Keep your butter cold to ensure flaky layers in the final scones—this step is key, trust me!
Step 4: Bring It All Together
Pour the pumpkin wet mix into the flour mixture. Using your hands, gently toss everything together just until the dough comes together in a shaggy ball. Don’t overwork it—overmixing will make your scones tough. If you’ve followed along, your dough should be soft and easy to shape but not sticky.
Step 5: Shape and Slice
Turn your dough onto a lightly floured surface. Gently pat it into a circle about 7 inches in diameter—no need to knead, just be gentle! Use a sharp knife to slice the circle into 8 triangles. Carefully transfer these to your prepared baking sheet, spacing them a bit apart so they have room to rise.
Step 6: Bake and Cool
Bake in your preheated oven for 18-22 minutes, until the bottoms are lightly browned and the scones feel firm. Let them cool on the sheet for about 10 minutes—that short wait is tough, but it helps the scones set and get ready for glazing.
Step 7: Whip Up the Maple Glaze
In a bowl, whisk together powdered sugar, maple syrup, non-dairy milk, and vanilla until smooth and glossy. If you want a thinner glaze, add a splash more non-dairy milk. Drizzle generously over your cooled scones once they’re ready to be enjoyed!
Top Tip
From my experience making these Vegan Pumpkin Scones with Maple Glaze Recipe multiple times, some little tips make all the difference between good and great.
- Keep Butter Cold: Before working it into the flour, cube it and pop it back in the fridge. This ensures flaky scones.
- Handle the Dough Gently: Overmixing toughens your scones, so be light when combining wet and dry.
- Use Fresh Spices: Pumpkin pie spice gets boring when old—freshly ground spices will elevate your scones instantly.
- Don’t Skip the Vinegar: It reacts with baking soda to give your scones that perfect lift and tenderness.
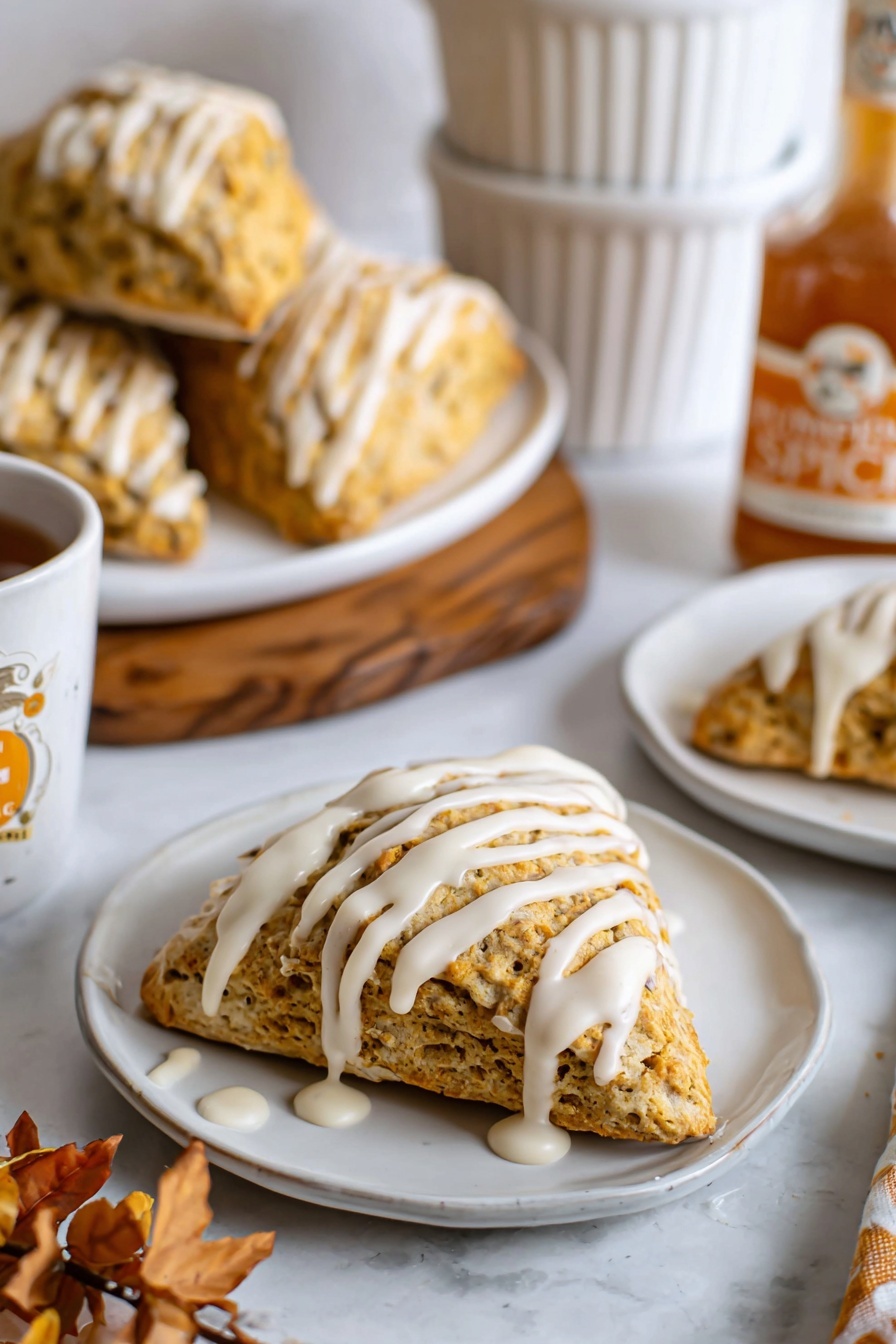
How to Serve Vegan Pumpkin Scones with Maple Glaze Recipe
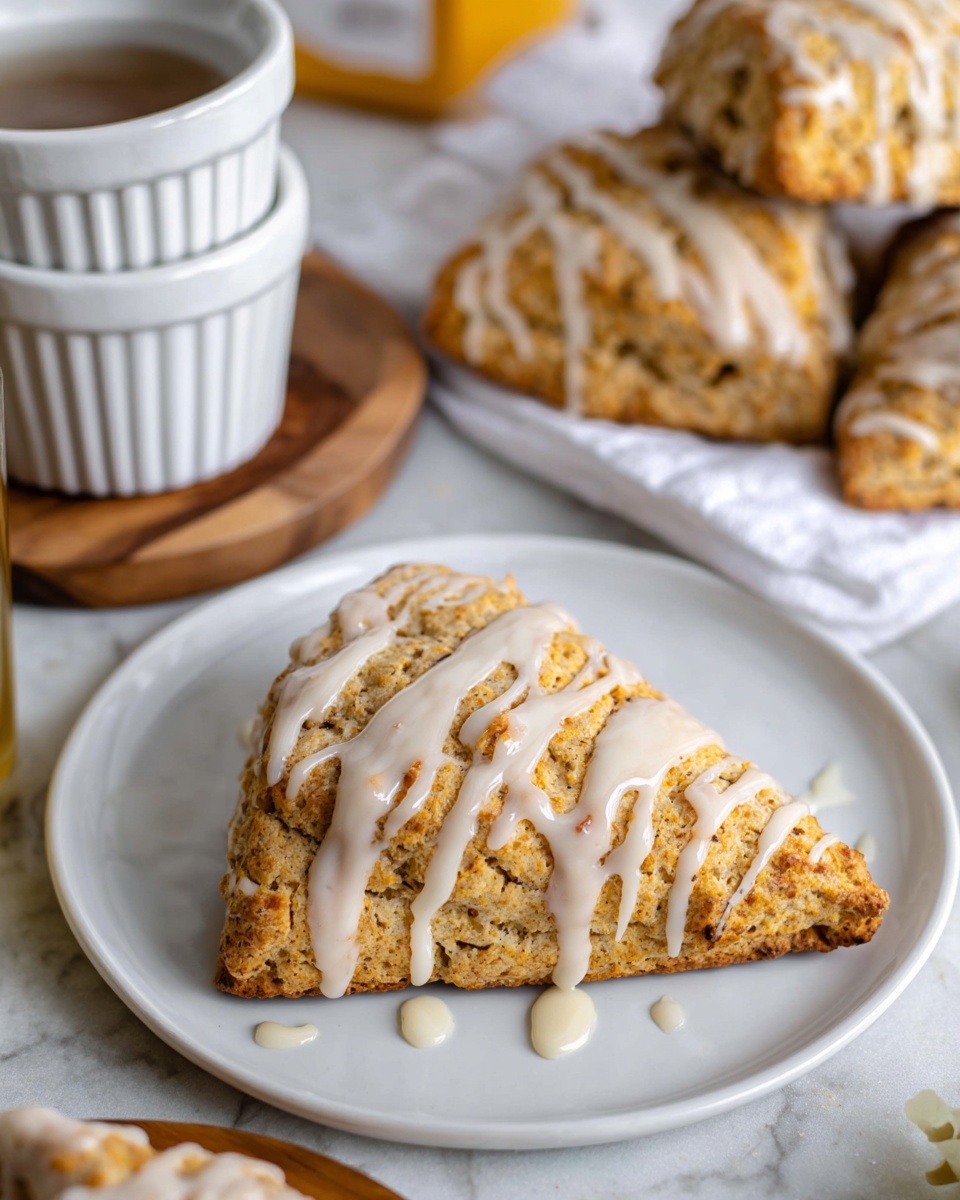
Garnishes
I usually keep the garnish simple—just the maple glaze. But on special mornings, I sprinkle a little extra cinnamon sugar or toasted pumpkin seeds on top for crunch and a pretty touch.
Side Dishes
These scones pair fabulously with a hot cup of coffee or chai latte. For a heartier brunch, I like serving them alongside dairy-free yogurt with fresh fruit or a tofu scramble to balance sweet and savory.
Creative Ways to Present
For a festive brunch, arrange the scones on a rustic wooden platter, drizzle extra glaze on each, and add little bowls of maple syrup and vegan butter for guests to spread. It makes your table feel warm, inviting, and special.
Make Ahead and Storage
Storing Leftovers
I usually store leftovers in an airtight container at room temperature for up to two days, but honestly, these scones rarely last that long in my house! If you want to keep them fresh longer, refrigerate but allow the scones to come to room temp before enjoying.
Freezing
These scones freeze beautifully—just wrap each in plastic wrap then place in a freezer bag. When I want a treat, I thaw them overnight in the fridge or warm from frozen in the oven for a few minutes, and they’re almost as good as fresh.
Reheating
To keep the edges crisp, reheat your scones at 325°F in the oven for about 5-7 minutes. Microwaving works in a pinch, but you lose a bit of that delightful crispness.
Frequently Asked Questions:
Absolutely! Canned pumpkin purée works perfectly and is really convenient. Just be sure it’s pure pumpkin, not pumpkin pie filling, which has added sugars and spices.
I recommend using a firm non-dairy butter that comes in sticks rather than tubs. It’s easier to cube and works best for flaky layers. Brands like Miyoko's or Earth Balance are reliable picks.
You can try substituting a 1:1 gluten-free flour blend, but the texture may differ slightly. I suggest adding a bit of xanthan gum (if your blend doesn’t already include it) to help with structure and binding.
Leftover scones are best enjoyed within two days when stored in an airtight container at room temperature. For longer storage, refrigerate them for up to 5 days or freeze for up to 3 months.
Final Thoughts
Honestly, I look forward to baking these Vegan Pumpkin Scones with Maple Glaze Recipe every fall — and sometimes even off-season because they’re just that good. I hope you give this recipe a try and find it as comforting and delicious as I do. Trust me, once you nail this one, you’ll have a perfect seasonal treat ready anytime you want a little autumn magic in your kitchen.
Print
Vegan Pumpkin Scones with Maple Glaze Recipe
- Prep Time: 15 minutes
- Cook Time: 22 minutes
- Total Time: 45 minutes
- Yield: 8 scones
- Category: Breakfast
- Method: Baking
- Cuisine: American, French
- Diet: Vegan
Description
Delight in these tender and flaky Vegan Pumpkin Scones topped with a sweet maple glaze. Perfect for fall breakfasts or cozy brunches, these scones combine the warm spices of pumpkin pie spice with a rich, dairy-free butter and a luscious maple glaze for a comforting, plant-based treat.
Ingredients
Scone Ingredients
- ⅔ cup pumpkin purée
- 1 tablespoon non-dairy milk
- 2 teaspoon vanilla extract
- 1 teaspoon white vinegar
- 2 cups all-purpose flour
- ½ cup light brown sugar, tightly packed
- 2 teaspoon baking powder
- ¼ teaspoon baking soda
- ⅛ teaspoon kosher salt
- 2 ½ teaspoon pumpkin pie spice
- 10 tablespoon non-dairy butter, cut into ¼ inch cubes, cold
Maple Glaze Ingredients
- 1 cup powdered sugar, sifted
- 3 tablespoon maple syrup
- 1 ½ teaspoon non-dairy milk
- ½ teaspoon vanilla extract
Instructions
- Preheat Oven: Preheat your oven to 400° F and line a baking sheet with parchment paper to prepare for baking.
- Mix Wet Ingredients: In a small bowl, whisk together the pumpkin purée, non-dairy milk, vanilla extract, and white vinegar until combined.
- Combine Dry Ingredients: In a large bowl, stir together the all-purpose flour, light brown sugar, baking powder, baking soda, kosher salt, and pumpkin pie spice.
- Incorporate Butter: Add the cubed cold non-dairy butter into the dry mixture. Using your hands or a fork, work the butter into the flour mixture until it resembles coarse meal with pea-sized bits.
- Form Dough: Pour the pumpkin mixture into the dry ingredients. Gently toss and combine with your hands until just moistened and a shaggy dough forms; avoid overmixing to keep scones tender.
- Shape Scones: Turn the dough onto a lightly floured surface. Gently pat it into a 7-inch diameter circle. Using a sharp knife, cut the circle into 8 equal triangles and transfer them to the parchment-lined baking sheet.
- Bake: Bake the scones in the preheated oven for 22 minutes or until the bottoms are browned and scones are cooked through.
- Cool: Remove scones from the oven and let them cool on the baking sheet for 10 minutes before glazing.
- Prepare Maple Glaze: In a medium bowl, whisk together the sifted powdered sugar, maple syrup, vanilla extract, and non-dairy milk until smooth. Add a little more non-dairy milk if a thinner consistency is desired.
- Glaze and Serve: Use a spoon to drizzle the maple glaze over the cooled scones. Serve immediately and enjoy this flavorful vegan treat.
Notes
- Do not overwork the dough; gently toss and pat it into shape to maintain a tender texture.
- Keep the non-dairy butter cold by cubing it first and refrigerating until ready to use.
- If you prefer a thinner glaze, add extra non-dairy milk a little at a time until desired consistency is reached.
- Use parchment paper on your baking sheet to prevent sticking and for easy cleanup.
Nutrition
- Serving Size: 1 scone
- Calories: 280 kcal
- Sugar: 15 g
- Sodium: 210 mg
- Fat: 12 g
- Saturated Fat: 3 g
- Unsaturated Fat: 8 g
- Trans Fat: 0 g
- Carbohydrates: 38 g
- Fiber: 2 g
- Protein: 3 g
- Cholesterol: 0 mg


Leave a Reply