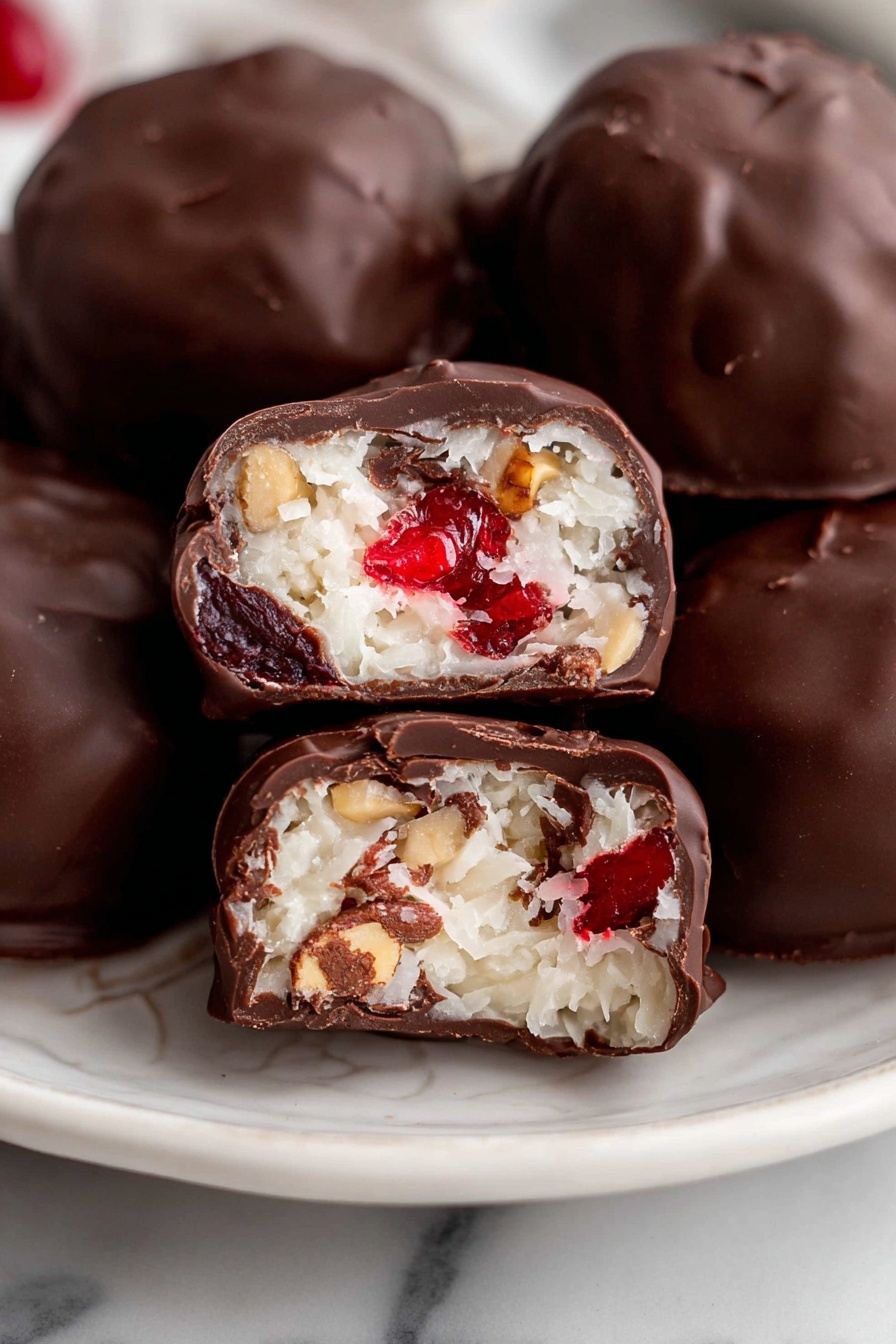
There's something so wonderfully nostalgic about bite-sized treats that melt in your mouth—like these delightful sweets from my grandma’s recipe box. The Martha Washington Candy Recipe blends rich chocolate, chewy coconut, and a burst of cherry for a nostalgic flavor that’s tough to beat. Trust me, once you make it, you’ll want to keep a stash for every occasion!

Jump to:
Why You'll Love This Recipe
Honestly, the Martha Washington Candy Recipe holds a special place in my kitchen because it’s simple, customizable, and delivers a perfect balance of texture and flavor every single time. Making it feels like unwrapping a precious family secret—and sharing it with you feels just as sweet.
- Classic Combination: Coconut, cherries, and chocolate play together in perfect harmony, giving these candies a unique, nostalgic taste you can’t find everywhere.
- No Baking Required: It’s a simple recipe that anyone can master—just mix, chill, dip, and enjoy! Great when you want homemade treats but short on oven time.
- Customizable Crunch: Pecans add that extra buttery crunch, but you can swap in walnuts or almonds if you like.
- Perfect for Gifting: These candies look as delightful as they taste, making them wonderful for holidays, parties, or just sweet surprises.
Ingredients & Why They Work
Every ingredient in the Martha Washington Candy Recipe plays a part in creating that luscious flavor and texture combo. I always say good candy starts with quality ingredients—fresh pecans, well-drained cherries, and rich chocolate for dipping. Here’s the lowdown on what I use and why:
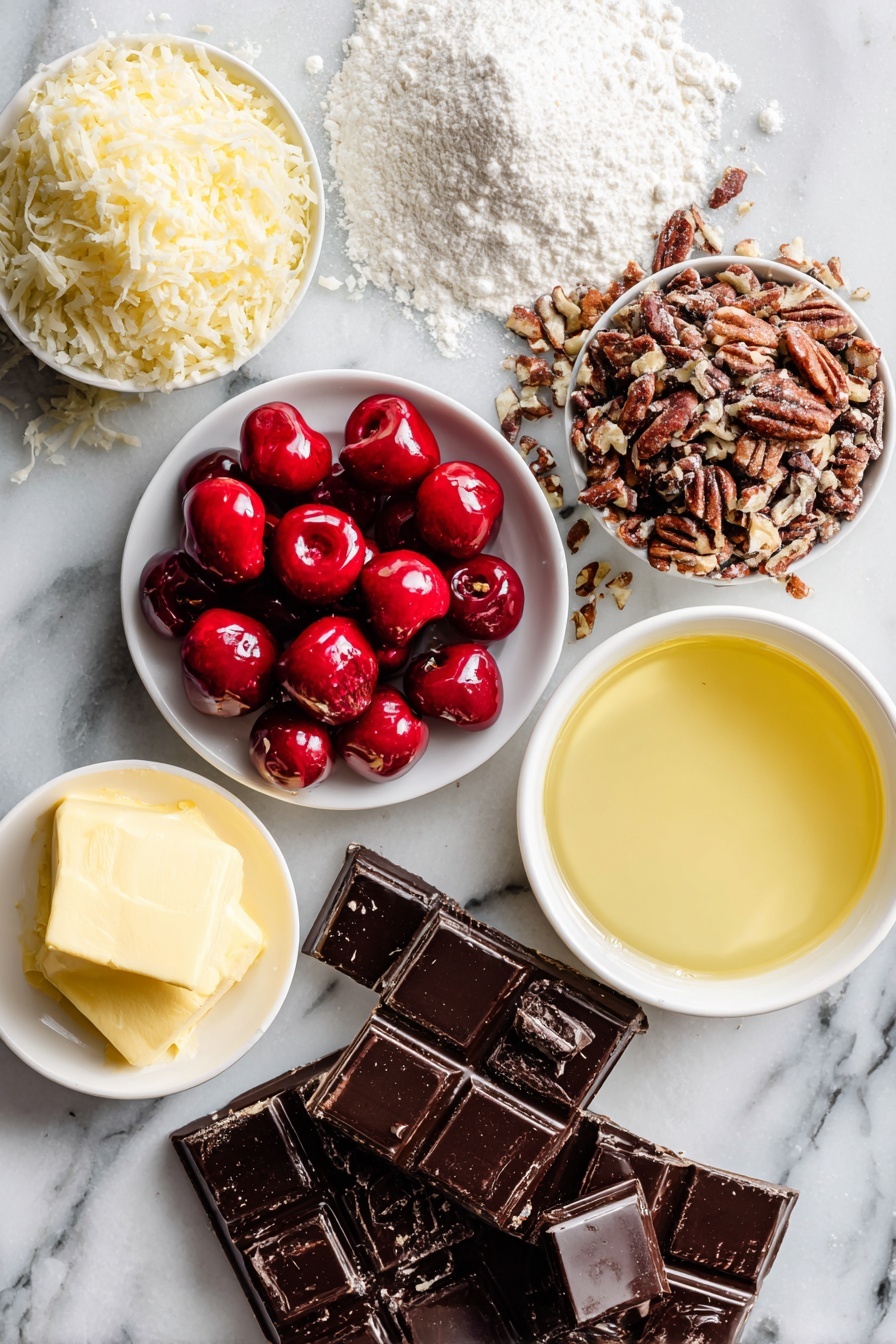
- Unsalted Butter: Melting the butter softens the base and adds richness without any unwanted saltiness.
- Powdered Sugar: Gives that smooth sweetness and helps the mixture hold together perfectly.
- Vanilla Extract: Just a splash adds warmth and depth, making the candy more complex flavor-wise.
- Shredded Sweetened Coconut: The chewy, tropical component that defines Martha Washington Candy’s soul.
- Sweetened Condensed Milk: Acts like glue and adds creamy sweetness, making the mixture sticky enough to shape.
- Maraschino Cherries: Adds bursts of juicy, sweet-tart flavor; make sure to chop and dry them well to avoid sogginess.
- Pecans: Their buttery crunch contrasts the chewiness and keeps every bite interesting.
- Chocolate Melting Wafers: These smooth chocolate discs make dipping easy, creating a flawless, shiny coating.
Make It Your Way
I love that this Martha Washington Candy Recipe is flexible—you can make it as traditional or adventurous as you like. Over the years, I've played around with different nuts or even swapped cherries for dried cranberries for a holiday twist.
- Variation: For a nut-free option, try substituting the pecans with sunflower seeds or leaving nuts out entirely; it still tastes amazing and works great for allergy-sensitive friends.
- Chocolate Types: I sometimes use bittersweet or milk chocolate wafers to change the overall sweetness depending on my mood or the season.
- Texture Tweaks: Adding a little orange zest to the mixture brings a fresh brightness that pairs beautifully with the chocolate and cherries.
Step-by-Step: How I Make Martha Washington Candy Recipe
Step 1: Mix the Butter and Sugar for a Smooth Base
Start by melting the butter—remember, it shouldn’t be piping hot, just fully liquid. Pour it into a large mixing bowl and add the powdered sugar. Stir those two together until you get a smooth, creamy mixture with no lumps. Then, add your vanilla extract for that warm, inviting aroma. It’s a subtle but lovely step that wakes up the whole batch.
Step 2: Stir in Coconut and Condensed Milk Until Sticky
Next, toss in the shredded coconut along with the sweetened condensed milk. This combination creates the thick, tacky texture you need to roll your candies. Use a sturdy spoon because the mixture will be dense but that’s exactly what you want!
Step 3: Fold in Chopped Cherries and Pecans Gently
Carefully fold in your chopped maraschino cherries and pecans—if your cherries are still a bit wet, pat them dry first to prevent sogginess. This step adds beautiful bursts of color and bite; I always look forward to this moment because it makes the whole bowl inviting and festive.
Step 4: Shape and Chill the Candy Balls
Use a small cookie scoop or your hands to roll the mixture into 1-inch balls. Place them on a parchment-lined baking sheet and pop them into the fridge for about 30 minutes so they get firm enough to dip without falling apart.
Step 5: Melt Chocolate and Dip the Chilled Candy Balls
Melt your chocolate wafers according to the package instructions—microwave in short bursts or use a double boiler to keep it smooth and glossy. Once melted, dip each chilled ball into the chocolate using a fork or dipping tool. Let extra chocolate drip off before placing them back on the parchment to set.
Step 6: Chill Again and Enjoy
Refrigerate the dipped candies for 10-15 minutes until the chocolate hardens completely. Then, they’re ready to enjoy or pack up for sharing. The layers of flavor and texture really shine here—trust me, everyone will ask for your secret!
Top Tip
Having made the Martha Washington Candy Recipe countless times, I’ve learned the small tweaks that can make a big difference. Here are some tips that keep my candies perfect every time:
- Dry Those Cherries Well: Excess moisture is the enemy here. I always blot my maraschino cherries with paper towels before chopping to keep the candy mixture from becoming too wet.
- Use a Small Scoop: This not only helps with even-sized candies but speeds the rolling process and creates neat, uniform results that look professional.
- Chocolate Temperature Matters: Don’t overheat your chocolate or it might seize. Low and slow melting ensures a shiny, smooth coating every time.
- Refrigerate Between Steps: Chilling the balls before dipping is crucial—it prevents them from breaking apart when dunked in chocolate.
How to Serve Martha Washington Candy Recipe
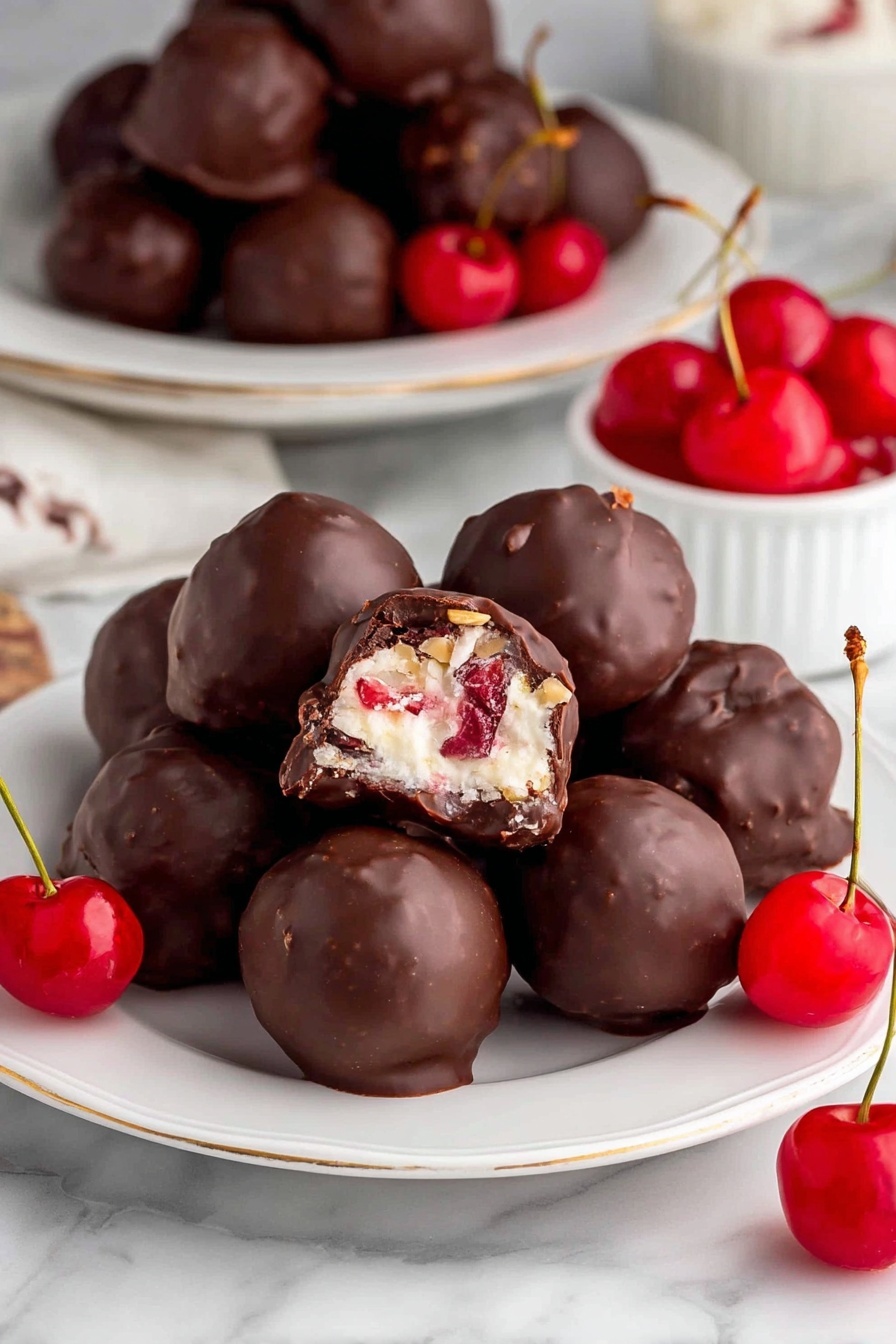
Garnishes
I like to sprinkle just a pinch of crushed pecans or even a tiny drizzle of white chocolate on top after dipping for an extra decorative flourish. It makes the candies look festive and adds a subtle textural contrast. A tiny dusting of edible glitter never hurts either when it’s party time!
Side Dishes
These candies pair beautifully with a hot cup of coffee or tea — perfect for dessert platters, afternoon treats, or even as a sweet after-dinner nibble. I’ve also served them alongside cheese boards where the sweetness balances salty bites wonderfully.
Creative Ways to Present
For holiday gifts, I like boxing Martha Washington Candy in pretty tins layered with parchment paper. They also make charming additions to dessert tables wrapped individually in cellophane tied with twine or festive ribbons. Nothing beats homemade candy wrapped in love!
Make Ahead and Storage
Storing Leftovers
I store leftover Martha Washington Candy in airtight containers in the fridge. They keep beautifully for up to two weeks, and honestly, the flavors deepen after a day or two, so it’s worth waiting if you can. Just remember to let them come to room temperature before eating for the best texture.
Freezing
Freezing is a great option—I layer candies between sheets of parchment in a freezer-safe container to prevent them sticking together. They freeze well for up to three months and thaw quickly at room temp. Just avoid refreezing once thawed for best results.
Reheating
Since these candies don’t need warming up, just bringing them to room temperature after refrigeration or freezing is enough. If your chocolate coating looks dull after storage, a quick blast with a warm, dry hand can help bring back its shine without melting it.
Frequently Asked Questions:
Absolutely! Nuts add crunch, but you can leave them out or substitute sunflower or pumpkin seeds for a nut-free version. The candy will still be delicious and chewy.
The key is to drain the cherries very well and then pat them dry with paper towels before chopping. This removes excess moisture and keeps the candy from getting too wet.
Chocolate melting wafers work best because they melt smoothly and set with a glossy finish. You can also use high-quality chocolate bars, but be sure to temper them for the best texture and shine.
Definitely! Martha Washington Candy can be made up to two weeks ahead if refrigerated in an airtight container. The flavors often deepen over time, making them even tastier by party day.
Final Thoughts
Making Martha Washington Candy is like holding a little piece of sweet history in your hands—a treat that connects generations through its rich flavors and simple joy. I hope you enjoy making and sharing this recipe as much as I do. It’s truly a labor of love that tastes like celebration in every bite. Go ahead, give it a try—your fridge (and your friends!) will thank you.
Print
Martha Washington Candy Recipe
- Prep Time: 45 minutes
- Cook Time: 30 minutes
- Total Time: 1 hour 15 minutes
- Yield: 36 servings
- Category: Dessert
- Method: No-Cook
- Cuisine: American
Description
Martha Washington Candy is a classic, rich, and delightful treat featuring a buttery, coconut and pecan center mixed with sweetened condensed milk and maraschino cherries, all coated in smooth melted chocolate. Perfect for holiday gatherings or sweet indulgences.
Ingredients
Base Ingredients
- 1½ sticks unsalted butter melted
- 4 cups powdered sugar
- 1 teaspoon vanilla extract
Mix-ins
- 3 cups shredded coconut sweetened
- 14 ounce (1 can) sweetened condensed milk
- 10 ounce (1 jar) maraschino cherries drained and chopped
- 1½ cups pecans chopped
Coating
- 16 ounces chocolate melting wafers
Instructions
- Mix base: In a large mixing bowl, combine the melted butter and powdered sugar until smooth. Add in the vanilla extract and mix well.
- Add coconut and condensed milk: Stir in the shredded coconut and sweetened condensed milk until evenly mixed.
- Fold in cherries and pecans: Gently fold in the chopped maraschino cherries and pecans until everything is fully combined, forming a thick and sticky mixture.
- Form balls and chill: Roll the mixture into 1-inch balls and place them on a baking sheet lined with parchment or wax paper. Chill the balls in the refrigerator for about 30 minutes, or until firm.
- Melt chocolate: While the balls are chilling, melt the chocolate wafers according to the package instructions using a microwave or a double boiler. Stir until smooth.
- Dip balls in chocolate: Remove the chilled balls from the refrigerator. Using a fork or dipping tool, carefully dip each ball into the melted chocolate, fully coating them. Allow excess chocolate to drip off.
- Set chocolate coating: Place the chocolate-coated candies back onto the parchment-lined baking sheet. Chill in the refrigerator until the chocolate sets, about 10-15 minutes.
- Serve and store: Serve the candies once the chocolate is firm. Store leftovers in an airtight container.
Notes
- Make-Ahead: Prepare up to 2 weeks in advance and store in the refrigerator; flavors improve after chilling a day or two.
- Storage: Keep candies in an airtight container in the refrigerator for up to 2 weeks.
- Freezing: Freeze for up to 3 months in a freezer-safe container with parchment between layers to prevent sticking.
- Pat cherries completely dry before adding to prevent extra moisture in the mixture.
- Use a small cookie scoop for even-sized candies.
- Keep candies in a cool spot if serving at room temperature to prevent melting.
Nutrition
- Serving Size: 1 piece
- Calories: 180 kcal
- Sugar: 20 g
- Sodium: 40 mg
- Fat: 9 g
- Saturated Fat: 4 g
- Unsaturated Fat: 4 g
- Trans Fat: 0 g
- Carbohydrates: 25 g
- Fiber: 1 g
- Protein: 2 g
- Cholesterol: 20 mg


Leave a Reply