There’s something magical about biting into a creamy, tangy cheesecake topped with luscious blueberries. This Blueberry Cheesecake Recipe is one of those desserts that feels both special and comforting—perfect for celebrations or just because. Its smooth texture and fresh blueberry topping will make you want to savor every bite.

Jump to:
Why You'll Love This Recipe
What I adore about this Blueberry Cheesecake Recipe is how it brings together simple ingredients to create a dessert that tastes so rich, fresh, and elegant—all without fussing over complicated steps. It’s my go-to for impressing friends or treating myself.
- Perfectly smooth texture: The secret to this cheesecake's silky finish is beating the cream cheese thoroughly and using room temperature ingredients.
- Crack-free baking: A water bath and gentle cooling prevent those unsightly cracks, making your cheesecake look as good as it tastes.
- Fresh blueberry sauce: The homemade sauce bursts with vibrant flavor and pairs beautifully with the creamy filling.
- Simple yet impressive: With straightforward steps and common ingredients, this cheesecake feels fancy but is surprisingly doable at home.

Ingredients & Why They Work
Each ingredient plays a crucial role in making this Blueberry Cheesecake Recipe turn out just right. From the crisp vanilla wafer crust to the rich cream cheese filling, here’s why they all shine together—and a few shopping tips I swear by.

- Vanilla wafers: These give the crust a unique vanilla aroma and subtle crunch; if you don’t have wafers, graham crackers work too, but wafers offer a lighter sweetness.
- Sugar: Balances the tang of cream cheese and sour cream perfectly; use fine granulated sugar for even mixing.
- Butter: Melted butter binds the crust crumbs for a buttery base that holds firm during baking.
- Cream cheese: The star of the show—softened completely for that smooth, creamy texture.
- Eggs and egg yolk: Help set the filling without making it rubbery; room temperature ones mix in more evenly.
- Sour cream: Adds subtle tanginess and keeps the filling moist and silky.
- Vanilla extract: Enhances flavor depth, bringing out the creaminess and brightness.
- Blueberry Sauce: Fresh or homemade blueberry sauce adds bursts of natural sweetness and vibrant color, making every slice pop.
Make It Your Way
I love making this blueberry cheesecake just as the recipe is written because it’s such a reliable classic, but it’s also a fantastic base for your creativity. Feel free to tweak toppings, crust types, or even try a lemon zest twist in the filling for a bright spin.
- Berry Mix: I once swapped half of the blueberries for raspberries—equally delicious and a bit more colorful!
- Crust Variations: Swap vanilla wafers for gluten-free cookies or even crushed pretzels for a salty contrast.
- Flavor Boost: Adding a teaspoon of lemon zest to the cheesecake mixture gives a fresh, fragrant note that pairs beautifully with blueberries.
- Less Sweet Version: I’ve cut down the sugar slightly for a more tart, sophisticated cheesecake that still pleases a sweet tooth.
Step-by-Step: How I Make Blueberry Cheesecake Recipe
Step 1: Crafting the Perfect Crust
First, I crush vanilla wafers until they're fine crumbs—this is easiest with a food processor, but you can use a ziplock bag and rolling pin too. Mix in sugar and melted butter until it feels like damp sand. Press this mixture firmly into your 9-inch pie pan, making sure to get the crust up the sides evenly. A nice even crust is crucial—it holds all that creamy filling perfectly! Bake at 350°F for about 8 to 10 minutes. You'll want to see the edges just starting to brown—this means it’s ready and will have a beautiful crunch. Let it cool completely before adding your filling.
Step 2: Whipping Up the Creamy Filling
Here’s a tip: let your cream cheese sit out until it’s room temperature. It makes mixing so much easier—no lumps, I promise! Beat it thoroughly for 3 to 5 minutes until it’s light and fluffy; this takes patience but the texture pays off. Add sugar and beat again for a few minutes to fully dissolve. Then, add eggs one at a time, mixing gently after each addition—overbeating here can cause cracks, so keep an eye on the texture. Fold in sour cream and vanilla only until just combined to avoid overmixing. Pour this luscious filling over your chilled crust with care.
Step 3: Baking with a Water Bath for Perfect Results
Place your pie pan inside a larger roasting pan and fill the outer pan with warm water halfway up the sides of the pie pan. This water bath creates gentle steam heat, which prevents cracking and ensures even baking. Bake at 325°F for 45 minutes. The edges should feel set, but the center will still have a slight jiggle—this wobble is key, so don’t overbake! Once done, turn off the oven, crack the door open, and let the cheesecake cool in there for 30 minutes, then transfer to a rack to cool completely before refrigerating for at least 4 hours or overnight. Patience here means a creamier texture and no cracks!
Step 4: Making and Serving with Blueberry Sauce
While the cheesecake bakes, prepare your blueberry sauce so it can chill and thicken nicely. When ready to serve, spoon a generous amount over each slice. The tart-sweet sauce balanced against the rich cheesecake is absolute perfection. Trust me, it’s a crowd-pleaser every time.
Top Tip
With my many runs making this Blueberry Cheesecake Recipe, I’ve learned the small details truly make a difference. Here are the tips that saved me headaches and guaranteed consistently beautiful cheesecakes.
- Room Temperature Ingredients: Always let your cream cheese, eggs, and sour cream sit out for at least 30 minutes before mixing to avoid lumps and cracking.
- Don’t Overbeat: Overmixing the filling incorporates too much air, which causes cracks during baking—stop mixing as soon as ingredients are just combined.
- Use a Water Bath: This simple trick insulates the cheesecake, providing gentle moisture that prevents cracking and helps set the filling evenly.
- Gentle Cooling: Sudden temperature shifts crack cheesecakes. Always cool it slowly—first in the oven with door slightly open, then at room temperature, then in the fridge.
How to Serve Blueberry Cheesecake Recipe

Garnishes
On top of the luscious blueberry sauce, I love adding a few fresh blueberries and a light dusting of powdered sugar to make it look as pretty as it tastes. A sprig of fresh mint adds a lovely pop of color and a hint of freshness that balances the richness beautifully.
Side Dishes
This cheesecake pairs wonderfully with a cup of strong coffee or a light dessert wine like Moscato. For a more indulgent treat, serve alongside whipped cream or vanilla bean ice cream to complement the creaminess and the fruit’s brightness.
Creative Ways to Present
For gatherings, I’ve piped whipped cream into delicate rosettes around the edges and arranged fresh blueberries artistically on top for an eye-catching centerpiece dessert. You can also serve individual mini cheesecakes in mason jars with layers of blueberry sauce and crust—so cute and convenient!
Make Ahead and Storage
Storing Leftovers
Leftover cheesecake keeps beautifully in the fridge, tightly covered with plastic wrap or in an airtight container to avoid any fridge odors. I’ve found it stays fresh up to 4 days, though it rarely lasts that long at my house!
Freezing
Freezing cheesecakes can be tricky, but I wrap mine well in plastic wrap and then foil before popping it into the freezer. When thawed slowly in the fridge overnight, the texture is almost as perfect as freshly made! I recommend freezing individual slices for easier thawing.
Reheating
Cheesecake is best enjoyed chilled, so I don’t usually reheat leftovers. If you want to take the chill off slightly for a softer bite, let pieces sit at room temperature for about 20 minutes before serving.
Frequently Asked Questions:
Prevent cracks by using a water bath during baking, mixing ingredients gently with room temperature components, avoiding overbaking, and cooling the cheesecake slowly in the oven with the door cracked open before refrigerating.
Yes, frozen blueberries work well for the sauce. Just thaw and drain excess juice before cooking them down to avoid a watery sauce. The flavor remains delicious.
For best texture and flavor, chill the cheesecake in the refrigerator for at least 4 hours, but overnight chilling yields the creamiest, most flavorful results.
Absolutely! Simply swap the vanilla wafer crust for gluten-free cookies or gluten-free graham crackers, and the rest of the recipe remains the same.
Final Thoughts
This Blueberry Cheesecake Recipe holds a special place in my kitchen because it’s my reliable, luscious treat that always brings smiles and happy sighs around the table. I hope you enjoy making it as much as I do—it’s the kind of dessert that makes you feel like you’ve really accomplished something delicious and memorable. Trust me, once you try it, you’ll be reaching for blueberries year-round just to bake this again!
Print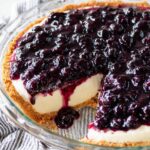
Blueberry Cheesecake Recipe
- Prep Time: 25 minutes
- Cook Time: 45 minutes
- Total Time: 1 hour 10 minutes
- Yield: 12 servings
- Category: Dessert
- Method: Baking
- Cuisine: American
Description
A creamy and smooth fresh blueberry cheesecake featuring a vanilla wafer crust, baked in a water bath for a perfectly tender texture, and topped with a homemade blueberry sauce for a delightful finish.
Ingredients
Vanilla Wafer Crust
- 45 vanilla wafers (heaping 1-½ cups crumbs)
- 2 tablespoons sugar
- 6 tablespoons butter, melted
Cheesecake Filling
- 2 8 oz. blocks cream cheese, softened
- 2 eggs, room temperature
- 1 egg yolk, room temperature
- 1 cup sugar
- 1 cup sour cream, room temperature
- 1 teaspoon vanilla extract
Blueberry Sauce
- 1 Recipe Blueberry Sauce (prepared separately)
Instructions
- Prepare Crust: Add vanilla wafers to a food processor and pulse until finely ground or crush by hand. Mix in melted butter and sugar until evenly combined. Press the mixture evenly onto the bottom and up the sides of an ungreased 9-inch pie pan. Bake at 350 degrees F for 10 minutes or until the crust starts to brown. Cool completely.
- Make Cheesecake Filling: Preheat oven to 325 degrees F. Beat cream cheese for 3 to 5 minutes until very smooth and fluffy. Add sugar and beat another 3 minutes. Beat in eggs and egg yolk one at a time, mixing just until combined after each addition. Stir in sour cream and vanilla extract until just combined. Pour filling over cooled crust.
- Bake Cheesecake in Water Bath: Place the pie pan inside a large roasting pan. Add warm water to the roasting pan until it reaches halfway up the sides of the pie pan. Bake at 325 degrees F for 45 minutes. The edges should be mostly set while the center jiggles slightly.
- Cool Cheesecake: After baking, turn off the oven and leave the cheesecake inside with the door cracked open for 30 minutes to cool gradually. Remove from oven and cool completely on a wire rack before refrigerating. Chill cheesecake in the refrigerator for at least 4 hours, preferably overnight.
- Prepare Blueberry Sauce: While the cheesecake bakes, prepare the blueberry sauce according to the recipe instructions. Chill the sauce separately in the refrigerator until ready to serve.
- Serve: Spoon the chilled blueberry sauce over the cheesecake slices just before serving.
Notes
- Use a water bath to prevent cracks by insulating the cheesecake during baking.
- Ensure all ingredients (eggs, sour cream, cream cheese) are at room temperature for smooth mixing and crack prevention.
- Mix cream cheese thoroughly until light and fluffy.
- Avoid opening the oven door during baking to maintain stable temperature and prevent cracking.
- Do not overbake; the center should still jiggle slightly when done.
- Cool gradually to prevent sudden temperature changes that cause cracks.
- If cracks do form, cover them with blueberry sauce when serving.
- Watch the how-to video for helpful visual guidance.
Nutrition
- Serving Size: 1 slice
- Calories: 380 kcal
- Sugar: 28 g
- Sodium: 270 mg
- Fat: 28 g
- Saturated Fat: 16 g
- Unsaturated Fat: 10 g
- Trans Fat: 0 g
- Carbohydrates: 28 g
- Fiber: 1 g
- Protein: 6 g
- Cholesterol: 120 mg


Leave a Reply