There's something magical about turning simple brownies into festive delights that light up the holiday table. This Brownie Christmas Trees Recipe combines a rich, fudgy base with whimsical green frosting and sparkly sprinkles that instantly bring out the kid in all of us. It's not just a dessert; it’s a mini celebration you can make and share with joy.

Jump to:
Why You'll Love This Recipe
I remember making these Brownie Christmas Trees with my niece years ago, and her eyes widened with delight as each “tree” took shape. It's such a fun project that tastes as good as it looks, perfect for holiday parties or a cozy afternoon baking session.
- Festive presentation: The stacked brownie "trees" are eye-catching and bring instant holiday charm to your dessert table.
- Quick and simple: Using boxed brownies keeps things easy without sacrificing that rich chocolatey flavor.
- Customizable frosting: You get full control over the frosting’s flavor and texture — plus the fun of decorating with sprinkles and stars.
- Kid-friendly project: The frosting piping and decorating part is a hit with kids and adults alike, turning baking into quality family time.

Ingredients & Why They Work
This recipe shines because it balances convenience and homemade charm. The brownie base is super fudgy thanks to the oil and eggs, while the homemade frosting gives you that soft, creamy texture perfect for piping. Plus, those bright green colors and sprinkles bring it all to life!

- Brownie Mix: Using a quality boxed mix saves time but baking it properly ensures it stays dense and moist — the perfect foundation for stacking.
- Eggs: They bind the ingredients and add richness — essential for that classic brownie chewiness.
- Vegetable Oil: Makes the brownies moist and tender; don’t swap this for butter unless you're using a recipe designed for it.
- Water: Keeps the batter moist and helps with the right brownie consistency.
- Powdered Sugar: Gives the frosting a smooth, sweet base that pipes beautifully.
- Butter (softened): This adds the creamy texture needed for a stable frosting that won’t melt away.
- Vanilla Extract: Just a touch enhances flavors and cuts through the sweetness.
- Milk: Added sparingly to adjust frosting consistency — too much makes it runny, so go slow!
- Green Food Coloring: The star of the show for that vibrant tree color — add a few drops at a time to get your perfect hue.
- Holiday Sprinkles & Yellow Stars: Tiny details that make these brownies festive and fun to decorate.
- Disposable Piping Bag with Wilton Star Tip 1m: Creates those pretty piped “branches” on the trees, but you can also improvise with a zip-top bag snipped at the corner.
- 3 Round Cookie/Biscuit Cutters: These sizes let you stack the brownies artfully — I find sets from your local kitchen store or even thrift shops work well.
Make It Your Way
One of the best parts of this Brownie Christmas Trees Recipe is how easily you can add your spin. Whether you tweak the frosting flavor or go wild with decorations, it’s a really flexible recipe that invites creativity.
- Variation: One year, I swapped the green frosting for a peppermint buttercream — it was a huge hit and gave the brownies a lovely minty kick that screams holiday!
- Dietary modification: I’ve also experimented with gluten-free brownie mixes to accommodate friends — just make sure your mix bakes dense enough for stacking.
- Seasonal twist: If you’re making beyond Christmas, switch sprinkles to hearts for Valentine’s Day or pastel colors for Easter trees.
Step-by-Step: How I Make Brownie Christmas Trees Recipe
Step 1: Bake the Brownies and Let Them Cool Completely
Start by preparing the brownie mix according to the box instructions — I usually add the eggs, oil, and water right into the bowl with the mix and stir until smooth. Bake in a square pan for even layers. Let the brownies cool fully before cutting; this keeps them from crumbling and helps the layers stack neatly later.
Step 2: Whip Up the Green Frosting
Blend powdered sugar, softened butter, and vanilla extract until silky. Then add milk, one tablespoon at a time, until the frosting is soft enough to pipe — think thick but smooth. Don’t rush the coloring; add green food coloring a drop at a time and mix well. When it’s just right, fill your piping bag fitted with the star tip.
Step 3: Cut Out Brownie Circles
Use the 3 cookie cutters in different sizes to gently press circles from the brownie slab. Don’t press too hard or the brownies might crack. These circles will stack into tree shapes, so pick cutters that nest well (I use sizes that are just a bit smaller than the last).
Step 4: Pipe, Stack, and Decorate the Trees
Start with the largest brownie circle; pipe a ring of frosting on top just large enough to support the next size. Stack the medium circle, pipe again, then top with the smallest circle. Finish with a generous swirl to look like tree branches. Add a tiny yellow star on the peak and sprinkle festive holiday confetti for that extra sparkle.
Top Tip
I've made these Brownie Christmas Trees dozens of times and here are my best hacks so your trees look flawless and your frosting sets perfectly.
- Cool completely before cutting: Warm brownies tend to crumble; patience really pays off for neat circles.
- Frosting consistency matters: Too thick makes piping tough, too runny and the layers slip — aim for soft peaks in the frosting.
- Use gentle pressure with cutters: A slow, rocking motion helps cut clean circles without fracturing your brownies.
- Decorate right after piping: The frosting starts to set quickly, so add stars and sprinkles soon after for best stickiness.
How to Serve Brownie Christmas Trees Recipe

Garnishes
I love using classic red and white holiday sprinkles combined with tiny silver dragees for shimmer. The yellow star candies on top give it that festive finishing touch, making each brownie tree look like it belongs under your Christmas lights.
Side Dishes
These brownies pair wonderfully with a scoop of vanilla ice cream or a mug of hot cocoa to keep that cozy holiday vibe going. For parties, I also recommend sharp cheddar cheese cubes and cranberry bites to balance the sweetness.
Creative Ways to Present
One year, I laid out a whole "forest" on a platter dusted with powdered sugar snow, interspersed with small pine sprigs and cinnamon sticks. It was like edible holiday decor — guests loved it! You can even place each brownie tree on mini cupcake liners or tiny wooden rounds for an elegant touch.
Make Ahead and Storage
Storing Leftovers
I store leftover Brownie Christmas Trees in an airtight container at room temperature for up to 3 days. They tend to stay moist and the frosting holds up well short-term. Just be gentle when stacking or moving them — those delicate frosting branches can be a bit fragile.
Freezing
Freezing works if you want to prepare ahead—wrap each tree individually in plastic wrap and place in a freezer-safe box. Thaw overnight in the fridge before serving to maintain texture. I found that some of the creaminess in the frosting softens after freezing but still tastes amazing!
Reheating
I usually recommend skipping reheating to preserve the frosting’s look and texture. If you want warm brownies, remove frosting first or gently heat briefly in the microwave (10 seconds at a time) — just enough to warm the base without melting the decorations.
Frequently Asked Questions:
Absolutely! Homemade brownies add a special touch, just make sure they are dense and fully cooled before cutting so your trees stack nicely.
Keep the brownies and frosting cool, especially during decorating and serving. If it’s warm, refrigerate the brownies to let the frosting set better before serving.
Let kids pipe with a zip-top bag snipped at the corner if you don’t have a piping bag. Use sprinkles and candies that are easy to grab. Most importantly, keep it fun — imperfections add to the charm!
Yes! Choose a gluten-free brownie mix and ensure all your decorations and sprinkles are gluten-free. The frosting recipe stays the same, so no need to adjust that part.
Final Thoughts
This Brownie Christmas Trees Recipe holds a special place in my heart because it turns baking into a shared moment — the kind where you laugh, make a mess, and create something delightful together. Give it a try this year; you’ll enjoy both the process and the smiles it brings!
Print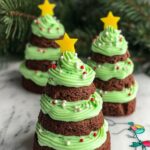
Brownie Christmas Trees Recipe
- Prep Time: 30 minutes
- Cook Time: 25 minutes
- Total Time: 55 minutes
- Yield: 12 servings
- Category: Dessert
- Method: Baking
- Cuisine: American
Description
Festive Brownie Christmas Trees made from layered brownie circles decorated with green frosting, holiday sprinkles, and star toppers. A fun, delicious holiday treat perfect for celebrations and parties.
Ingredients
Brownie Base
- 1 box brownie mix (any brand), baked and cooled
- 2 eggs
- ½ cup vegetable oil
- 3 tablespoon water
Frosting
- 2 cups powdered sugar
- ½ cup butter, softened to room temperature
- 1 teaspoon vanilla extract
- 2-3 tablespoon milk
- green food coloring
Decoration & Tools
- Holiday sprinkles
- Yellow stars
- Disposable piping bag
- Wilton Star tip 1m
- 3 round cookie/biscuit cutters in varying sizes
Instructions
- Prepare Frosting: In a bowl, combine powdered sugar, softened butter, and vanilla extract. Gradually add 1 tablespoon of milk at a time until the frosting reaches a spreadable consistency. Add green food coloring and mix well.
- Prepare Piping Bag: Attach the Wilton Star tip 1m to the disposable piping bag and fill the bag with the green frosting.
- Cut Brownie Circles: Using the 3 round cookie cutters of varying sizes, gently cut circles out of the baked and cooled brownie slab.
- Assemble Trees: Start with the largest brownie circle, squeeze frosting from the piping bag onto the top, then layer the medium and smallest brownie circles on top, squeezing frosting between each layer. Top the last brownie with frosting to resemble the peak of a Christmas tree.
- Decorate: Place a yellow star on top of each brownie tree and add holiday sprinkles over the frosting to complete the festive look.
- Repeat: Continue assembling and decorating the remaining brownie circles into Christmas trees until all brownies are used.
Notes
- Make sure brownies are completely cooled before cutting to avoid crumbling.
- Adjust frosting consistency by adding more milk if it’s too thick or more powdered sugar if too thin.
- Use any green food coloring shade to customize the look of the frostings.
- Holiday sprinkles can be swapped for small edible pearls or colored sugar for variety.
- For a gluten-free version, use gluten-free brownie mix.
Nutrition
- Serving Size: 1 brownie tree
- Calories: 280 kcal
- Sugar: 25 g
- Sodium: 150 mg
- Fat: 15 g
- Saturated Fat: 8 g
- Unsaturated Fat: 6 g
- Trans Fat: 0 g
- Carbohydrates: 35 g
- Fiber: 2 g
- Protein: 3 g
- Cholesterol: 35 mg


Leave a Reply