There’s something truly magical about a homemade pie, especially when it’s a Cherry Pie with Lattice Crust Recipe that bursts with sweet-tart flavors and comes wrapped in a flaky, golden lattice. Let me show you how easy and rewarding this classic summer dessert can be!

Jump to:
Why You'll Love This Recipe
I seriously can’t get enough of this cherry pie—with its flaky homemade crust and that gorgeous lattice top, it’s almost too pretty to eat. The filling has just the right balance of tartness from the cherries and a hint of warm spices that keep everyone coming back for seconds.
- Perfect Sweet-Tart Balance: The tart cherries and just enough sugar create a filling that’s vibrant but not overly sweet.
- Flaky Lattice Crust: The homemade pie dough bakes up crisp and golden, with a stunning woven lattice that’s easier than it looks.
- Make-Ahead Friendly: You can prepare the crust and filling in advance to save time on baking day.
- Classic Comfort Food: Serve it warm with vanilla ice cream for the ultimate cozy dessert experience.
Ingredients & Why They Work
To get the best flavor and texture, I always reach for frozen tart cherries—they’re tart, tangy, and available year-round. The spices add warmth without overpowering the cherries, and that homemade pie crust is key for a flaky but sturdy base to hold all that juicy filling.
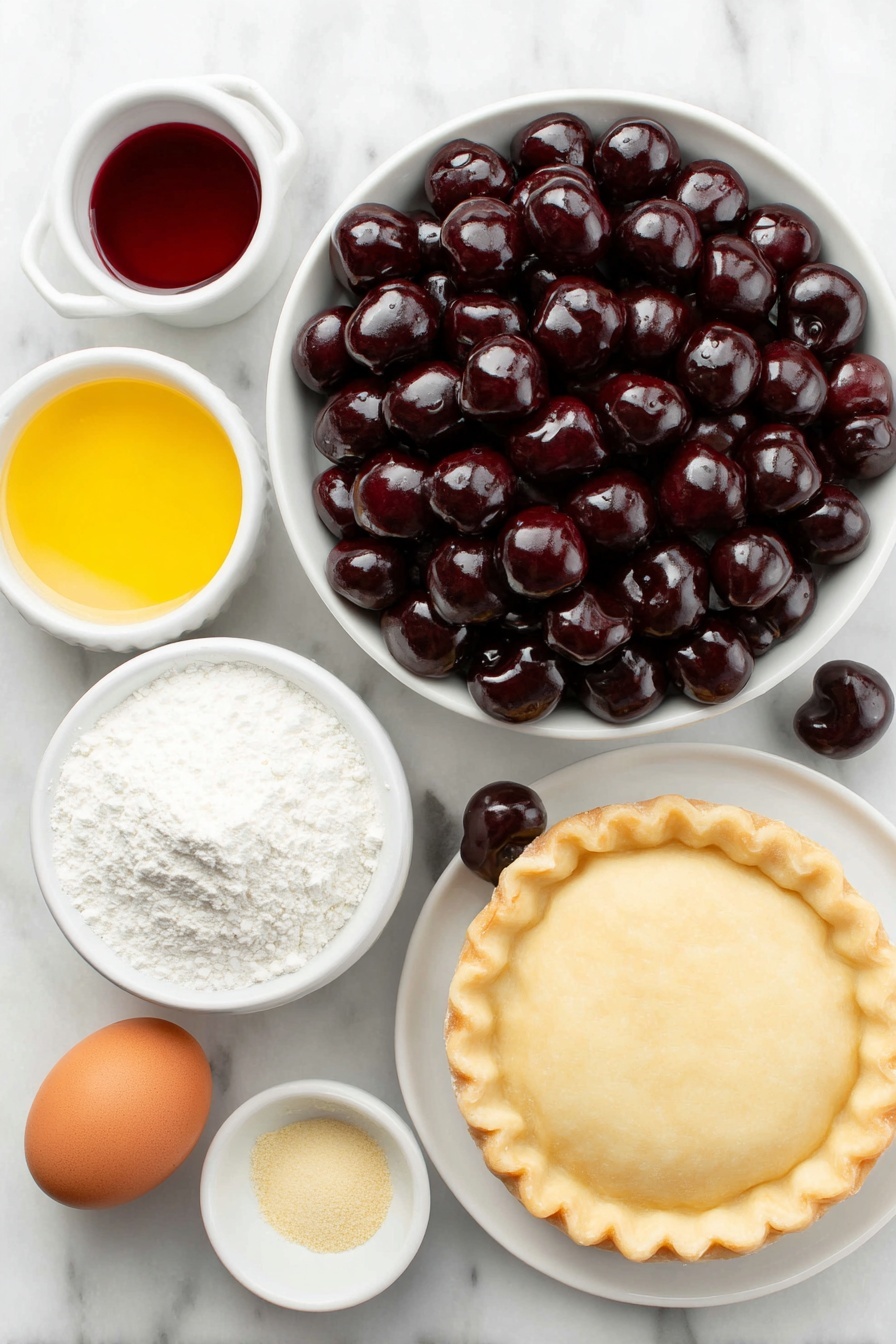
- Frozen Pitted Tart Cherries: Tart cherries give the filling a bright, tangy flavor that balances the sweetness perfectly.
- Cornstarch: This thickens the cherry juices beautifully so the filling isn’t runny after baking.
- Water: Used both to make the cornstarch slurry and to help create a shiny egg wash on the crust.
- Cane Sugar: Adds natural sweetness without an overly processed flavor.
- Cinnamon: Provides a warm, cozy note that complements the cherries.
- Ground Ginger: Adds a subtle spicy kick that lifts the filling.
- Almond Extract: Just a touch brings depth and a lovely aroma to the pie.
- Pinch of Salt: Enhances all the flavors and balances the sweetness.
- Pie Crust: Homemade and chilled, it supplies the buttery, flaky base and top lattice.
- Large Egg: Used for the egg wash to give the crust a beautiful golden sheen.
- Coarse Sugar (optional): Sprinkled on top to add a bit of crunch and sparkle.
- Vanilla Ice Cream: The classic sidekick to this warm cherry pie.
Make It Your Way
One of the best things about this Cherry Pie with Lattice Crust Recipe is how easy it is to personalize. Whether you’re adapting it for dietary needs or just shaking things up a bit, you can make this pie truly your own while still keeping its classic charm.
- Gluten-Free Variation: I’ve swapped the traditional pie crust for a gluten-free crust using almond flour and tapioca starch. It still creates a flaky texture and complements the tart cherries perfectly!
- Spice it Up: Sometimes, I like to add a pinch of ground cardamom or a hint of star anise to the cherry filling for extra warmth and complexity—especially in cooler months.
- Make it Vegan: Substitute the egg wash with a mixture of almond milk and maple syrup for a golden glaze, and use a vegan pie crust recipe to keep it plant-based and delicious.
- Seasonal Twists: During cherry season, fresh cherries can replace frozen for a brighter, fruitier filling. Or, toss in a handful of fresh blueberries for a colorful twist!
Step-by-Step: How I Make Cherry Pie with Lattice Crust Recipe
Step 1: Prepare the Cherries and Capture Their Juices
After thawing the tart cherries, I pour them into a strainer set over a bowl to catch every drop of that lovely juice. Measuring out exactly 1 cup of cherry juice is key—it’s what thickens into that glossy, luscious filling. If the cherries don’t yield quite enough juice, just nuke them in 15-second bursts until you have enough. Don’t toss the extra juice; it’s great for a refreshing summer drink or smoothies.
Step 2: Whisk Together the Cornstarch Slurry
Mix the cornstarch with ¼ cup water until it’s smooth and free of lumps. This simple mixture will help thicken our cherry filling to that perfect consistency—glossy, not gloopy.
Step 3: Cook the Cherry Filling to Perfection
Pour the measured cherry juice into a saucepan and bring it to a boil. Stir in the cane sugar until it dissolves and the mixture boils again. Adding the cornstarch slurry next, stir continuously until the juices thicken, become clear, and develop a beautiful glossy finish. Remove the pan from the heat and stir in warm spices—cinnamon, ground ginger, and a dash of almond extract—plus a pinch of salt to balance the flavors. Let the filling cool completely before moving on; this step is crucial to avoid a soggy crust later.
Step 4: Roll Out and Chill the Bottom Pie Crust
Take your chilled pie dough and gently roll it out on a floured surface, leaving about a ½-inch overhang around the pie plate edge. Once shaped, cover it loosely with plastic wrap and pop it into the fridge for 30 minutes. This chilling step helps keep the crust flaky and prevents it from shrinking during baking. Meanwhile, preheat the oven to 425°F and place a baking sheet on the bottom rack—this baking sheet will catch drips and help bake the bottom crust evenly.
Step 5: Roll Out and Chill the Top Crust Dough
While the bottom crust chills, roll out the remaining dough for the lattice top. Transfer it to a baking sheet and cover loosely with plastic wrap. Keeping the top crust chilled makes it easier to cut neat strips and weave the lattice without sticking.
Step 6: Whisk Up the Egg Wash
In a small bowl, whisk the large egg with the last tablespoon of water to make that gorgeous golden egg wash. This little step not only adds shine but also helps the coarse sugar adhere for a delightful crunch on top.
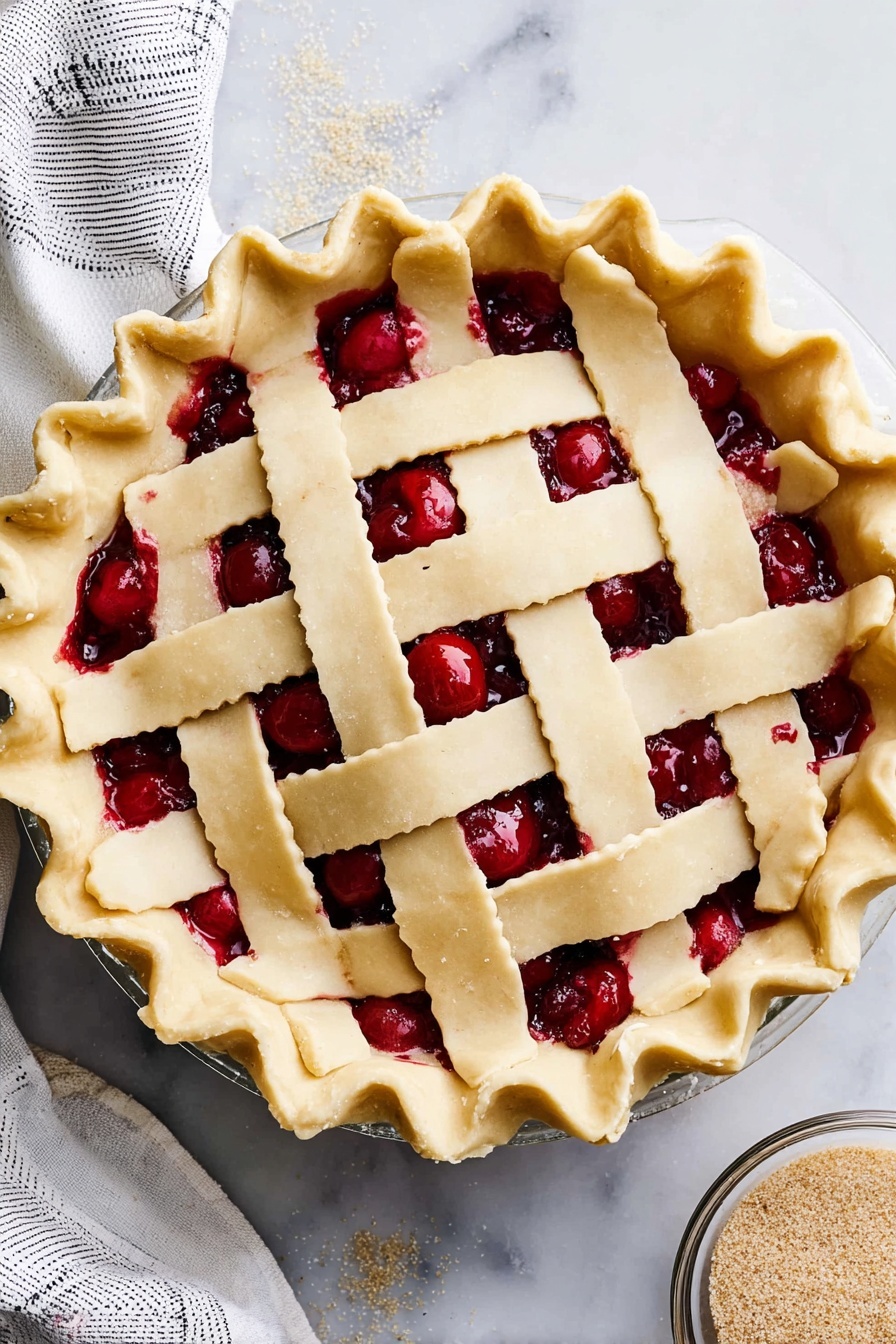
Step 7: Assemble the Pie with a Beautiful Lattice Crust
Remove your bottom crust from the fridge and pour in the cooled cherry filling, spreading it evenly. Transfer the chilled top crust dough to a cutting board and slice into 1-inch strips using a sharp knife or pizza cutter. Lay 4 to 5 strips evenly across the filling, then weave another 4 to 5 strips through them in a classic lattice design, gently lifting strips as you go. Trim the edges flush with the bottom crust, then fold the bottom crust edge up and over the lattice edges. Seal it all together using your fingers or a fork for that charming crimped finish.
Step 8: Final Touch and Bake
Brush the entire lattice crust generously with the egg wash and sprinkle coarse sugar if you like that extra sparkle and texture. Place the assembled pie on the heated baking sheet in your preheated oven. Bake at 425°F for 20 minutes to jump-start the crust browning, then lower the oven to 375°F and bake for another 40 to 50 minutes. Look for a deep golden crust and bubbling filling—if the edges brown too fast, cover them with foil to prevent burning.
Step 9: Patience Is a Virtue—Cool Before Serving
This is the hardest part: letting the pie cool completely for about 4 hours. Cooling allows the filling to set so your slices hold their shape beautifully when cut. Trust me, it’s worth the wait!
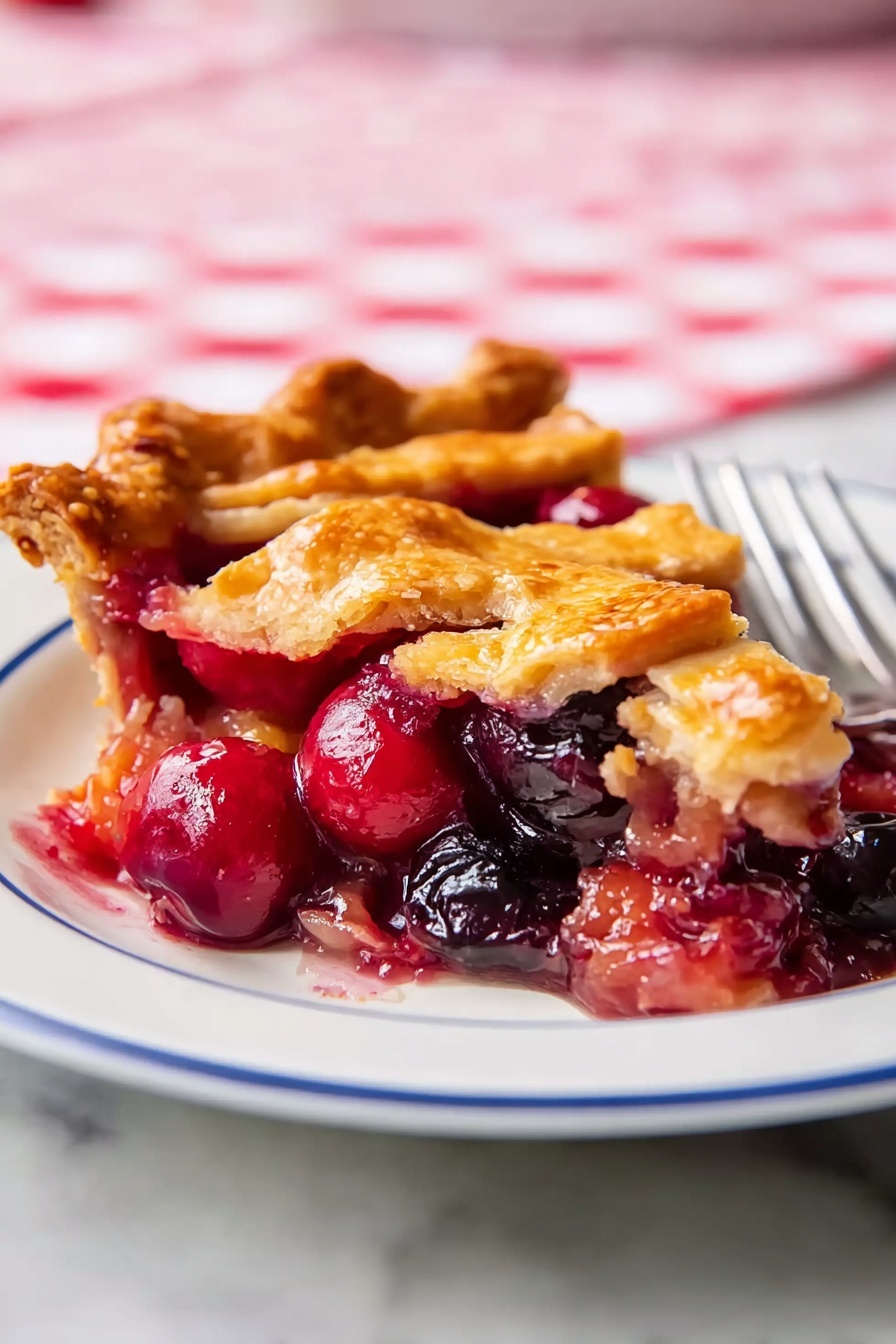
Step 10: Serve and Enjoy!
Slice your masterpiece, serve warm or at room temperature with a scoop of vanilla ice cream, and bask in the compliments!
Top Tip
Getting your Cherry Pie with Lattice Crust just right can feel like a small art—and these tips from my kitchen will help you seal in the juicy goodness and achieve that picture-perfect golden crust every time.
- Chill Thoroughly: I learned early on that chilling the pie crust both before rolling and after fitting it in the pie plate really helps prevent shrinking and keeps the lattice neat and crisp during baking.
- Use Frozen Tart Cherries: Frozen tart cherries give that ideal balance of sweet and tart—you won't get the same pop of flavor with sweeter cherry varieties, so stick to the tart for the best filling.
- Weave the Lattice Gently: When weaving the lattice strips, lifting and pulling them gently to weave avoids tearing the dough and keeps the crust looking flawless.
- Cool Completely Before Slicing: It’s tempting to dig right in, but waiting about 4 hours for the pie to cool allows the filling to set up perfectly, making for neater slices and better taste.
How to Serve Cherry Pie with Lattice Crust Recipe
Garnishes
Sprinkle a little extra coarse sugar on top of the lattice crust just before baking to add a subtle sparkle and crunch. When serving, add a scoop of rich vanilla ice cream—its creamy sweetness wonderfully balances the tart cherry flavors. For a festive touch, consider a light dusting of powdered sugar or a few toasted almond slices to echo the almond extract in the filling.
Side Dishes
This cherry pie shines wonderfully on its own, but if you’re serving it as part of a summer meal, fresh whipped cream and coffee or herbal tea pair beautifully. For a brunch or dessert spread, fresh fruit salads, crisp green salads with light citrus dressing, or a cheese plate with mild cheeses can round out the flavors without overwhelming the pie’s delightful balance.
Make Ahead and Storage
Storing Leftovers
Your Cherry Pie with Lattice Crust is best stored at room temperature for up to two days, covered loosely with foil or plastic wrap to keep the crust from softening too much. For longer storage, refrigerate the pie; it will keep well for about 4 to 5 days. Just be sure to let it come back to room temperature or warm it slightly before serving for that fresh-from-the-oven feel.
Freezing
You can freeze the unbaked pie after assembling it with the lattice crust. Wrap it tightly in plastic wrap followed by aluminum foil to protect it from freezer burn. When ready to bake, thaw it overnight in the refrigerator and bake as instructed, adding a few extra minutes to the baking time if needed. Alternatively, leftovers can be frozen after baking; slice and wrap individual pieces for quick treats later.
Reheating
Gently reheat slices of pie in a 350°F oven for about 10–15 minutes to restore the flaky crust and warm filling. Avoid microwaving as it can make the crust soggy. A scoop of ice cream on top after warming is a classic finishing touch!
Frequently Asked Questions:
Absolutely! Fresh tart cherries work wonderfully, especially when they are in season. Just pit and measure out 2 pounds, and follow the same steps. You might need to cook the fresh cherries slightly longer if they release less juice.
Make sure the cherry filling is cooled completely before pouring it into the crust to keep the bottom from getting soggy. Additionally, chilling the crust before baking helps it stay flaky and crisp.
Chilling the rolled-out top crust dough before cutting strips helps it stay firm and pliable. Use a sharp knife or pizza cutter for clean strips, and weave gently to avoid tearing. You can also work on a cool surface to keep the dough from getting too warm.
It’s best to let the pie cool completely for about 4 hours to allow the filling to set properly. This helps slices hold their shape and prevents the filling from running.
Final Thoughts
Making the perfect Cherry Pie with Lattice Crust is truly a labor of love—each step from chilling the dough to weaving that delicate lattice turns ingredients into memories. Whether you’re serving it warm with vanilla ice cream on a summer evening or packing it for a family picnic, this pie brings a comforting burst of tart-sweet joy. So take your time, enjoy the process, and savor every flaky, fruity bite!
Print
Cherry Pie with Lattice Crust Recipe
- Prep Time: 2 hours
- Cooling Time: 4 hours
- Cook Time: 1 hour
- Total Time: 3 hours
- Yield: 8 servings
- Category: Dessert
- Method: Baking
- Cuisine: American
- Diet: Vegetarian
Description
A classic summer dessert, this sour cherry pie features a flaky homemade crust filled with a sweet-tart cherry filling thickened with cornstarch and lightly spiced with cinnamon, ginger, and almond extract. Perfect served with vanilla ice cream, this recipe can be made ahead by preparing the crust and filling in advance.
Ingredients
Filling
- 2 pounds frozen pitted tart cherries, thawed, juices reserved
- ¼ cup cornstarch
- ¼ cup plus 1 tablespoon water, divided
- ¾ cup cane sugar
- ½ teaspoon cinnamon
- ½ teaspoon ground ginger
- ¼ teaspoon almond extract
- Pinch salt
Pie Crust
- 1 recipe Pie Crust, chilled at least 2 hours
Finishing
- 1 large egg
- Coarse sugar, optional
- Vanilla ice cream, for serving
Instructions
- Prepare cherries and juice: Place the thawed cherries in a strainer set over a bowl to capture the excess juices. Measure 1 cup of the cherry juice and reserve any leftover juice for later use. Transfer the cherries to a large bowl.
- Make cornstarch slurry: In a small bowl, stir together the cornstarch and ¼ cup water until smooth and set aside.
- Cook cherry filling: Pour the 1 cup cherry juice into a small saucepan and bring to a boil. Add the cane sugar, stirring until dissolved, and return to a boil. Stir in the cornstarch mixture and cook until the juices thicken and appear clear and glossy. Remove from heat and stir in cinnamon, ground ginger, almond extract, and a pinch of salt. Allow the filling to cool completely.
- Roll and chill bottom crust: Roll out the pie crust dough for the bottom crust according to your pie crust recipe, leaving a ½-inch overhang around the pie plate. Loosely cover with plastic wrap and chill it in the refrigerator for 30 minutes. Meanwhile, preheat your oven to 425°F and place a baking sheet on the bottom rack.
- Roll and chill top crust: Roll out the remaining pie dough for the top crust and transfer it to a baking sheet. Loosely cover with plastic wrap and refrigerate until the bottom crust has finished chilling.
- Prepare egg wash: In a small bowl, whisk together the egg and the remaining 1 tablespoon of water; set aside.
- Assemble the pie: Remove the bottom crust from the fridge and pour in the cooled cherry filling evenly. Transfer the top crust dough to a cutting board and cut into 1-inch strips. Lay 4 to 5 strips crosswise over the filling. Weave 4 to 5 more strips through the crosswise strips to create a lattice pattern, lifting strips as needed. Trim the edges of the lattice strips flush with the bottom crust edge. Fold the bottom crust edge up over the lattice edges and crimp with fingers or a fork to seal.
- Finish and bake: Brush the lattice crust with the egg wash and sprinkle with coarse sugar if desired. Place the pie on the preheated baking sheet in the oven. Bake at 425°F for 20 minutes, then reduce the oven temperature to 375°F and bake for another 40 to 50 minutes until the crust is golden brown and the filling bubbles. If crust edges brown too quickly, tent with foil to prevent burning.
- Cool: Let the pie cool completely for about 4 hours before slicing to allow the filling to set properly.
- Serve: Slice and serve the cherry pie with vanilla ice cream for a classic accompaniment.
Notes
- If you do not have 1 cup cherry juice from the thawed cherries, microwave the cherries for 15 seconds to release more juice. Repeat as needed until you have 1 cup. Save any extra juice for another use.
- The pie crust can be made 1 to 2 days in advance and kept chilled before rolling.
- Use frozen tart cherries for best tartness and availability beyond summer.
- To prevent soggy bottom crust, ensure filling is mostly cooled before assembling.
- For a perfectly shiny crust, brushing with egg wash and sprinkling coarse sugar adds great texture and appearance.
Nutrition
- Serving Size: 1 slice
- Calories: 360 kcal
- Sugar: 26 g
- Sodium: 150 mg
- Fat: 15 g
- Saturated Fat: 4 g
- Unsaturated Fat: 9 g
- Trans Fat: 0 g
- Carbohydrates: 50 g
- Fiber: 3 g
- Protein: 3 g
- Cholesterol: 40 mg


Leave a Reply