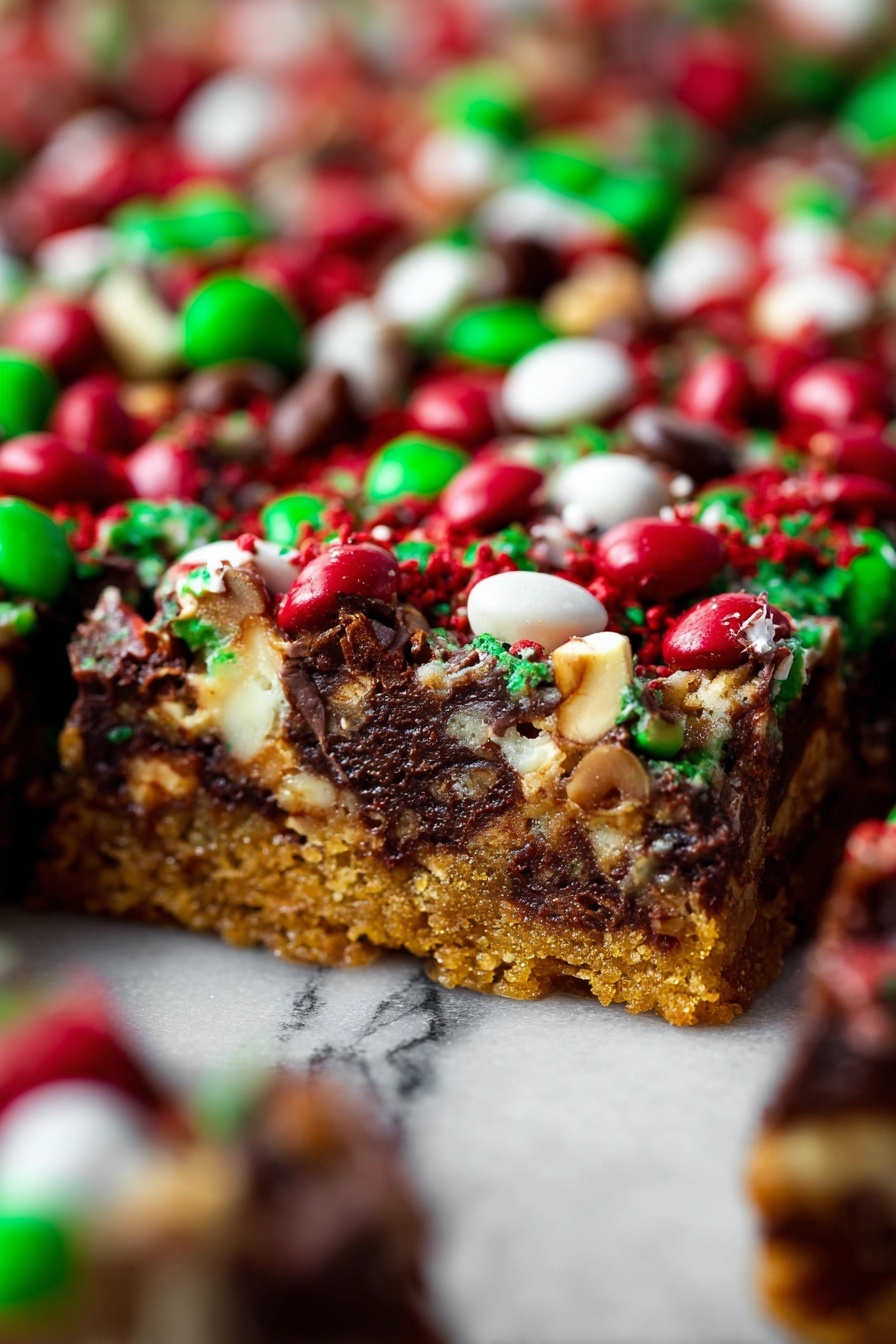
There’s something utterly magical about the layers of flavor and texture in this **Christmas Cookie Bar Recipe** — it’s like holiday cheer baked into every bite. When I’m looking to impress guests or just indulge myself, these bars deliver that perfect balance of crunch, chewiness, and festive fun that makes the season feel even sweeter.

Jump to:
Why You'll Love This Recipe
Honestly, these Christmas cookie bars stole my heart the first time I baked them. They’re so simple to whip up, yet they look and taste like something you’d find in a fancy bakery. Plus, they’re versatile enough to tweak with your favorite holiday flavors — and that makes sharing them even more special.
- Layered Texture: The crunchy graham cracker crust with chewy oats and gooey melted condensed milk creates a delightful bite every time.
- Festive Toppings: A colorful mix of chocolate chips and Holiday M&Ms gives it that extra jingle of Christmas spirit.
- Super Easy: No fancy equipment or complicated steps — anyone can make these bars in 35 minutes.
- Perfect for Gifting: These bars slice beautifully and travel well, making them ideal for holiday cookie swaps or thoughtful presents.
Ingredients & Why They Work
Each ingredient in this Christmas Cookie Bar Recipe plays a special role in balancing flavor and texture — from the crunchy base to the sweet, melty finish. Here’s a quick rundown so you know what to look for when you shop:

- Graham Crackers: Crushing these yourself gives a fresher, crunchier crust than pre-made crumbs, plus you control the texture.
- Sugar: Adds just the right touch of sweetness to balance the rich buttery crust.
- Butter: Melted butter binds the crust ingredients and adds a rich, silky mouthfeel.
- Sweetened Condensed Milk: This gooey layer holds everything together beautifully and helps caramelize the bars as they bake.
- Quick Oats: Adds rustic chewiness and a little extra heartiness to the bars.
- Semi-Sweet Chocolate Chips: A classic holiday staple — they melt slightly for that perfect fudgy goodness.
- Peanut Butter Chips: Bring a subtle salty-sweet flavor and creamy texture that pairs perfectly with chocolate.
- White Chocolate Chips: For a hint of buttery sweetness and beautiful contrast.
- Holiday M&Ms: These colorful candies add crunch and festive flair — plus, they’re super fun to eat!
Make It Your Way
I love mixing things up with these cookie bars — they’re like a blank canvas for your holiday cravings. You can personalize toppings or switch out chips to fit your family's favorites or dietary needs, making each batch uniquely yours.
- Nut-Free Variation: Swap the peanut butter chips for more white or semi-sweet chocolate chips to keep everyone safe without sacrificing flavor.
- More Crunch: Add chopped nuts like pecans or walnuts on top for an extra festive crunch I always enjoy.
- Holiday Theme: Sprinkles in red and green make a cheerful presentation for parties or gifting.
- Vegan Switch-Up: Use dairy-free butter and vegan chocolate chips to create a delightful plant-based version.
Step-by-Step: How I Make Christmas Cookie Bar Recipe
Step 1: Crush and Press the Crust
Start by preheating your oven to 350°F and lining a 9x13-inch pan with nonstick spray and a sheet of parchment paper — this helps the bars release easily later. Crush your graham crackers finely but not into dust; I usually pulse them in a food processor. Mix the crumbs with sugar and melted butter until everything looks evenly moistened. Press this mixture firmly into the bottom of your prepared pan — I use the bottom of a measuring cup to get an even, compact layer.
Step 2: Layer the Goodies
Pour the sweetened condensed milk evenly over your crust — make sure to spread it all the way to the edges. This sticky layer is what binds the toppings, so don’t be shy about covering the crust thoroughly. Next, sprinkle the quick oats, chocolate chips, peanut butter chips, white chocolate chips, and festive M&Ms in an even layer on top. I like to gently press a few M&Ms in so they don’t roll off while baking.
Step 3: Bake and Cool
Place the pan in your preheated oven and bake for about 25 minutes — look for golden edges and bubbling spots around the toppings. Hot tip: Keep an eye starting at 20 minutes to avoid overbaking, which can dry out the bars. After baking, let the whole pan cool completely on a wire rack before slicing. I find refrigerating for 30 minutes helps everything set up nicely for clean-cut bars.
Top Tip
After making this Christmas Cookie Bar Recipe a handful of times, I’ve learned some handy tricks that really elevate the outcome and save stress in the kitchen.
- Press Crust Firmly: Using even pressure ensures your crust doesn’t crumble apart when slicing.
- Watch the Bake Time: Every oven is different, so check the bars slightly early — they should be golden but not burnt.
- Let Cool Completely: Cutting too soon makes a mess; patience leads to neat bars with perfect squares.
- Customize Toppings: I switch up the chips and candies year to year to keep things fun and surprise my family.
How to Serve Christmas Cookie Bar Recipe

Garnishes
I usually skip extra garnishes since the bars themselves are decks of color and texture, but for parties, a light dusting of powdered sugar adds a snowy touch. Another thing I've tried is a drizzle of melted white chocolate or a sprinkle of crushed peppermint to amp up festivity and flavor.
Side Dishes
These bars pair wonderfully with a classic cup of hot cocoa or a creamy eggnog — both balance the sweetness beautifully. For holiday brunches, I like to serve these alongside fresh fruit or a simple yogurt parfait to lighten things up a bit.
Creative Ways to Present
For cookie exchanges or gifts, I like to cut the bars into bite-sized squares and box them in little holiday-themed tins or mason jars layered with parchment paper. Sometimes, adding a festive ribbon and a handwritten note turns these bars into heartfelt treats that people remember.
Make Ahead and Storage
Storing Leftovers
Leftover Christmas Cookie Bars keep wonderfully in an airtight container at room temperature for up to 3 days, though I find they taste even better chilled the next day. Just make sure to separate layers with parchment paper so they don’t stick together.
Freezing
If you want to save some for later, these bars freeze well. Wrap them tightly in plastic and place them in a freezer-safe container for up to 2 months. When you’re ready, thaw overnight in the fridge and enjoy — it’s like fresh-baked magic all over again.
Reheating
To bring out that just-baked warmth, I pop a bar or two in the microwave for about 10 seconds — you want it soft, not melted. Alternatively, a quick warm-up in a 300°F oven for 5 minutes refreshes the gooey texture without drying them out.
Frequently Asked Questions:
Absolutely! Substitute gluten-free graham crackers and certified gluten-free oats to make this recipe safe for gluten-sensitive folks without sacrificing flavor or texture.
You can crush graham crackers either by placing them in a sealed plastic bag and smashing them with a rolling pin or pulse them in a food processor for a finer, more uniform crumb.
Definitely! You can swap in any colorful candy or even dried fruit to customize the bars to your taste or occasion. Just be mindful of melting candies that might affect texture.
While it’s not mandatory, refrigerating for about 30 minutes after they cool helps firm them up and makes slicing much easier and cleaner.
Final Thoughts
This Christmas Cookie Bar Recipe has become my go-to for holiday gatherings because it’s easy, festive, and irresistibly delicious. Every time I bake a pan, I’m met with smiles and requests for seconds — it’s that good. I can’t wait for you to try it and see just how perfect it is for celebrating the season with warmth and sweetness.
Print
Christmas Cookie Bar Recipe
- Prep Time: 10 minutes
- Cook Time: 25 minutes
- Total Time: 35 minutes
- Yield: 15 bars
- Category: Dessert
- Method: Baking
- Cuisine: American
Description
Christmas Magic Cookie Bars are a festive, delightful treat perfect for holiday gatherings. They feature a crunchy graham cracker crust topped with a luscious layer of sweetened condensed milk, oats, and a colorful mix of chocolate chips and holiday M&Ms. These bars combine crunchy, sweet, and creamy textures, making them a holiday favorite that's easy to prepare and great to share.
Ingredients
Crust
- 12 Graham Crackers, crushed
- 2 Tablespoons Sugar
- 9 Tablespoons Butter, melted
Topping
- 1 ½ Cups Sweetened Condensed Milk
- ¾ Cup Quick Oats
- 1 ⅓ Cups Semi Sweet Chocolate Chips
- ¾ Cup Peanut Butter Chips
- ⅓ Cup White Chocolate Chips
- 1 Cup Holiday M&Ms
Instructions
- Preheat Oven and Prepare Pan: Preheat the oven to 350 degrees Fahrenheit. Line a 9x13 inch baking pan with nonstick spray and press a piece of parchment paper into the pan for easy removal.
- Make Crust: In a bowl, combine the crushed graham crackers, sugar, and melted butter. Press this mixture firmly into the bottom of the prepared 9x13 inch pan, creating an even crust layer.
- Add Toppings: Pour the sweetened condensed milk evenly over the crust, spreading it to the edges. Sprinkle the quick oats, semi-sweet chocolate chips, peanut butter chips, white chocolate chips, and holiday M&Ms evenly over the top.
- Bake: Bake the assembled bars in the preheated oven for 25 minutes until the edges are golden and the toppings are melted and set.
- Cool and Serve: Remove from the oven and allow the bars to cool to room temperature or serve them warm. Cut into 15 bars for serving.
Notes
- Use parchment paper to easily lift the bars out of the pan once cooled.
- Substitute peanut butter chips with butterscotch or white chocolate chips for a different flavor.
- Allow bars to cool completely for cleaner slices.
- Store bars in an airtight container at room temperature for up to 5 days.
- For a nut-free version, omit peanut butter chips and replace with extra chocolate chips.
Nutrition
- Serving Size: 1 bar
- Calories: 280 kcal
- Sugar: 22 g
- Sodium: 110 mg
- Fat: 15 g
- Saturated Fat: 8 g
- Unsaturated Fat: 6 g
- Trans Fat: 0 g
- Carbohydrates: 34 g
- Fiber: 2 g
- Protein: 3 g
- Cholesterol: 25 mg


Leave a Reply