There’s something delightfully nostalgic and festive about this **Christmas White Chocolate Candy Bars Recipe**—it’s like a holiday hug in every bite! Creamy white chocolate melts together with fluffy marshmallows and colorful gumdrops to create a treat that's as fun to make as it is to enjoy with family and friends.

Jump to:
- Why You'll Love This Recipe
- Ingredients & Why They Work
- Make It Your Way
- Step-by-Step: How I Make Christmas White Chocolate Candy Bars Recipe
- Top Tip
- How to Serve Christmas White Chocolate Candy Bars Recipe
- Make Ahead and Storage
- Frequently Asked Questions:
- Final Thoughts
- Christmas White Chocolate Candy Bars Recipe
Why You'll Love This Recipe
I genuinely love how easy and cheerful this recipe is. It feels festive without fuss, perfect for holiday baking marathons, and it always brings a smile from kids and adults alike. Plus, no baking means no stress—I can have these ready way ahead of time.
- Super simple to make: Just a few ingredients and your microwave do the magic, so no need to heat up the oven during the busy season.
- Festive and colorful: Those red and green gumdrops really brighten up the bars, making them perfect for gifting or holiday parties.
- Customizable: You can easily swap out candies or add nuts for your own signature twist.
- Kid-friendly and fun: I love making these with my nieces—they enjoy picking out the candy and shaping the bars.

Ingredients & Why They Work
Each ingredient plays a special role in giving these candy bars their soft, creamy texture and festive vibe. Choosing good quality white chocolate chips will really make a difference in richness, and the mini marshmallows add that perfect chewy contrast.

- Butter: Helps everything melt smoothly and adds a subtle richness to the base.
- White chocolate chips: They melt beautifully and give you that sweet, creamy flavor without overwhelming the other ingredients.
- Mini marshmallows: They create that soft, gooey texture that's so comforting in candy bars.
- Red and green gumdrops or chewy candy: Adds festive pops of color and a little bite of extra sweetness.
Make It Your Way
I like to mix things up with this Christmas White Chocolate Candy Bars Recipe depending on who I’m making them for. Sometimes I sneak in some crushed peppermint for an extra minty pop, or swap gumdrops for dried cranberries when I want a less sugary touch.
- Variation: One year, I added a handful of chopped toasted pecans—oh, it introduced this amazing crunch that paired perfectly with the soft marshmallows and creamy chocolate.
Step-by-Step: How I Make Christmas White Chocolate Candy Bars Recipe
Step 1: Prep Your Pan First
I always start by lining an 8x8 baking dish with parchment paper and lightly greasing it. This little prep step saves me from sticky fingers later and ensures the candy bars pop right out without any stress.
Step 2: Melt, Stir, and Melt Some More
Pop the butter, white chocolate chips, and marshmallows in a microwave-safe bowl and melt for 1 minute. Then, stir with a greased spatula (this helps keep things smooth). Continue microwaving in 30-second bursts, stirring between, until everything is glossy and melted. Patience here is key—go slow to keep the chocolate from scorching.
Step 3: Fold in the Festive Goodies
After letting your mixture cool for about a minute (so it’s warm but not piping hot), fold in the chopped red and green gumdrops. This way, the colors keep their shape and the candy bars get that irresistible burst of flavor.
Step 4: Press, Chill, and Slice
Transfer the mixture to your prepared pan and press it down evenly with your spatula. Cover it with plastic wrap and pop it in the fridge for at least 4 hours—I usually leave it overnight for perfect firmness. When ready, lift the candy out using the parchment and slice into bite-sized pieces. Simple!
Top Tip
From my experience whipping up these Christmas White Chocolate Candy Bars, a few small tricks make your candy bars turn out just right every time.
- Slow melting: Take your time melting the chocolate and marshmallows to avoid burning—30-second intervals with stirring make a big difference.
- Grease your spatula: I always grease my spatula with a tiny bit of butter to keep the sticky mixture from clinging while stirring and folding.
- Chill well: Don't rush the chilling step—patience means candy bars that slice smoothly without crumbling.
- Use parchment paper: This is a game changer for easy removal—trust me, you’ll thank yourself!
How to Serve Christmas White Chocolate Candy Bars Recipe

Garnishes
For extra holiday sparkle, I sprinkle crushed candy canes or a tiny dusting of edible glitter on top of the bars right after pressing them down. It makes them look gorgeous on the platter and adds a festive crunch I adore.
Side Dishes
I love serving these alongside a warm cup of spiced hot cocoa or peppermint tea. They're also fantastic as part of a holiday cookie tray with softer cookies and salted nuts for balance.
Creative Ways to Present
I’ve wrapped these candy bars individually in festive parchment and tied them with twine for homemade gifts. Another fun idea is layering them in clear jars with other candies for a beautiful, edible centerpiece at holiday parties.
Make Ahead and Storage
Storing Leftovers
Store your leftover Christmas White Chocolate Candy Bars in an airtight container at room temperature or in the fridge if you prefer a firmer texture. They've kept well with me for up to a week, still tasting fresh and delicious.
Freezing
I've frozen these bars wrapped tightly in plastic wrap and placed in a freezer-safe bag before, and they thaw beautifully overnight in the fridge. Just let them come to room temperature before serving for the best texture.
Reheating
Since these are no-bake candy bars, reheating isn't typically necessary. But if you want them a bit softer, I give them a quick 10-second zap in the microwave—just enough to soften but not melt completely.
Frequently Asked Questions:
You absolutely can! Substituting semi-sweet or milk chocolate chips will give you a different flavor profile. Keep in mind that melting times may vary slightly, and the candy bars won’t be the same classic festive white color but still delicious.
No worries if gumdrops are tricky to find. You can substitute chopped dried fruits like cranberries or cherries, or even colorful sprinkles for visual appeal—just make sure any substitutes are cut into small, bite-sized pieces for the perfect texture.
Stored in an airtight container, these bars should keep fresh for about a week at room temperature or up to two weeks in the fridge. Beyond that, the texture may start to degrade, so it’s best to enjoy them sooner.
For a vegan version, swap butter for coconut oil or a plant-based margarine and use vegan white chocolate chips (made without dairy). Make sure any candy pieces you add are also vegan-friendly. The texture might vary a bit but still taste wonderful.
Final Thoughts
Honestly, this Christmas White Chocolate Candy Bars Recipe has become one of my go-to festive treats because it strikes the perfect balance between simplicity and holiday joy. It’s fun, colorful, and makes an incredible gift or party addition. I can’t wait for you to try making it in your kitchen—it’s the kind of recipe that really brings the magic of the season to your taste buds.
Print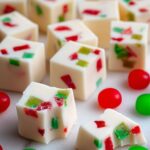
Christmas White Chocolate Candy Bars Recipe
- Prep Time: 20 minutes
- Cook Time: 0 minutes
- Total Time: 4 hours 20 minutes
- Yield: 24 servings
- Category: Dessert
- Method: No-Cook
- Cuisine: American
- Diet: Vegetarian
Description
This festive Christmas Candy recipe combines creamy white chocolate, gooey marshmallows, and colorful gumdrops to create a sweet holiday treat that’s easy to make and perfect for sharing.
Ingredients
Main Ingredients
- 2 tablespoons butter
- 1 (12 oz) bag white chocolate chips
- 1 (10 oz) bag mini marshmallows
- 1 cup red and green gumdrops or chewy candy, chopped
Instructions
- Prepare the baking dish: Line an 8x8 inch baking dish with parchment paper and lightly grease to prevent sticking. Set aside.
- Melt the mixture: Add butter, white chocolate chips, and mini marshmallows to a large microwave-safe bowl. Microwave for 1 minute, then stir with a greased spatula. Continue microwaving in 30-second increments, stirring after each, until the mixture is fully melted and smooth.
- Fold in candies: Allow the melted mixture to cool for about 1 minute, then gently fold in the chopped red and green gumdrops or chewy candy until evenly distributed.
- Set the candy: Transfer the mixture to the prepared baking dish and use a spatula to press it into a flat, even layer.
- Chill: Cover the dish with plastic wrap and refrigerate for a minimum of 4 hours or up to overnight to set completely.
- Slice and serve: Lift the candy out of the dish using the parchment paper. Remove the paper and slice the candy into small bite-sized pieces. Store in an airtight container for best freshness.
Notes
- Ensure to stir well between microwave intervals to prevent burning the chocolate and marshmallows.
- If gumdrops are not available, use any chewy colorful candies for a similar effect.
- The candy can be stored at room temperature in an airtight container for up to one week.
- For a different flavor, try adding a teaspoon of peppermint extract to the melted mixture before folding in candies.
- Use a sharp knife to make clean cuts into small bite-sized pieces.
Nutrition
- Serving Size: 1 piece (approx.)
- Calories: 110 kcal
- Sugar: 12 g
- Sodium: 15 mg
- Fat: 5 g
- Saturated Fat: 3 g
- Unsaturated Fat: 1 g
- Trans Fat: 0 g
- Carbohydrates: 16 g
- Fiber: 0.5 g
- Protein: 1 g
- Cholesterol: 10 mg

Leave a Reply