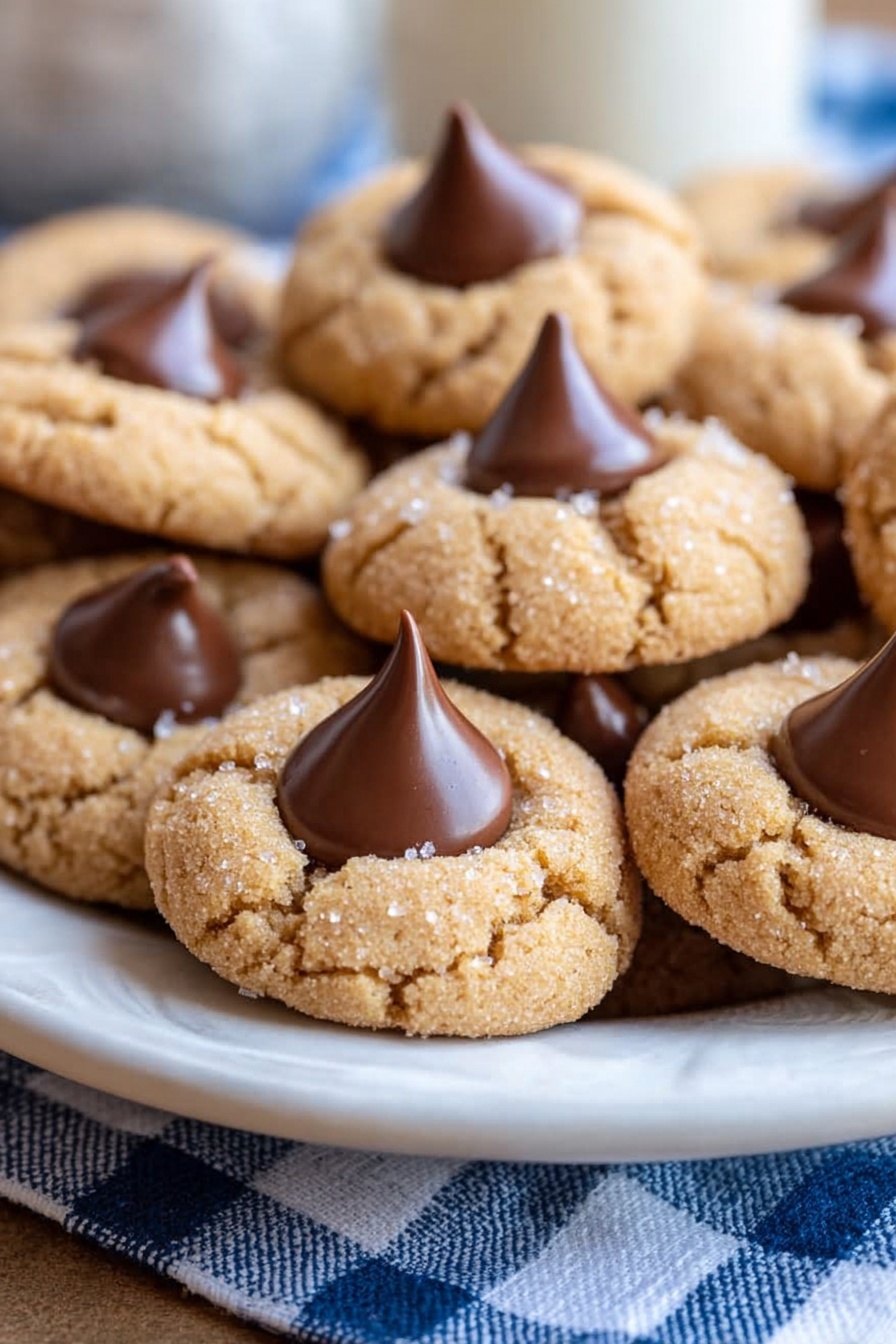
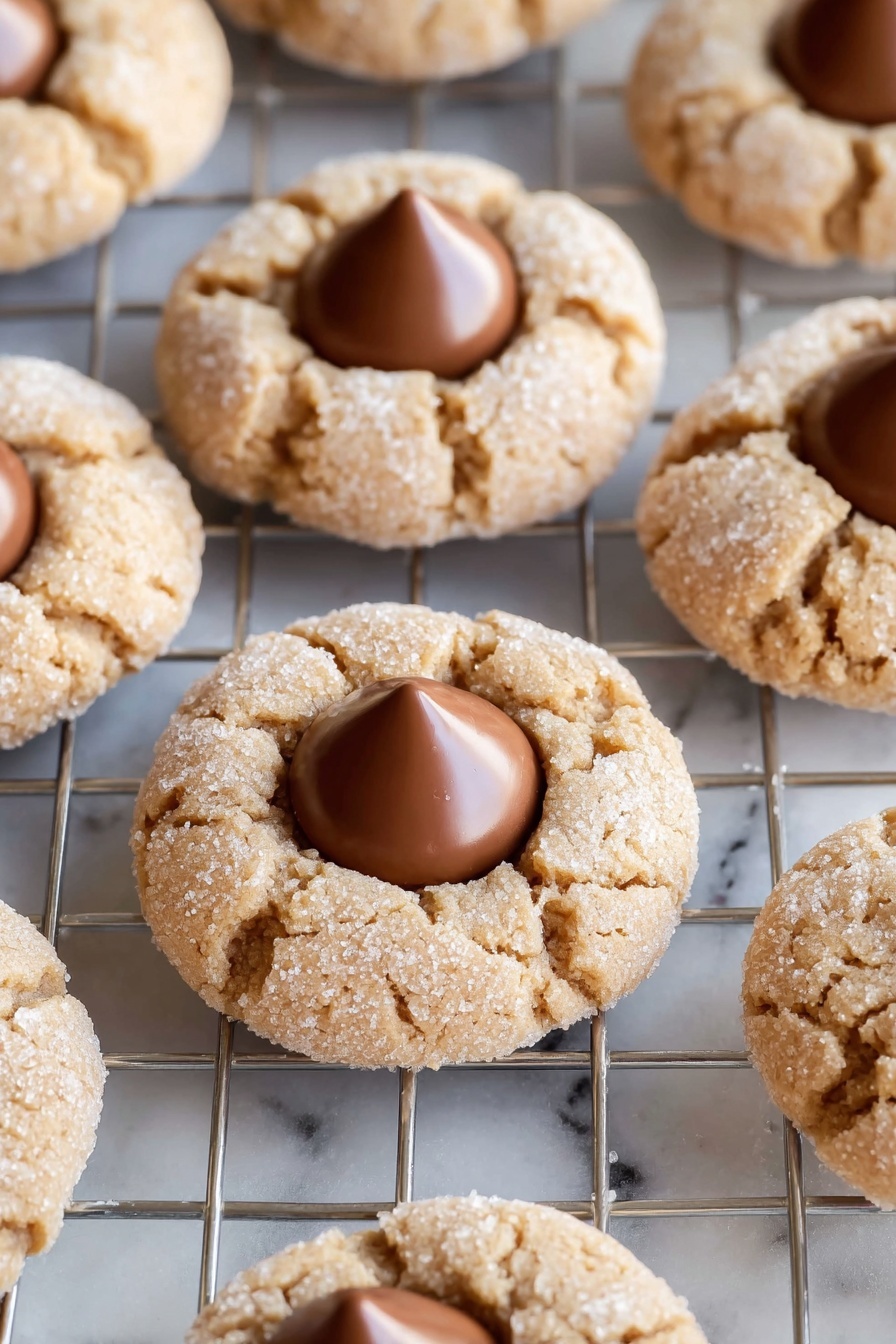
There's something magically nostalgic about that first bite of a peanut butter cookie crowned with a shiny chocolate kiss. This Classic Peanut Butter Blossoms Recipe never fails to bring back warm memories and smiles, making it a must-bake for holidays, gatherings, or just whenever you want a comforting, delicious treat.
Why You'll Love This Recipe
Honestly, these cookies are like a warm hug from your oven. What makes this Classic Peanut Butter Blossoms Recipe special is how simple ingredients come together to create a perfect peanut butter cookie with that iconic chocolate kiss finish. I still remember baking a huge batch with my sister and how they disappeared within hours!
- Perfect Texture: The cookies are soft in the center with a slightly crisp edge, balancing peanut butter richness with sweet crunch.
- Iconic Chocolate Kiss: That melty chocolate center adds a delightful surprise and elevates these beyond just any peanut butter cookie.
- Quick and Easy: You only need one bowl and a handful of pantry staples to whip them up in under 30 minutes.
- Great for Gifting: They look adorable in a tin or bag, making them your go-to cookie for holidays and celebrations.
Ingredients & Why They Work
Each ingredient here plays a role in making your Classic Peanut Butter Blossoms Recipe turn out just right. From creamy peanut butter that gives that rich flavor, to brown sugar which adds moisture and chewiness, every element is thoughtfully chosen. Here are a few tips for shopping and prepping:
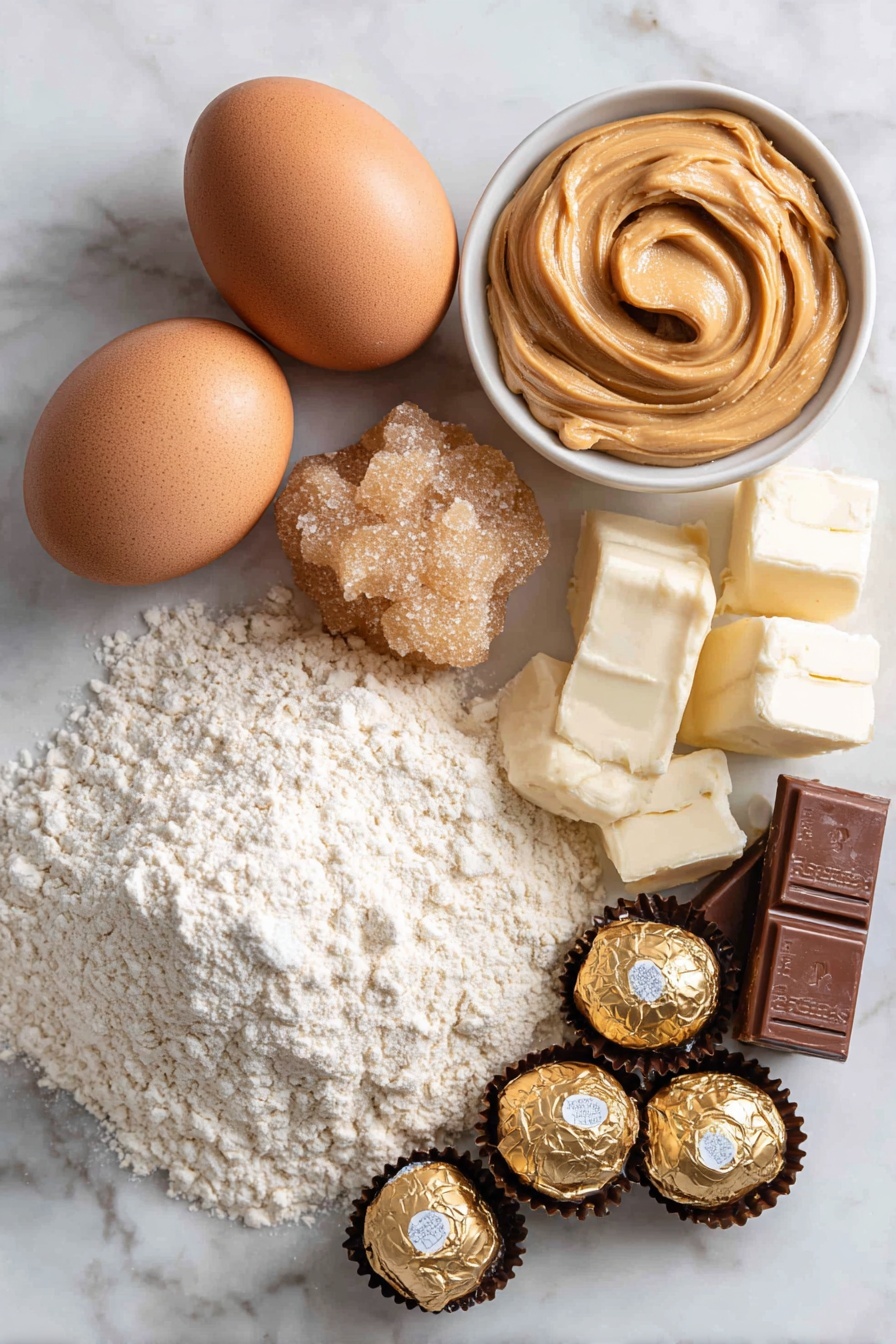
- Granulated sugar: Gives a crisp edge and slightly sparkling texture, especially when rolled in sugar before baking.
- Brown sugar: Keeps the cookies moist and adds a hint of caramel flavor.
- Creamy peanut butter: Essential for that classic peanut butter flavor and smooth bite; avoid natural peanut butter as it may change texture.
- Unsalted butter: Using softened butter helps with easy mixing and creates a tender crumb.
- Large egg: Binds everything together; room temperature eggs blend more evenly.
- All-purpose flour: The base structure for the cookie, giving balance between fluffiness and sturdiness.
- Baking soda: Helps the cookie rise slightly so they're not too dense.
- Baking powder: Provides gentle lift and lightness.
- Salt: Balances sweetness and enhances the peanut butter flavor.
- Chocolate candy kisses: The iconic finishing touch; I always stick with classic Hershey’s for that familiar taste.
Make It Your Way
This Classic Peanut Butter Blossoms Recipe is such a lovely canvas for your baking creativity. Personally, I like to add a sprinkle of flaky sea salt over the kisses just before serving—it amps up the flavor beautifully. But don’t hesitate to make it your own!
- Peanut Butter Swap: I once tried creamy almond butter instead, and while it changed the flavor, the texture was still great—perfect if you want a twist or have a peanut allergy.
- Chocolate Variations: Using dark chocolate kisses adds richness, and white chocolate kisses give a fun visual pop.
- Nut Toppings: If you’re feeling fancy, pressing a few chopped peanuts or a drizzle of melted peanut butter over the top creates a festive feel.
- Spicy Kick: For a grown-up version, a tiny pinch of cayenne in the dough balances the sweetness surprisingly well.
Step-by-Step: How I Make Classic Peanut Butter Blossoms Recipe
Step 1: Whip Together The Sugars and Peanut Butter Mixture
Start by preheating your oven to 375°F (190°C) so it’s ready to go when your dough is mixed. In a large bowl, I use an electric mixer to cream the brown sugar, granulated sugar, creamy peanut butter, softened butter, and the egg until the mixture is smooth and well combined. Make sure your butter isn’t cold—that way everything blends effortlessly and you don’t end up with lumps.
Step 2: Gently Fold in the Dry Ingredients
Switch your mixer to low and add the flour, baking soda, baking powder, and salt a little at a time. This prevents any flour clouds and ensures it all merges nicely into a soft, slightly sticky dough. If your dough feels too crumbly, a teaspoon of milk can help, but usually, this combo is balanced.
Step 3: Shape, Sugar, and Bake
Roll the dough into 1-inch balls—this part is fun, and I often sneak in a little extra sugar on my fingers for that sparkle. Then roll each ball in granulated sugar to give the cookies a beautiful, sugary crust. Place them spaced about 2 inches apart on an ungreased baking sheet (this allows them some space to puff slightly).
Bake one sheet at a time for 8-10 minutes or until the edges are just turning a light golden brown. Timing here is key because you want the centers soft but not doughy.
<!-- /wp:paragraph>
Step 4: Add Chocolate Kisses Immediately
The moment your cookies come out of the oven, gently press a chocolate candy kiss into the center of each. Don’t press too hard or the cookies might crack, but just enough so the chocolate nestles perfectly as it softens. Transfer the cookies to a wire rack to cool completely—that hour of cooling is so worth the wait to get that firm, melty center.
Top Tip
From my many rounds of baking these cookies, I've picked up a few tricks that help make the Classic Peanut Butter Blossoms Recipe shine. They can feel simple, but these tips truly make a difference!
- Right Temperature Matters: Use softened butter and room-temperature egg for smooth mixing and perfect dough consistency.
- Don't Overbake: Watch the edges closely—removing cookies as soon as they turn golden ensures they stay soft inside.
- Press Kisses While Warm: Adding the chocolate kisses immediately after baking helps them soften slightly and stick perfectly without cracking the cookie.
- Space Cookies Properly: Give each dough ball room to spread without touching to keep them uniform and pretty.
How to Serve Classic Peanut Butter Blossoms Recipe
Garnishes
I usually keep these cookies simple, letting the chocolate kiss speak for itself. But for special occasions, I love to dust a little powdered sugar or sprinkle flaky sea salt to create that perfect sweet-salty balance. A tiny drizzle of melted peanut butter over the kiss makes them look extra festive too.
Side Dishes
These cookies pair wonderfully with a cold glass of milk (classic for a reason!). For gatherings, I like to serve them alongside fresh fruit or a simple bowl of mixed nuts to contrast their sweetness. Coffee or a smooth hot chocolate? Even better!
Creative Ways to Present
One of my favorite ways to present these is on a tiered dessert stand at holiday parties—they instantly become the stars of the table. Wrapping them in small cellophane bags tied with festive ribbons also makes an easy and charming gift. For a crowd, arranging them in the shape of a wreath, with holly sprigs, adds a delightful seasonal touch.
Make Ahead and Storage
Storing Leftovers
I store leftover cookies in an airtight container at room temperature with parchment layers between them to keep them soft and fresh for up to a week. They somehow taste even better the day after baking once the flavors have a chance to meld.
Freezing
You can freeze these cookies either as dough balls or fully baked cookies. I prefer freezing the dough shaped into balls, rolled in sugar, on a baking sheet, then transferring them to a freezer bag. When ready, just pop frozen dough balls on a tray and bake—you’ll have fresh cookies anytime.
Reheating
To enjoy leftover cookies warm, heat them in a microwave for 10-15 seconds or in a preheated oven at 300°F for 5 minutes. This softens the cookie and melts the chocolate kiss to that gooey perfection you crave.
Frequently Asked Questions:
Natural peanut butter tends to have more oil and less stabilizers which can make the cookie dough too soft or oily. For the best texture and flavor, I recommend using creamy peanut butter like Jif or Skippy.
Press the chocolate kisses into the cookies immediately after they come out of the oven while the dough is still soft and warm. Press gently, don’t push too hard, and this will help the kiss settle in without cracking the cookie.
Yes! Substitute the all-purpose flour with a gluten-free all-purpose baking flour blend that includes xanthan gum for structure. The texture will be slightly different but still delicious.
Store Classic Peanut Butter Blossoms in an airtight container at room temperature with parchment paper separating layers. They stay fresh for about a week. Avoid refrigeration as it can dry them out.
Final Thoughts
Baking these Classic Peanut Butter Blossoms always feels like a little celebration in my kitchen. They’re straightforward but yield that perfect blend of peanut buttery goodness with luscious chocolate that you just can’t resist. Whether you’re making a big batch for friends or a cozy treat for yourself, I hope this recipe brings as much joy to your home as it has to mine. You really can’t go wrong with these sweet little blossoms—go ahead, give them a try and bake up some smiles!
Print
Classic Peanut Butter Blossoms Recipe
- Prep Time: 15 minutes
- Cook Time: 10 minutes
- Total Time: 25 minutes
- Yield: 24 cookies
- Category: Dessert
- Method: Baking
- Cuisine: American
Description
Classic Peanut Butter Blossoms are soft, chewy peanut butter cookies topped with a signature chocolate kiss in the center. These festive treats combine the rich flavor of peanut butter with the sweetness of sugar and chocolate, perfect for holiday gatherings or anytime snacking.
Ingredients
Cookie Dough
- ½ cup granulated sugar, plus extra for dusting
- ½ cup brown sugar, packed
- ½ cup creamy peanut butter
- ½ cup unsalted butter, softened
- 1 large egg, at room temperature
- 1 ½ cups all-purpose flour
- 1 teaspoon baking soda
- ½ teaspoon baking powder
- ¼ teaspoon salt
Topping
- 24 chocolate candy kisses, such as Hershey's
Instructions
- Preheat Oven: Preheat your oven to 375°F to prepare for baking the cookies.
- Mix Wet Ingredients: In a large bowl, use an electric mixer on medium speed to blend the brown sugar, granulated sugar, peanut butter, softened butter, and egg until the mixture is smooth and creamy.
- Add Dry Ingredients: Reduce mixer speed to low and gradually add the all-purpose flour, baking soda, baking powder, and salt into the bowl. Mix until just combined to form the cookie dough.
- Shape and Coat Dough Balls: Roll the dough into 1-inch balls and then roll each ball in additional granulated sugar to coat. Place the coated dough balls on an ungreased baking sheet, spacing them about 2 inches apart.
- Bake Cookies: Bake one sheet of cookies at a time in the preheated oven for 10 minutes, until the edges are light golden brown.
- Add Chocolate Kisses: Immediately after baking, remove the cookies from the oven and press one chocolate candy kiss into the center of each cookie while still warm.
- Cool Cookies: Transfer the cookies to a wire rack to cool completely. Let them cool for about 1 hour to allow the chocolate to set before serving.
Notes
- Make sure the egg is at room temperature for better mixing and texture.
- Do not grease the baking sheet; the cookies spread properly without it.
- You can substitute peanut butter with natural peanut butter for a more intense flavor.
- Press the chocolate kisses into hot cookies immediately out of the oven for proper melting and adherence.
- Store cookies in an airtight container at room temperature for up to one week.
Nutrition
- Serving Size: 1 cookie
- Calories: 120 kcal
- Sugar: 10 g
- Sodium: 90 mg
- Fat: 6 g
- Saturated Fat: 2 g
- Unsaturated Fat: 4 g
- Trans Fat: 0 g
- Carbohydrates: 14 g
- Fiber: 1 g
- Protein: 3 g
- Cholesterol: 15 mg


Leave a Reply