There's something about the crispy, cheesy goodness wrapped in golden spring roll skins that makes this Crispy Cheeseburger Spring Rolls Recipe an instant crowd-pleaser. If you love cheeseburgers but want a fun twist, these are right up your alley!

Jump to:
Why You'll Love This Recipe
I still remember the first time I made these crispy burgers in a spring roll wrapper — it was like all my favorite comfort foods wrapped into one crispy bite. They’re fun to eat, packed with flavor, and perfect for parties or a quick dinner. Once you try them, you’ll get why I come back to this recipe again and again.
- Flavor Explosion: Combining seasoned ground beef, melty cheese, and tangy pickles inside a crispy shell is just unbeatable.
- Easy to Make: It’s straightforward with simple ingredients you probably already have, and assembling the rolls is actually pretty fun.
- Versatile Serving: These rolls work as an appetizer, snack, or main dish depending on the sides you choose.
- Make-Ahead Friendly: You can prep and freeze uncooked rolls, so dinner is ready whenever you want it.
Ingredients & Why They Work
I love how each ingredient in this Crispy Cheeseburger Spring Rolls Recipe brings something special to the table. From the savory and juicy beef to the tangy pickles and creamy cheese, everything comes together perfectly. Here are a few ingredient notes to keep in mind while shopping:
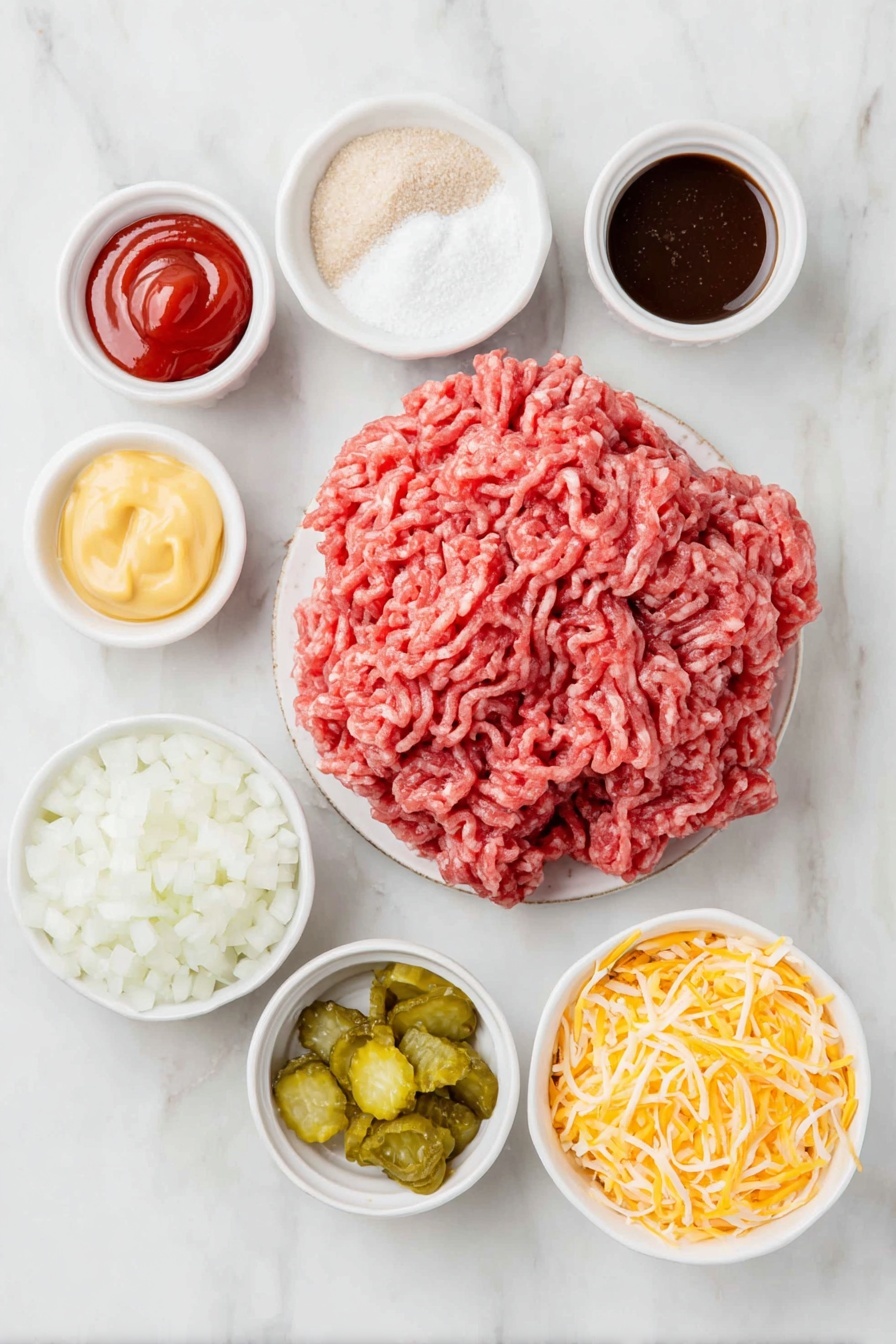
- Ground beef: I recommend 80/20 beef for that perfect balance of flavor and fat that keeps the filling juicy.
- Onion: Finely dicing the onion helps it cook evenly without any big surprise chunks.
- Ketchup & yellow mustard: Classic cheeseburger flavors that add a familiar tang and sweetness.
- Worcestershire sauce: A secret punch of umami that deepens the beef flavor.
- Cheddar or American cheese: I find shredded cheddar gives a nice sharpness; American melts beautifully if you prefer extra creaminess.
- Dill pickles: They bring that sharp vinegar bite that cuts through the richness.
- Spring roll wrappers: Make sure they’re thawed if frozen, but still cool and pliable for wrapping.
- Flour paste: A simple combo of flour and water to seal your rolls tight for frying.
- Oil: For frying, a neutral oil like vegetable or canola works great to get that perfect golden crisp.
Make It Your Way
Now, I’m all about making recipes my own and this Crispy Cheeseburger Spring Rolls Recipe is no exception. I’ve tried a few tweaks and it’s fun to personalize—whether adjusting flavors or adding extras. Feel free to experiment!
- Variation: I once added some chopped cooked bacon to the filling for an extra smoky punch, and it was divine.
- Cheese swap: Try pepper jack for some heat or mozzarella for a milder gooey center.
- Make it spicy: Mix in some diced jalapeños or hot sauce into the beef mixture to kick things up a notch.
- Air fryer option: I often use my air fryer to get a perfectly crispy finish with less oil and less mess.
- Vegan version: Substitute the beef with plant-based crumbles and use vegan cheese if you want to try a plant-based twist.
Step-by-Step: How I Make Crispy Cheeseburger Spring Rolls Recipe
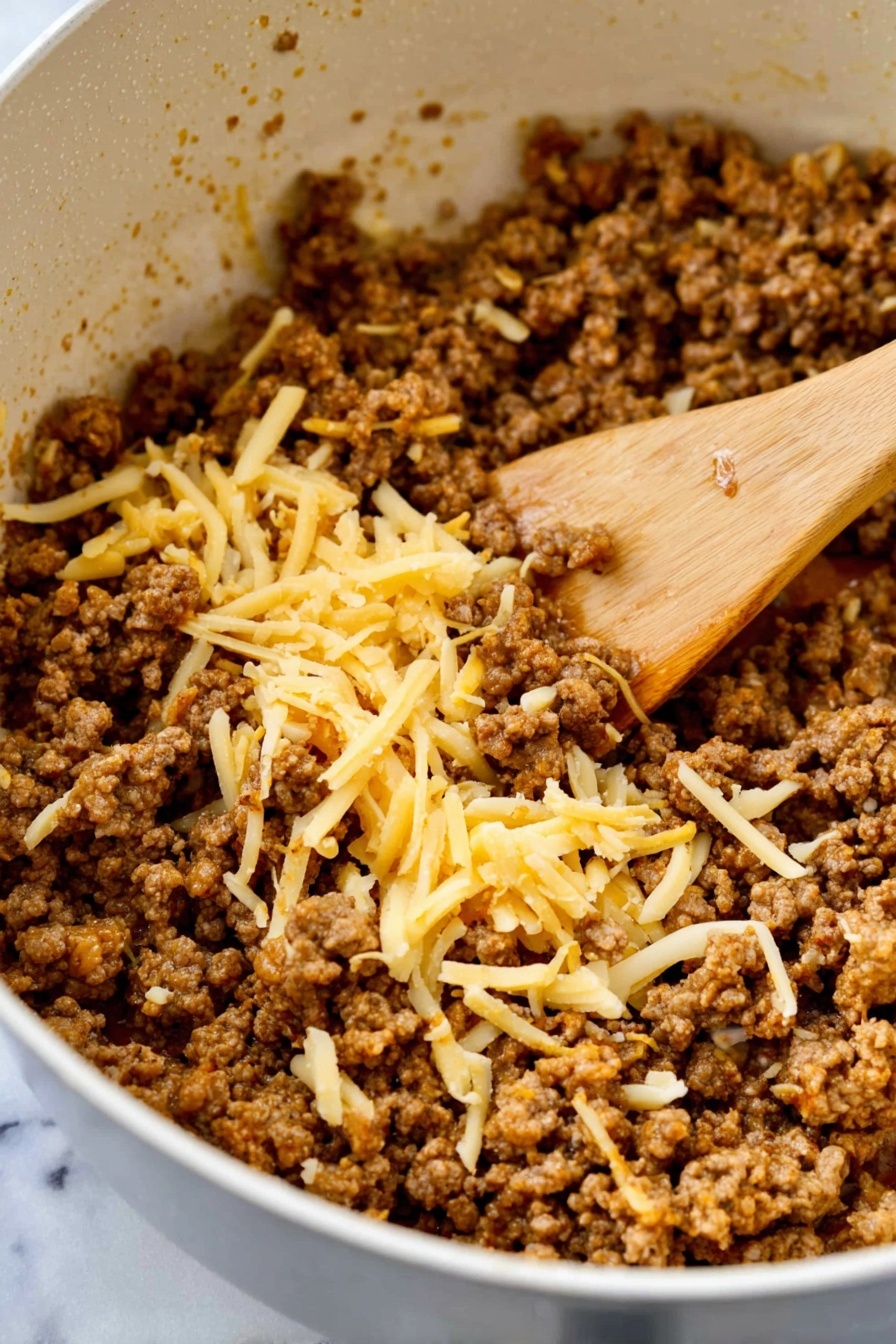
Step 1: Cook the beef and onions until perfectly browned
Heat a skillet over medium-high heat and add your ground beef with the diced onion. I like to let it cook without stirring too much at first so those crispy, caramelized bits develop—that’s where a lot of the flavor hides! Aim for rich browning and don’t rush. Once browned, drain all the excess grease so your filling isn’t too oily.
Step 2: Mix in the sauces and spices, then cool slightly
Stir ketchup, mustard, Worcestershire sauce, garlic powder, onion powder, salt, and pepper into the beef. Give it a good mix to coat everything evenly. Let it cool 5 minutes—that’s key to prevent the cheese from melting too soon and making your rolls soggy.
Step 3: Add cheese and pickles, then prep the wrappers
Fold in the shredded cheese and finely chopped dill pickles. Keep your spring roll wrappers covered with a damp towel so they don’t dry out as you assemble. This keeps them soft and pliable, which makes folding so much easier.
Step 4: Assemble and seal your cheeseburger spring rolls
Place about 2 tablespoons of filling in the center of each wrapper. Fold the sides in tightly and roll up like a little burrito, sealing the edges with your flour and water paste. Don’t overfill or the rolls will burst while cooking—less is more here. I use a pastry brush or my finger to apply the paste carefully.
Step 5: Fry or air-fry to golden perfection
Heat about 2 inches of oil to 350°F and fry 3–4 rolls at a time for 3–4 minutes until golden and crisp. Drain on paper towels to get rid of excess oil. Alternatively, spray the rolls with oil and air-fry at 390°F for 10-12 minutes, flipping halfway. Both methods yield super crispy, melty rolls—the choice is yours!
Top Tip
I’ve made these spring rolls quite a few times and learned some handy tricks that really boost success. Here’s what saved me from soggy wrappers and missing that perfect crunch:
- Don’t overfill: It’s tempting to pack in as much as possible, but a light hand keeps the wraps sealed and avoids bursts during frying.
- Drain the grease thoroughly: After cooking the beef, draining is crucial so your filling stays juicy but not oily.
- Keep wrappers covered: Exposure to air dries them out, making rolling difficult and prone to cracks.
- Heat the oil properly: Cooking at 350°F ensures a crispy texture without greasy or undercooked spots. Use a thermometer for accuracy if you can.
How to Serve Crispy Cheeseburger Spring Rolls Recipe
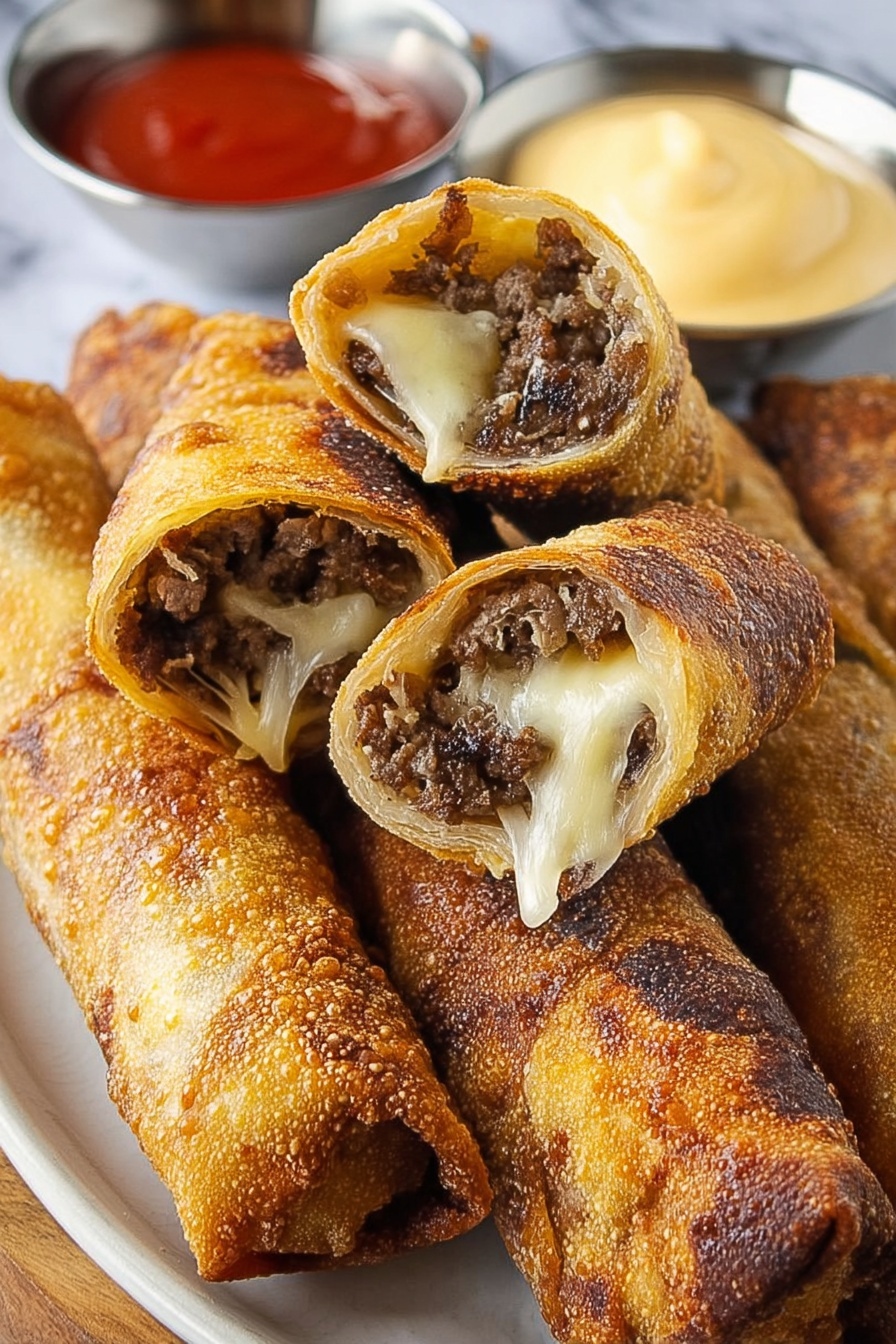
Garnishes
I love to keep things simple with fresh chopped chives or a sprinkle of sesame seeds for a little extra flair. A side of pickles or a crisp leaf of lettuce adds freshness that contrasts the fried rolls nicely. And of course, dipping sauces are a must!
Side Dishes
My go-to sides include a fresh green salad, crispy fries, or even some sweet potato wedges. Coleslaw also pairs beautifully, adding cool crunch and balance. You can’t go wrong with any classic burger side.
Creative Ways to Present
One fun party idea is serving these rolls upright in a mason jar with your dips arranged around — perfect finger food. Or slice them diagonally and arrange on a platter for a fancy appetizer display. I’ve even used mini spring roll wrappers to make bite-size versions for cocktail hours.
Make Ahead and Storage
Storing Leftovers
If you have leftovers (which is rare!), store them uncovered on a plate in the fridge so the wrapper stays crisp-ish—tightly covering them traps moisture and softens the crunch. I usually reheat in the oven or air fryer to refresh the crispiness.
Freezing
One of the best things about this Crispy Cheeseburger Spring Rolls Recipe is how freezer-friendly it is. Freeze the uncooked rolls on a parchment-lined tray until solid, then transfer to a zip-top bag. You can cook them right from frozen, just add a minute or two to your frying or air-frying time.
Reheating
Reheat in a 375°F oven or in an air fryer, flipping halfway, until crispy and warmed through. Avoid microwaving as it makes the wrappers soggy and tough. If you’re careful with reheating, these spring rolls taste almost as good as fresh!
Frequently Asked Questions:
Yes, you can definitely bake them! Brush the rolls with oil and bake at 400°F for about 15-20 minutes, flipping halfway for even crispiness. While frying gives the crispiest result, baking is a great lower-fat option.
Make sure not to overfill the rolls and seal the edges tightly with the flour paste. Also, avoid overcrowding the pan so the oil temperature stays consistent. Following these tips will help keep the rolls intact.
Absolutely! You can cook and cool the beef mixture a day in advance. Store it covered in the refrigerator, then assemble the rolls when ready. This makes meal prep quick and easy.
Traditional ketchup mixed with mayonnaise is a classic, but I also love sweet chili sauce with sour cream for a little twist. Feel free to get creative with mustard-based sauces or even a tangy BBQ sauce!
Final Thoughts
This Crispy Cheeseburger Spring Rolls Recipe has become a comfort food favorite in my kitchen that’s easy to make and fun to share. It’s a playful way to enjoy cheeseburger flavors with a delightful crunch, perfect for any occasion. I hope you give it a try and love it as much as I do—you’ll feel like you’ve discovered a delicious little secret.
Print
Delicious Recipe
- Prep Time: 20 minutes
- Cook Time: 15 minutes
- Total Time: 35 minutes
- Yield: 12 rolls
- Category: Appetizer
- Method: Frying
- Cuisine: American
Description
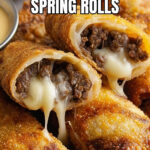
Delicious Cheeseburger Spring Rolls combine seasoned ground beef, tangy pickles, and melted cheese wrapped in crispy spring roll wrappers. Perfectly fried or air-fried, these spring rolls are a fun twist on classic cheeseburgers, served with flavorful dipping sauces.
Ingredients
Filling
- 1 pound ground beef (80/20 for best flavor)
- 1 small onion, finely diced
- 2 tablespoons ketchup
- 1 tablespoon yellow mustard
- 1 teaspoon Worcestershire sauce
- 1 teaspoon garlic powder
- 1 teaspoon onion powder
- Kosher salt, to taste
- Freshly cracked black pepper, to taste
- 1 cup shredded cheddar or American cheese
- ¼ cup finely chopped dill pickles
Wrapping and Frying
- 12 spring roll wrappers (thawed if frozen)
- 2 tablespoons flour
- 3 tablespoons water
- Oil for frying (or cooking spray for air frying)
Dipping Sauces (Optional)
- Mix of ketchup and mayonnaise
- Sweet chili sauce and sour cream
Instructions
- Cook the Filling: Heat a skillet over medium-high heat. Add ground beef and finely diced onion. Cook, stirring occasionally, until beef is browned and onions have crispy edges, about 7 minutes. Drain all excess grease from the pan.
- Season the Meat: Stir in ketchup, yellow mustard, Worcestershire sauce, garlic powder, onion powder, kosher salt, and freshly cracked black pepper. Mix well and cook for an additional minute. Remove from heat and let cool for 5 minutes.
- Add Cheese and Pickles: Once the beef mixture has cooled slightly, fold in shredded cheese and finely chopped dill pickles until evenly combined.
- Prepare Wrappers: Keep spring roll wrappers covered with a damp towel to prevent drying out. Mix 2 tablespoons flour with 3 tablespoons water to make a sealing paste.
- Assemble Rolls: Place one spring roll wrapper on a flat surface. Spoon about 2 tablespoons of the filling in the center. Fold the sides of the wrapper inward and roll tightly like a burrito, sealing the edges with the flour paste. Avoid overfilling to prevent breaking.
- Fry the Rolls: Heat about 2 inches of oil in a deep skillet to 350°F. Fry 3 to 4 spring rolls at a time for 3 to 4 minutes or until golden brown and crispy. Drain on paper towels.
- Air Fry Option: Alternatively, spritz the assembled rolls lightly with oil and cook in an air fryer at 390°F for 10 to 12 minutes, flipping halfway through for even crispness.
- Serve: Serve the spring rolls hot with dipping sauces such as a mix of ketchup and mayonnaise or sweet chili sauce paired with sour cream.
- Freeze for Later: To freeze, place uncooked rolls on a parchment-lined tray and freeze until solid. Transfer to a zip-top bag and store frozen. When cooking from frozen, add 1 to 2 minutes to frying or air frying time.
Notes
- Use 80/20 ground beef for the best flavor and moisture balance.
- Drain all grease thoroughly after cooking the beef to avoid soggy spring rolls.
- Keep wrappers covered with a damp towel to prevent them from drying out and cracking.
- Seal edges well with the flour paste to prevent filling from leaking during cooking.
- For a healthier option, use the air fryer method instead of deep frying.
- Customize the filling by adding diced jalapeños or substituting pickles for relish for different flavor profiles.
- Freeze uncooked rolls instead of cooked to maintain crispiness upon reheating.
Nutrition
- Serving Size: 1 roll
- Calories: 220 kcal
- Sugar: 2 g
- Sodium: 350 mg
- Fat: 14 g
- Saturated Fat: 6 g
- Unsaturated Fat: 7 g
- Trans Fat: 0.2 g
- Carbohydrates: 15 g
- Fiber: 1 g
- Protein: 11 g
- Cholesterol: 45 mg


Leave a Reply