There’s something magical about creamy, melt-in-your-mouth Christmas treats, and this one turns the holiday spirit up a notch. The Festive Christmas Swirl White Chocolate Fudge Recipe combines velvety white chocolate with charming red and green swirls that instantly brighten any holiday gathering. It’s the kind of recipe that makes your kitchen smell heavenly and your guests ask for seconds.

Jump to:
- Why You'll Love This Recipe
- Ingredients & Why They Work
- Make It Your Way
- Step-by-Step: How I Make Festive Christmas Swirl White Chocolate Fudge Recipe
- Top Tip
- How to Serve Festive Christmas Swirl White Chocolate Fudge Recipe
- Make Ahead and Storage
- Frequently Asked Questions:
- Final Thoughts
- Festive Christmas Swirl White Chocolate Fudge Recipe
Why You'll Love This Recipe
Honestly, making this fudge has become my go-to festive treat because it’s both showy and surprisingly simple. I love how the colors swirl together — it feels like painting with chocolate! Plus, the taste is just pure holiday joy with every bite.
- Easy to Make: The fudge comes together quickly on the stove, no complicated candy thermometers needed.
- Beautiful Presentation: The red and green swirls add instant festive charm without any extra fancy decorating skills.
- Rich & Creamy Texture: Thanks to the sweetened condensed milk and butter, the fudge is silky smooth and decadent.
- Perfect for Gifting: Cut into bite-sized squares, it makes a thoughtful homemade gift your friends and family will love.

Ingredients & Why They Work
The magic here lies in simple, quality ingredients that blend beautifully. White chocolate lends sweetness and creaminess, while the condensed milk prevents crystallization, keeping your fudge smooth. Plus, those bold gel food colors don’t water down your fudge like liquid dyes sometimes do.

- White chocolate chips: Using good-quality chips, like Ghirardelli, ensures smooth melting and rich flavor.
- Sweetened condensed milk: Adds both sweetness and moisture, creating that perfect fudge texture.
- Unsalted butter: Cubed and cold, it blends in smoothly without separating—important for that creamy finish.
- Red gel food coloring: Use gel, not liquid, for vibrant color without affecting consistency.
- Green gel food coloring: Same as red, it keeps the swirls bold and festive.
Make It Your Way
One of the things I really enjoy about the Festive Christmas Swirl White Chocolate Fudge Recipe is how flexible it is. I often tweak the colors or add mix-ins depending on what I have on hand or the vibe I want to create — and you should definitely feel free to do the same!
- Variation: Sometimes I swap the green gel for a blue or pink swirl for different holidays or just for fun — it always brightens the look.
- Dietary Modification: For those looking to avoid dairy, try a white chocolate alternative made with coconut milk, but note texture may vary.
- Festive Mix-ins: Add crushed peppermint candies or chopped nuts to the batter before swirling for extra texture and flavor.
- Less Sweet: If you prefer less sweet fudge, a good trick is to add a pinch of sea salt to balance the flavor beautifully.
Step-by-Step: How I Make Festive Christmas Swirl White Chocolate Fudge Recipe
Step 1: Prep Your Pan and Ingredients
I start by lining an 8x8-inch square baking pan with parchment paper, making sure the paper hangs over the edges so I can lift the fudge out easily. It’s a small step that saves so much hassle later—trust me on this one! Then gather everything together so you’re ready to go without pause.
Step 2: Melt White Chocolate with Condensed Milk and Butter
Next, over medium-low heat, I combine the white chocolate chips, sweetened condensed milk, and cold cubed butter in a saucepan. Stirring constantly for 4-6 minutes is key — you want everything melted evenly without burning the chocolate. When the mixture is silky smooth, I remove the pan from the heat.
Step 3: Divide and Color Your Fudge Mixture
I scoop about one-third of the mixture into a small bowl and add red gel food coloring, starting with about ¼ teaspoon and adding more if needed until I get that vibrant holiday red. Then, another third goes into a different bowl with green gel colored the same way. The last third stays white for the classic swirl effect.
Step 4: Dollop, Swirl, and Smooth
I randomly dollop spoonfuls of each colored fudge into the prepared pan, alternating colors. Then, with a wooden skewer or butter knife, I gently swirl the colors to create those gorgeous festive patterns. The final trick is to press down lightly with a piece of parchment paper to smooth the top — careful not to ruin the swirls!
Step 5: Chill and Slice
Finally, I pop the pan in the fridge for 2-3 hours until the fudge is firm. Once set, I lift it out using the parchment paper edges and slice into bite-sized 1x1 inch squares. Voilà—festive fudge ready to share and enjoy!
Top Tip
From my many fudge-making attempts, a few things truly make a difference. These little tips helped me go from gritty disappointment to smooth, perfect fudge every time.
- Constant Stirring: Stir the mixture without stopping while melting so the chocolate melts evenly; this prevents grainy texture.
- Quick Work on Swirling: The fudge firms up fast off heat, so color and swirl swiftly to keep that beautiful flow.
- Warm Knife Slicing: Run your knife under warm water and dry it before slicing to get smooth edges without cracking.
- Cold Butter Cubes: Adding cold butter helps the fudge set with a nice firmness without being oily.
How to Serve Festive Christmas Swirl White Chocolate Fudge Recipe

Garnishes
I often top my fudge squares with a tiny sprinkle of crushed peppermint or a small edible glitter dust to really catch the light at parties. Sometimes, I even tuck a little fresh rosemary or a sprig of holly nearby for a rustic holiday feel — it’s all about making it look as festive as it tastes.
Side Dishes
This fudge pairs beautifully with a warm cup of spiced tea or rich coffee. For a full dessert spread, I serve it alongside gingerbread cookies and cranberry-orange bites to balance the richness with a hint of tartness.
Creative Ways to Present
One year, I packaged this fudge in clear holiday-themed boxes with little red ribbons — so cute and giftable! Another favorite is arranging the squares on a festive platter with pinecones and twinkle lights around for a stunning centerpiece that practically invites guests to dig in.
Make Ahead and Storage
Storing Leftovers
When I have leftovers, I store the fudge in an airtight container in the fridge, where it keeps beautifully for up to a week. The texture stays creamy but firm, perfect for nibbling anytime.
Freezing
I’ve frozen this fudge wrapped tightly in parchment paper and then foil, placed in a freezer-safe container. It keeps well for up to two months. Just thaw it overnight in the fridge to preserve the texture and flavor.
Reheating
I usually don’t reheat fudge, but if it’s too firm from the fridge, leaving it at room temperature for 15-20 minutes softens it nicely without losing that creamy bite. Avoid microwaving, which can melt and ruin the texture.
Frequently Asked Questions:
Gel food coloring is best because it provides vibrant colors without affecting the fudge’s consistency, unlike liquid dyes that can make it too runny.
Stir constantly while melting the chocolate mixture and avoid overheating. Removing from heat right when smooth helps prevent the sugar crystals from separating and the fudge becoming grainy.
Absolutely! For some extra crunch or a holiday twist, fold in crushed peppermint, chopped nuts, or sprinkles before swirling into the pan.
Use a sharp knife warmed under hot water and dried before slicing. This helps cut through the fudge cleanly without cracking or sticking.
Final Thoughts
This Festive Christmas Swirl White Chocolate Fudge Recipe holds such a special place in my holiday traditions—it’s quick to make, looks incredible, and tastes divine. Every year, bringing this to family gatherings feels like sharing a little bit of warmth and happiness, and I just know you’ll love it as much as I do. So, grab your apron and give it a go—you’re going to have so much fun swirling those colors and tasting pure festive bliss!
Print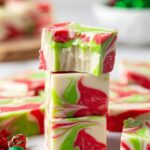
Festive Christmas Swirl White Chocolate Fudge Recipe
- Prep Time: 15 minutes
- Cook Time: 6 minutes
- Total Time: 2 hours 15 minutes
- Yield: 64 pieces
- Category: Dessert
- Method: Stovetop
- Cuisine: American
Description
This festive Christmas fudge is a creamy and colorful treat perfect for holiday celebrations. Made with white chocolate, sweetened condensed milk, and swirled with red and green gel food coloring, it creates a visually appealing and deliciously rich candy that’s easy to prepare and perfect for gifting or party platters.
Ingredients
Main Ingredients
- 22 oz white chocolate chips (2 11-oz. bags)
- 14 ounce can sweetened condensed milk
- 4 tablespoons unsalted butter, cold and cut into small cubes
Coloring
- ¼-½ teaspoon red gel food coloring (start with ¼ teaspoon and add more as needed)
- ¼-½ teaspoon green gel food coloring (start with ¼ teaspoon and add more as needed)
Instructions
- Prepare the Pan: Line an 8×8-inch straight sided baking pan with parchment paper, allowing enough overhang on the sides to lift the fudge out easily once set.
- Melt Ingredients: In a medium saucepan over medium-low heat, combine white chocolate chips, sweetened condensed milk, and cold butter cubes. Stir constantly for 6 minutes until the chocolate melts completely and the mixture is smooth. Remove from heat.
- Divide and Color Mixture: Transfer one third of the melted mixture to a small bowl, add red gel food coloring starting with ¼ teaspoon, and stir until uniform in color. In a second small bowl, add another third of the mixture and green gel food coloring, stirring until fully incorporated without streaks.
- Assemble Fudge Layers: Spoon dollops of white, red, and green fudge mixtures randomly into the prepared pan, using up all the fudge.
- Create Swirls: Use a wooden skewer or butter knife to gently swirl the colors into a decorative pattern on the fudge surface.
- Smooth Top: Gently press a small piece of parchment paper on the top of the fudge to smooth it out without disturbing the swirl pattern.
- Chill to Set: Refrigerate the fudge for 3 hours until fully set and firm.
- Slice and Serve: Lift the fudge out using the parchment overhang, place it on a cutting board, and slice into 64 one-inch squares. Serve and enjoy.
Notes
- Store fudge in an airtight container in the refrigerator for up to 1 week or freeze for up to 2 months. Thaw completely in the fridge before serving from frozen.
- Line the pan well with parchment or wax paper sprayed with cooking spray or butter for easy removal.
- Work quickly when mixing colors as the fudge thickens rapidly once removed from heat. Warm small bowls briefly if fudge firms too fast during assembly.
- Use a warm knife (run under hot water and dry) to slice fudge cleanly.
- Stir constantly while melting ingredients to prevent grainy texture from overheating.
- This fudge is rich, so cut into small pieces for serving.
Nutrition
- Serving Size: 1 piece (1x1 inch)
- Calories: 120 kcal
- Sugar: 18 g
- Sodium: 30 mg
- Fat: 6 g
- Saturated Fat: 4 g
- Unsaturated Fat: 1 g
- Trans Fat: 0 g
- Carbohydrates: 20 g
- Fiber: 0 g
- Protein: 1 g
- Cholesterol: 10 mg

Leave a Reply