There’s something about the soft, buttery crumb and sweet, smooth icing of these Festive Shortbread Cookies with Icing Recipe that makes any holiday moment instantly cozier. They’re simple to make but pack a beautiful, festive punch that’ll have everyone asking for more.

Jump to:
- Why You'll Love This Recipe
- Ingredients & Why They Work
- Make It Your Way
- Step-by-Step: How I Make Festive Shortbread Cookies with Icing Recipe
- Top Tip
- How to Serve Festive Shortbread Cookies with Icing Recipe
- Make Ahead and Storage
- Frequently Asked Questions:
- Final Thoughts
- Festive Shortbread Cookies with Icing Recipe
Why You'll Love This Recipe
I’ve been baking shortbread for years but these festive versions with icing and fun decorations really steal the show at parties and family gatherings. It’s a recipe that’s approachable for all skill levels but delivers that homemade charm you want to share.
- Perfect Texture: Buttery, tender shortbread with a melt-in-your-mouth crumb that’s just right every time.
- Easy Decorating: Simple icing and decorations that look festive but don’t take hours to perfect.
- Customizable: Tons of ways to change up the shapes, colors, and add-ons to make it your own.
- Great for Gifting: These cookies travel well and make for charming, thoughtful homemade gifts.
Ingredients & Why They Work
The magic here is in simple ingredients working together to create that classic shortbread flavor and texture, while the icing adds just enough sweetness and that beautiful glossy finish. Here’s why each piece matters:
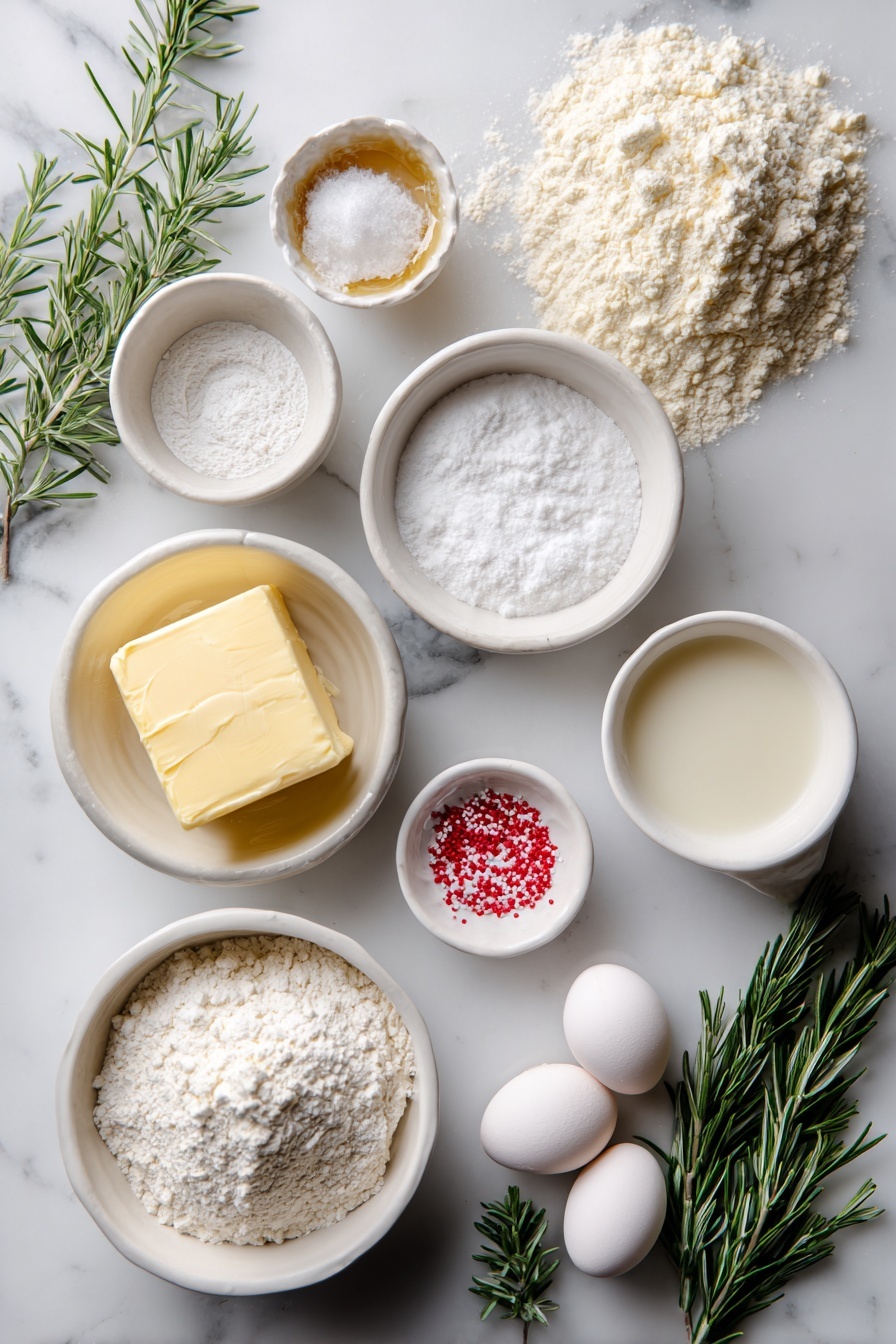
- Unsalted Butter: This is your base—room temperature helps it whip easily into a smooth dough with that rich flavor shortbread is known for.
- Powdered Sugar: Finer than granulated, it adds sweetness and tenderness without a gritty texture.
- Vanilla Bean Paste: Gives a natural vanilla flavor with those pretty flecks—way better than extract for flavor depth.
- Salt: Just a pinch to balance the sweetness and bring out buttery notes.
- All-Purpose Flour: The structure of your cookies. I like to use gluten-free if needed, but standard flour works beautifully.
- Cornstarch: Helps keep the cookies tender, preventing them from becoming too crumbly or tough.
- Powdered Sugar for Icing: For that smooth, sweet glaze that dries shiny and looks gorgeous.
- Vanilla Extract in Icing: To mirror the cookie’s flavor and keep the icing from being too plain.
- Milk: Just enough to thin the icing to the perfect dipping consistency.
- White Chocolate: Ideal for colorful festive details and a creamy finish when decorating.
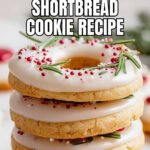
- Rosemary Sprigs, Sprinkles, and Sanding Sugar: These add beautiful, natural touches and sparkle without much fuss.
- Oil-Based Red Food Coloring: Crucial for coloring white chocolate—regular gel or water-based colors will seize it, trust me!
Make It Your Way
One of my favorite things about this Festive Shortbread Cookies with Icing Recipe is how easy it is to customize. I often switch up the shapes or the decorations based on what’s on hand or the season’s vibe—feel free to get creative!
- Variation: I love using peppermint extract instead of vanilla for a holiday twist that pairs beautifully with the rosemary and red sprinkles.
- Dietary Options: Gluten-free flour works wonderfully here, and you can swap dairy butter for plant-based alternatives to make it vegan-friendly.
- Color Play: Try green or gold food coloring in the white chocolate to match your holiday palette.
- Decorating Style: You can keep it rustic with just rosemary and sanding sugar, or go all out with intricate piping designs.
Step-by-Step: How I Make Festive Shortbread Cookies with Icing Recipe
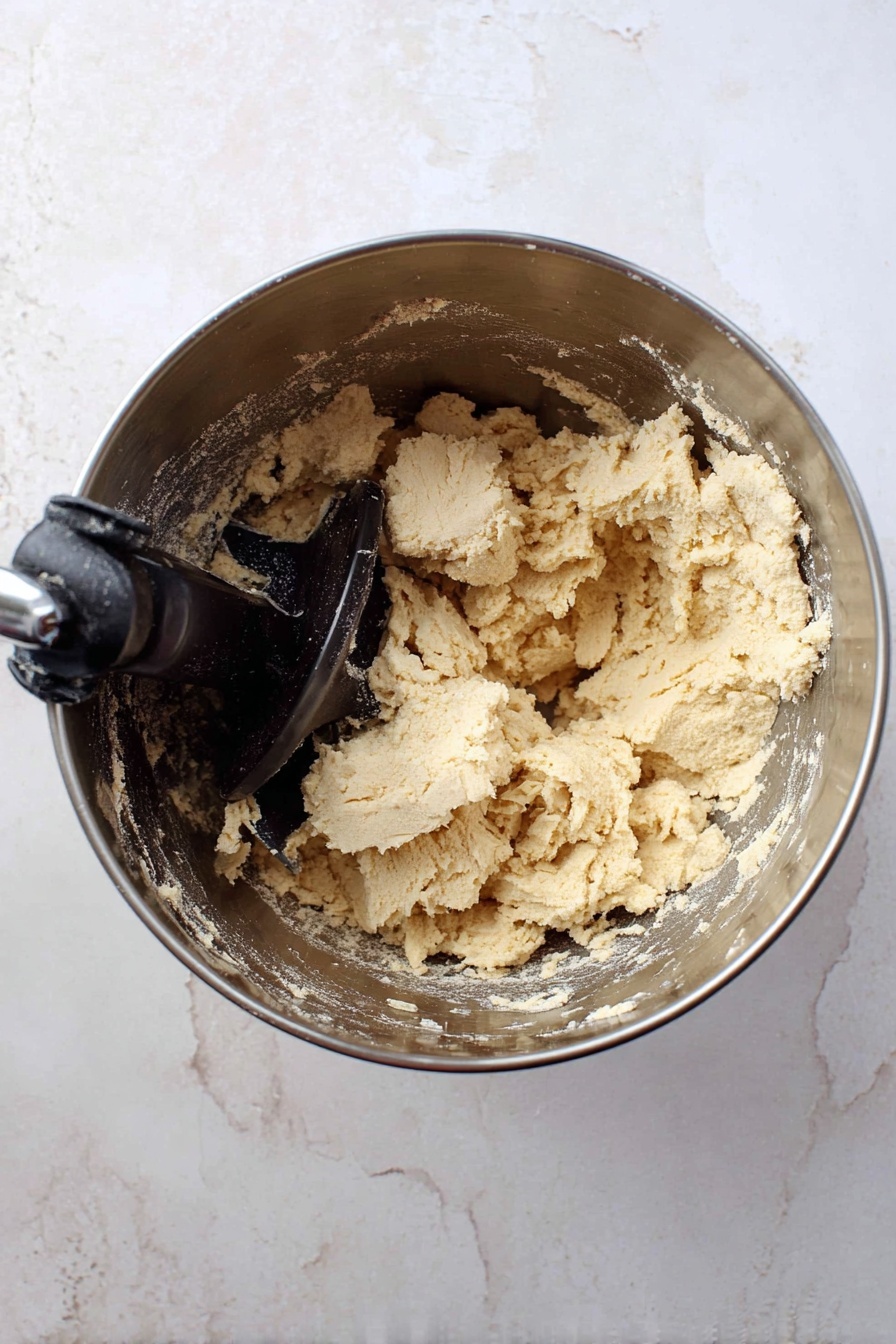
Step 1: Creaming the Butter and Sugar to Perfection
Start by beating room temperature butter on medium-high speed until it’s super smooth—this usually takes about 1-2 minutes. Then add the powdered sugar and mix again for a minute. Scrape down the bowl as needed to get everything evenly combined. This step sets the stage for tender, melt-in-your-mouth shortbread.
Step 2: Mix in Flavor and Flour
Next, add the vanilla bean paste and salt, beating just until incorporated. Now, lower your mixer speed and slowly add the flour and cornstarch. The dough will seem dry at first—don’t worry! Scrape down the sides and you’ll see it come together, pulling away from the bowl. Once it looks like a cohesive dough, wrap it and pop it in the fridge for 30 minutes to firm up.
Step 3: Rolling and Cutting Out the Cookies
Flour your surface generously and roll the chilled dough to about ¼-inch thickness. Use your favorite floured cookie cutters—round, scalloped, or festive shapes like wreaths. Don’t forget to save the scraps and reroll for more cookies; nothing goes to waste! Place them on a parchment-lined sheet about an inch apart and chill again for 15-30 minutes before baking.
Step 4: Baking Until Lightly Golden
Preheat your oven to 350°F (175°C). Bake the cookies for 8-10 minutes, rotating the tray halfway through for even baking. They should look set and just start to turn golden around the edges. Let them cool on the sheet for 5 minutes then move to a wire rack to cool completely—this is key for the icing to set properly.
Step 5: Dipping and Decorating with Icing
Whisk the powdered sugar, vanilla extract, and milk in a shallow bowl until smooth and lump-free. Carefully dip the cooled cookies upside down into the icing, one at a time. Let excess drip off—handle gently so the cookies don’t crack. Place decorated cookies on parchment to set.
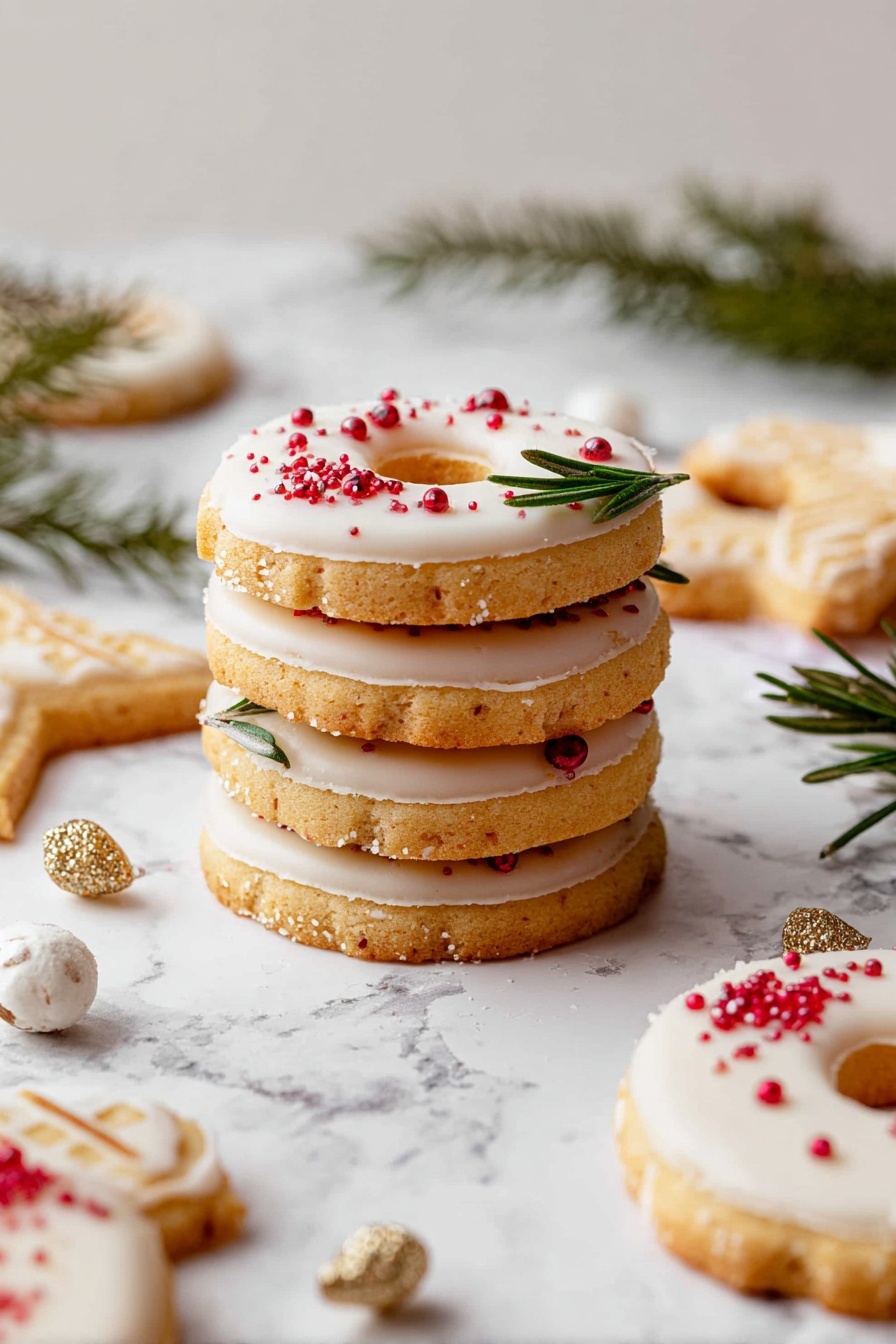
Step 6: Adding Festive Touches
For the wreath cookies, arrange small rosemary sprigs and red sprinkles into a pretty pattern before the icing dries. The rosemary adds a piney aroma that makes them smell as good as they look. For your Santa hats, melt white chocolate, tint part of it with oil-based red food coloring, and pipe on the shapes carefully. The contrast of red and white chocolate with sparkling sugar makes these cookies truly stand out on the platter.
Top Tip
Over the years of baking this Festive Shortbread Cookies with Icing Recipe, I’ve learned some tricks that save time and guarantee consistent results. These tips are my go-to essentials whenever I bake these treats:
- Keep Butter Soft but Not Melted: This makes it easier to cream and avoid greasy dough that won’t hold shape well.
- Chill Twice: Resting the dough before and after cutting helps the cookies keep their shape and bake evenly.
- Use Oil-Based Food Coloring: When coloring white chocolate, always opt for oil-based colors to prevent seizing and clumpy chocolate.
- Don’t Overbake: Removing cookies as soon as the edge color changes prevents them from drying out and keeps them tender.
How to Serve Festive Shortbread Cookies with Icing Recipe
Garnishes
I usually stick with fresh rosemary sprigs and a sprinkle of sanding sugar because it adds that perfect wintry sparkle and a gorgeous visual that’s still pretty natural. Tiny red sprinkles bring that holiday pop. Sometimes, I add crushed candy canes for a minty crunch that nails the festive vibe.
Side Dishes
These cookies are lovely alongside a warm cup of spiced tea or a rich hot chocolate. During holiday brunches, I serve them with fresh fruit and cheese platters—the buttery sweetness contrasts beautifully with sharp cheeses like aged cheddar or creamy brie.
Creative Ways to Present
For special occasions, I love arranging these cookies in a wreath shape on a large platter or stacking them in clear jars with ribbons tied around the lids. You can also place them on festive trays lined with parchment and scatter pine cones or small ornaments around—makes for an Instagram-worthy holiday table!
Make Ahead and Storage
Storing Leftovers
I keep my decorated cookies in an airtight container at room temperature for up to five days. If you want to keep them fresh longer, just skip decorating and freeze the plain baked cookies. When ready, thaw completely before adding icing and decorations.
Freezing
I’ve had great success freezing both unbaked dough and baked cookies. For dough, I roll it into a log or flatten it into discs, then wrap tightly and freeze for up to 3 months. You can slice or roll out dough directly from frozen for quick baking. For baked cookies, wrap them well and freeze undecorated, then decorate once thawed.
Reheating
If you want to freshen up the cookies after storage, just pop them in a preheated oven at 300°F for 5 minutes. This warms them through and revives that tender crumb without melting any icing too much.
Frequently Asked Questions:
Absolutely! Swap out the unsalted butter for a plant-based vegan butter that works well for baking. Just make sure your substitute behaves similarly, so the dough rolls and bakes nicely.
Rolling the dough to about ¼ inch thickness is ideal. It ensures the shortbread is tender without getting too crispy or fragile, and it holds up nicely to decorating and handling.
I don’t recommend gel or water-based food colorings for tinting white chocolate; they tend to seize the chocolate, making it grainy and unusable. Stick with oil-based coloring for smooth results.
When stored in an airtight container at room temperature, these iced cookies last about 5 days. Beyond that, the texture and icing quality can start to decline, so enjoying them fresh is best!
Final Thoughts
This Festive Shortbread Cookies with Icing Recipe has become my go-to for holiday gatherings because it’s reliable, delicious, and feels so special without being complicated. I love sharing them with friends and family—they bring a smile every time. I can’t wait for you to try these and make your own festive memories with them!
Print
Festive Shortbread Cookies with Icing Recipe
- Prep Time: 15 minutes
- Cook Time: 10 minutes
- Total Time: 1 hour 10 minutes
- Yield: 20 cookies
- Category: Dessert
- Method: Baking
- Cuisine: American
- Diet: Vegetarian
Description
Delightful shortbread cutout cookies perfect for festive occasions, featuring a tender buttery base with sweet vanilla icing and decorative touches like rosemary wreaths and white chocolate Santa hats.
Ingredients
Cookie Dough
- 1 cup unsalted butter room temperature
- ¾ cup powdered sugar
- 1 Tablespoon vanilla bean paste
- ¼ teaspoon salt
- 2 cups all purpose flour gluten free if needed
- 1 Tablespoon cornstarch
Icing
- 1 cup powdered sugar
- ½ teaspoon vanilla extract
- 2 Tablespoons milk
Decorations
- 4 ounces white chocolate
- Rosemary sprigs, sprinkles, sanding sugar for decorating
- Red food coloring oil-based
Instructions
- Make the Dough: Add the butter to the bowl of a stand mixer or large bowl with an electric mixer and beat on medium-high speed for 1-2 minutes until smooth. Scrape down the sides, add powdered sugar, and beat again for 1 minute.
- Combine Ingredients: Add vanilla bean paste and salt, beat until incorporated, scraping the bowl as needed. Add flour and cornstarch and beat on medium-low until dough forms, scraping down sides and continuing to mix until the dough pulls away from the bowl. Cover with plastic wrap and chill for 30 minutes.
- Roll and Cut: Line a baking sheet with parchment paper. Flour a work surface and roll dough to ¼ inch thick. Use floured round cookie cutters to cut out cookies and wreath shapes. Gather scraps and re-roll as needed. Arrange cookies 1 inch apart on baking sheet and chill for 15-30 minutes.
- Bake Cookies: Preheat oven to 350°F. Bake for 10 minutes, rotating halfway through, until edges are set and lightly golden. Cool on baking sheet 5 minutes, then transfer to wire rack to cool completely.
- Prepare Icing: Whisk powdered sugar, vanilla extract, and milk in a shallow dish until smooth and lump-free. Dip cooled cookies upside down into icing carefully and lift out gently.
- Decorate Wreaths: Place rosemary sprigs on cookies and sprinkle before icing sets. Add 2-3 small rosemary pieces on each side and 3 red sprinkles underneath plus more sprinkles around the cookie for decoration.
- Decorate Santa Hats: Let remaining cookies set on the baking sheet. Melt white chocolate and place some in a pastry bag. Mix remaining white chocolate with red oil-based food coloring and fill another piping bag. Use small tips to pipe hat shapes by swirling back and forth, add white chocolate details for the rim and top, then sprinkle sanding sugar. Optionally, use green food coloring to create Christmas tree shapes.
Notes
- Store cookies in an airtight container at room temperature for up to 5 days.
- For longer storage, freeze baked undecorated cookies up to 3 months; thaw before decorating.
- You can also freeze rolled dough up to 3 months and bake directly from frozen.
- Use oil-based food coloring with white chocolate to avoid seizing; water-based colorings like gel will cause the chocolate to seize.
Nutrition
- Serving Size: 1 cookie
- Calories: 150 kcal
- Sugar: 10 g
- Sodium: 60 mg
- Fat: 9 g
- Saturated Fat: 5 g
- Unsaturated Fat: 3 g
- Trans Fat: 0 g
- Carbohydrates: 15 g
- Fiber: 0.5 g
- Protein: 1 g
- Cholesterol: 25 mg


Leave a Reply