There’s something truly nostalgic and satisfying about making your own candy from scratch — the glossy, crackly texture, the burst of flavor. This Hard Tack Candy Recipe is a classic that’s surprisingly easy and yields deliciously crisp, brightly flavored treats every time.

Jump to:
Why You'll Love This Recipe
I’ve always loved how hard tack candy captures that perfect snap and how customizable it is with different flavors and colors. It’s a fun project that feels a little vintage but yields candy that tastes anything but old-fashioned.
- Simple Ingredients: You only need a handful of pantry staples to create candy that looks gourmet.
- Perfect for Gifts: Handmade candy always wows friends and family—it’s personal and delicious.
- Customizable Flavors: Whether you love mint, cherry, or something tropical, you can tailor the candy to your palate.
- Great for Beginners: This Hard Tack Candy Recipe walks you through the crucial stages with tips for success.

Ingredients & Why They Work
Each ingredient plays a key role in getting that shiny, glass-like candy that snaps just right. Here’s why I love these basics and how they come together.

- Sugar: The main sweetener that crystallizes into the hard candy texture.
- Light Corn Syrup: Helps prevent unwanted crystallization and keeps the candy smooth.
- Water: Dissolves the sugar and corn syrup evenly to start the cooking process.
- Food Coloring: Adds vibrant, fun hues—pick colors that brighten your candy tray.
- Oil Flavorings: These concentrated flavors make your candy uniquely yours, from fruity to minty options.
- Powdered Sugar: Keeps the candy pieces from sticking and finishes with a delicate dusting.
Make It Your Way
One of my favorite things about this Hard Tack Candy Recipe is how easy it is to tweak. I usually start with classic cherry and peppermint, but experimenting with tropical or holiday-themed flavors keeps things exciting. Feel free to get creative!
- Variation: Once, I tried this with a splash of lavender oil flavoring, and it was surprisingly delightful and subtle—perfect for gifting to friends who like floral notes.
Step-by-Step: How I Make Hard Tack Candy Recipe
Step 1: Combine Sugars and Water Gently
Start by mixing your sugar, light corn syrup, and water in a heavy non-stick pan over medium heat. Stir it gently until all the sugar dissolves completely — you’ll know because the mixture turns clear and smooth. After that, resist the urge to stir anymore; letting it boil undisturbed helps keep your candy crystal-clear and silky.
Step 2: The Science of Boiling
Keep that mixture boiling vigorously until your candy thermometer hits about 260°F (the “hard ball” stage). Right then, add your food coloring — no stirring needed, the bubbling does the work mixing it in perfectly. I find this part thrilling because the syrup starts changing and you know candy magic is happening.
Step 3: Reach the Hard Crack Stage
Keep boiling until the thermometer hits 300°F. This is called the hard crack stage, where your candy will snap crisply when it cools. Remove the pan from heat right away and let the bubbles settle naturally—don’t stir yet. It’s important not to rush or over-stir here to avoid grainy candy.
Step 4: Flavor and Pour
Now stir in your chosen oil flavorings with a wooden spoon. I’ve learned that wooden spoons don’t conduct heat too quickly so they’re perfect here. Pour the hot candy onto a well-greased or powdered sugar-coated cookie sheet. This helps the candy release easily once it cools.
Step 5: Cool and Break
Let the candy cool completely on the counter—avoid the fridge because rapid cooling can cause it to crack badly or cloud. Once set, take a knife or similar utensil and smash the candy into rustic chunks. Pop those into a zip-top bag with a tablespoon of powdered sugar and shake well to keep them from sticking.
Top Tip
From my candy-making experience, a few small tricks helped me avoid sticky disasters and get that perfect glassy finish every time you make this Hard Tack Candy Recipe. These tips might save you some frustration and make your candy look as good as it tastes.
- Use a Candy Thermometer: It’s the only way to know when you’ve hit the right temperature—candies fail when under or overcooked.
- Don’t Stir During Boiling: Stirring after the sugar dissolves causes crystallization, making your candy grainy.
- Choose Flavor Oils Wisely: A little goes a long way — start with a drop or two to avoid overwhelming the candy.
- Cool on the Counter: Rapid cooling in the fridge can cause cracking and cloudiness, so be patient!
How to Serve Hard Tack Candy Recipe

Garnishes
I love dusting the candy pieces lightly with powdered sugar or even sanding sugar for a little sparkle. Sometimes, if I’m feeling fancy, I’ll sprinkle crushed peppermint or edible glitter on top before it cools for festive presentations.
Side Dishes
This candy pairs wonderfully with hot drinks like tea, coffee, or warm cider. I’ve also set out bowls alongside cookies or fudge at holiday gatherings, making for a delightful sweet treat spread.
Creative Ways to Present
For parties, I like arranging hard tack candy in clear jars with ribbons tied around for instant gifts. Wrapping pieces individually in wax paper also adds a charming handmade vibe that guests appreciate.
Make Ahead and Storage
Storing Leftovers
I keep leftover candy in an airtight container or a zip-top bag with powdered sugar to prevent sticking. Stored this way at room temperature, the pieces stay fresh and crunchy for weeks—perfect for nibbling long after the initial batch.
Freezing
While I haven’t personally frozen hard tack candy, from what I’ve seen, it’s best stored in an airtight container and frozen only if you want to keep it very long-term. When thawed, it should retain the same crisp texture.
Reheating
This candy isn’t ideal for reheating like fudges or caramels. If you want softer candy pieces, you could briefly warm small chunks in the microwave (a few seconds at a time) but be careful not to melt them completely.
Frequently Asked Questions:
Regular flavor extracts tend to have a higher water content and can interfere with the candy’s texture, making it sticky or cloudy. Oil flavorings are concentrated and don’t add moisture, so they’re the best choice for this Hard Tack Candy Recipe.
This usually happens if the sugar crystals aren't fully dissolved or if you stir the syrup while it’s boiling, which encourages crystallization. Following the stirring guidelines and using a candy thermometer will help you avoid this.
Since this is a hard candy, adding nuts or chunks can disrupt the texture and may cause uneven hardening. However, you could sprinkle finely crushed nuts on top right after pouring the candy for a bit of crunch.
Stored in an airtight container at room temperature with a bit of powdered sugar to prevent sticking, hard tack candy can last several weeks while retaining its texture and flavor.
Final Thoughts
This Hard Tack Candy Recipe holds a special place in my kitchen because making candy yourself feels so rewarding—and it’s a fantastic gift that shows you care. It’s simple enough to try right away but versatile enough to become your own signature treat. I hope you’ll enjoy making (and sharing!) this timeless candy as much as I do.
Print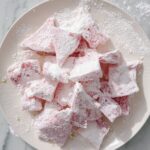
Hard Tack Candy Recipe
- Prep Time: 5 minutes
- Cook Time: 20 minutes
- Total Time: 1 hour 25 minutes
- Yield: 40 pieces
- Category: Dessert
- Method: Stovetop
- Cuisine: American
Description
Classic hard tack candy recipe featuring a sweet, crunchy texture with customizable flavors and colors. This traditional candy is simple to make with basic ingredients and perfect for gifting or enjoying as a nostalgic treat.
Ingredients
Main Ingredients
- 3¾ cups sugar
- 1½ cups light corn syrup
- 1 cup water
- 1 teaspoon food coloring
- 1 bottle oil flavorings (variety)
- 1 tablespoon powdered sugar
Instructions
- Combine Ingredients: Mix the corn syrup, sugar, and water in a non-stick pan on the stove until combined.
- Dissolve Sugar: Turn heat to medium and stir continuously until the sugar is completely dissolved. Stop stirring after this point to prevent crystallization.
- Boil Mixture: Allow the mixture to come to a rolling boil. When the candy thermometer reads 260 degrees Fahrenheit, carefully add the food coloring without stirring.
- Reach Hard Crack Stage: Continue boiling the mixture without stirring until the temperature reaches 300 degrees Fahrenheit, then remove from heat and let the boiling subside completely.
- Add Flavorings: Stir in the chosen oil flavorings using a wooden spoon to evenly distribute the flavor.
- Pour Candy: Pour the hot mixture onto a large cookie sheet that is either well greased or coated with powdered sugar to prevent sticking.
- Cool and Set: Allow the candy to cool at room temperature without refrigeration until fully set and hardened.
- Break Candy: Once set, use a knife or similar object to break the candy into bite-sized chunks.
- Coat with Powdered Sugar: Place the candy pieces into a ziplock bag with 1 tablespoon of powdered sugar and shake well to coat and prevent sticking.
Notes
- Do not stir the mixture after it reaches the boiling stage to avoid crystallization and grainy texture.
- The candy thermometer is essential to achieve the hard crack stage precisely for the perfect crunch.
- Use oil-based flavorings only to prevent texture issues with the candy.
- Greasing the pan or coating with powdered sugar ensures easy removal of the candy after setting.
- Store the candy in an airtight container to keep it crisp and prevent moisture absorption.
Nutrition
- Serving Size: 1 piece
- Calories: 60 kcal
- Sugar: 15 g
- Sodium: 5 mg
- Fat: 0 g
- Saturated Fat: 0 g
- Unsaturated Fat: 0 g
- Trans Fat: 0 g
- Carbohydrates: 15 g
- Fiber: 0 g
- Protein: 0 g
- Cholesterol: 0 mg

Leave a Reply