Nothing beats the comfort of a classic dessert, and this Homemade Banana Pudding Recipe is exactly that—its creamy layers and fresh bananas come together to create a truly special treat that feels like a warm hug in every spoonful.

Jump to:
Why You'll Love This Recipe
I’ve made dozens of banana puddings, but this recipe instantly became my go-to because it’s not just quick—it’s loaded with layers of flavor and texture that feel homemade, never artificial or heavy.
- Rich, Homemade Pudding: The pudding uses egg yolks and cornstarch to get that perfectly silky texture that’s so much better than instant pudding mixes.
- Balanced Sweetness: With vanilla bean paste and a touch of banana extract, the sweetness isn’t overpowering but wonderfully nuanced.
- Fun Creamy Topping: Cream cheese blended with Cool Whip and sweetened condensed milk makes the topping light but indulgent—a perfect contrast.
- Endless Assembly Options: Whether you love layered parfaits or a big trifle, this recipe adapts easily to your favorite way to serve banana pudding.

Ingredients & Why They Work
Each ingredient plays a crucial role in building that iconic banana pudding taste and texture. I always recommend using the best quality milk and fresh bananas because they truly enhance the flavor.

- Whole Milk: Provides a creamy base that's rich but not too heavy—essential for smooth pudding.
- Heavy Whipping Cream: Adds luscious creaminess, boosting texture and richness.
- Bourbon (Optional): Adds a subtle, warming depth—feel free to skip if you prefer.
- Egg Yolks: Key for thickening and that almost custard-like creaminess.
- Vanilla Bean Paste: So much more flavorful than vanilla extract, it gives a luxurious vanilla aroma and specks of real vanilla.
- Cornstarch: Thickens the pudding just right without any graininess.
- Caster Sugar: Dissolves quickly for smooth sweetness.
- Salted Butter: Enriches the pudding and balances the sweetness with a touch of saltiness.
- Banana/Banana Cream Extract: Amplifies the banana flavor to brighten the whole dessert.
- Cream Cheese: In the topping, it adds tang and creaminess that cuts through the sweetness.
- Cool Whip: Lightens the topping, making it airy and soft.
- Sweetened Condensed Milk: Gives the topping sweetness and a creamy texture that holds up well.
- Nilla Wafers: Classic banana pudding cookie that adds a crunchy, buttery layer.
- Bananas: Fresh slices provide sweet, natural fruit flavor and soft texture between the creamy layers.
- Fresh Mint Leaves (optional): A fresh herbaceous touch to brighten the presentation and add aroma.
Make It Your Way
This Homemade Banana Pudding Recipe feels flexible to me — I love tweaking it to fit different moods or occasions. You should definitely give your own spin a try!
- Variation: Once, I swapped the Nilla wafers with graham crackers for a slightly different crunch and flavor; it was a hit at a summer picnic!
- Dairy-Free Twist: For a vegan or dairy-free version, I’ve experimented with coconut milk and dairy-free cream cheese — just remember pudding might be a bit softer.
- Spiked Version: Adding bourbon to the pudding is my favorite adult upgrade—just a tablespoon as the recipe says adds warmth without overpowering the bananas.
- Presentation Style: Try layering it in individual glasses for a pretty party dessert that’s easy to serve and fewer crumbs afterward!
Step-by-Step: How I Make Homemade Banana Pudding Recipe
Step 1: Gently Warm Your Dairy and Bourbon
In a saucepan over medium-high heat, I combine the milk, heavy cream, and bourbon (if I’m using it). I carefully bring it to a simmer, just before it starts bubbling—usually about 5 to 7 minutes. This slow warming helps the flavors meld without scalding the milk.
Step 2: Whisk Together Your Egg Yolk Mixture
While the dairy heats, I whisk the egg yolks with vanilla bean paste, cornstarch, and sugar in a separate bowl until it’s smooth and pasty. This stage is crucial because it’s the base of your pudding—smoothness here means silky pudding texture later.
Step 3: Temper the Egg Yolks
This step helps avoid scrambled eggs in your pudding. I slowly add a tablespoon of the hot cream mixture into the yolks while whisking vigorously, repeating this 2 to 3 times. That gradually raises the temperature of the yolks safely.
Step 4: Cook the Pudding Until Thickened
After tempering, I pour the egg yolk mixture back into the saucepan with the warm milk mixture. I whisk constantly over medium heat for about 4-5 minutes until the pudding thickens and coats the back of a spoon. Then I take it off the heat and stir in the butter cubes and banana extract for richness and flavor.
Step 5: Chill the Pudding to Set
I pour the pudding into an airtight container, pressing cling wrap directly onto its surface to stop skin from forming. Then it goes into the fridge for at least 4 hours—overnight is even better for flavors to deepen and the pudding to set perfectly.
Step 6: Make the Creamy Topping
For the topping, I beat room temperature cream cheese, Cool Whip, sweetened condensed milk, and vanilla bean paste together with a handheld mixer until everything’s dreamy smooth and fluffy. This topping adds that signature light creaminess banana pudding fans adore.
Step 7: Assemble and Chill Before Serving
I build layers in my chosen dish: pudding, Nilla wafers, creamy topping, and banana slices—then repeat until everything’s used up, finishing with a topping layer and some wafer crumbs. Chill for at least an hour so the wafers soften ever so slightly but still hold their shape. That’s when it tastes absolute perfection!
Top Tip
Through several attempts, I’ve realized that patience is the real secret to fantastic banana pudding. Rushing the chilling or skipping the tempering step often leads to disappointing texture, so taking your time pays off big.
- Slowly Temper the Egg Yolks: Pouring hot milk into the yolks in small increments prevents them from scrambling, ensuring a silky pudding.
- Use Fresh Bananas: Overripe bananas can become mushy quickly; firm but ripe bananas give the best texture and sweeter flavor.
- Seal Your Pudding Surface: Pressing cling wrap right on top avoids the annoying pudding skin and keeps it smooth.
- Chill Long Enough: Refrigerate the pudding for at least 4 hours, preferably overnight, so it thickens fully and flavors develop.
How to Serve Homemade Banana Pudding Recipe

Garnishes
I always add a sprig of fresh mint leaves to brighten up the rich dessert visually and aromatically—it’s such a simple touch but feels refreshing against the creamy sweetness. You can also sprinkle some crushed Nilla wafers or a light dusting of cinnamon for extra texture.
Side Dishes
This banana pudding pairs beautifully with a light summer salad or grilled chicken for a balanced meal. If you’re serving it at a party, fresh fruit platters or a tangy citrus sorbet complement its richness wonderfully.
Creative Ways to Present
I like assembling this pudding in clear glass parfait dishes layered carefully so everyone can admire the vibrant banana slices and creamy layers. For special occasions, serving it in mason jars tied with a rustic ribbon turns simple dessert into a charming gift or party favor!
Make Ahead and Storage
Storing Leftovers
I cover leftover banana pudding tightly with plastic wrap or an airtight lid and refrigerate it for up to 3 days. The wafers continue to soften, making the pudding even creamier, but if you want to keep crunch, add fresh wafers right before serving.
Freezing
While you can freeze the pudding, I’ve found the texture changes a little—the creamy layers become slightly grainy after thawing. I prefer making smaller batches to enjoy fresh, but if you freeze, thaw overnight in the fridge for best results.
Reheating
This pudding tastes best cold, so I don’t recommend reheating. If you want a warm dessert, try gently warming a small portion in the microwave for 10-15 seconds, but avoid heating the entire pudding or you might lose that luscious texture.
Frequently Asked Questions:
Absolutely! In fact, I recommend making the pudding base a day ahead to let the flavors develop fully. Assemble it a few hours before serving and let it chill to get those perfect soft layers.
Pressing a piece of plastic cling wrap directly onto the surface of the pudding while it chills in the fridge prevents skin from forming. I never skip this step as it keeps the pudding silky smooth.
Egg yolks are essential for that thick, custardy texture, so I don’t recommend skipping them. However, for an egg-free version, using a high-quality instant banana pudding mix or cornstarch thickener could work, but the flavor and texture will be different.
To slow browning, slice bananas right before assembling and consider lightly tossing them in lemon juice. Also, assembling the pudding soon after slicing helps maintain their fresh look and flavor.
Final Thoughts
This Homemade Banana Pudding Recipe has a special place in my kitchen because it combines nostalgia with creativity. It’s approachable enough for weeknight dessert yet elegant enough to impress guests. I truly hope you give it a try and that it becomes your own favorite comfort dessert like it did mine!
Print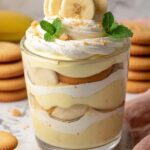
Homemade Banana Pudding Recipe
- Prep Time: 25 minutes
- Cook Time: 10 minutes
- Total Time: 35 minutes
- Yield: 6 servings
- Category: Dessert
- Method: Stovetop
- Cuisine: Southern American
- Diet: Vegetarian
Description
This homemade banana pudding recipe features a rich, creamy pudding made with milk, cream, egg yolks, and banana extract, layered with Nilla wafers and fresh bananas. Topped with a luscious cream cheese and Cool Whip mixture, it's a classic Southern dessert perfect for any occasion.
Ingredients
For the banana pudding:
- 2 cups whole milk
- 1 cup heavy whipping cream
- 1 tablespoon bourbon (optional)
- 5 large egg yolks
- 1 tablespoon vanilla bean paste
- ¼ cup cornstarch
- ½ cup caster sugar
- ¼ cup salted butter, cut into cubes
- 1 tablespoon banana or banana cream extract
For the creamy topping:
- 8 ounces full-fat brick cream cheese, room temperature
- 8 ounces Cool Whip, room temperature
- ½ cup sweetened condensed milk
- 1 tablespoon vanilla bean paste
For banana pudding assembly:
- 1 (11-ounce) box Nilla wafers
- 4 medium bananas, sliced into ½-inch thick slices
- Fresh mint leaves, for garnish (optional)
Instructions
- Heat dairy mixture: In a saucepan over medium-high heat, combine the whole milk, heavy cream, and bourbon if using. Heat until the mixture is barely hot and starting to simmer, about 7 minutes, but do not let it boil.
- Mix egg yolks and dry ingredients: In a medium bowl, whisk together the egg yolks, vanilla bean paste, cornstarch, and caster sugar until it forms a smooth, paste-like consistency.
- Temper egg yolks: Slowly add a tablespoon of the hot dairy mixture to the egg yolk mixture while stirring immediately to combine, and repeat this process 2 to 3 more times to temper the eggs and prevent curdling.
- Combine and thicken pudding: Remove the pan from heat but keep it on the stove. Pour the tempered egg yolk mixture into the hot cream mixture while whisking constantly to prevent the eggs from cooking, about 2 minutes. Return the pan to medium heat and continue whisking until the pudding thickens, about 5 minutes.
- Add butter and flavoring: Turn off the heat and stir in the cubed salted butter and banana extract until the butter melts completely and the pudding is smooth.
- Chill pudding: Transfer the pudding to an airtight container and press plastic wrap directly onto its surface to prevent a skin from forming. Cover and refrigerate until well chilled and thickened, about 4 hours or overnight for best results.
- Prepare creamy topping: In a large bowl, whisk together softened cream cheese, Cool Whip, sweetened condensed milk, and vanilla bean paste using an electric mixer or by hand until smooth and combined.
- Assemble banana pudding: In your chosen serving dish(es), layer pudding, Nilla wafers, creamy topping, and banana slices in that order. Repeat layers until the dish is filled, finishing with creamy topping and crushed wafers on top.
- Final chill and garnish: Refrigerate the assembled banana pudding for at least 1 hour before serving. Garnish with fresh mint leaves if desired. Serve and enjoy!
Notes
- Use full-fat dairy products for the creamiest texture and best flavor.
- Tempering the egg yolks is crucial to prevent curdling; add hot liquid slowly while whisking.
- If you don’t have vanilla bean paste, use pure vanilla extract as a substitute.
- For a boozy twist, bourbon is optional and enhances flavor but can be omitted.
- Assembling in individual glasses makes a great presentation for parties.
- Cover the pudding directly with plastic wrap to avoid a skin forming on the surface while chilling.
- Bananas brown quickly; slice just before assembling to keep them fresh looking.
- Leftover pudding can be stored covered in the refrigerator for up to 3 days.
Nutrition
- Serving Size: 1 cup
- Calories: 350 kcal
- Sugar: 32 g
- Sodium: 180 mg
- Fat: 20 g
- Saturated Fat: 12 g
- Unsaturated Fat: 6 g
- Trans Fat: 0 g
- Carbohydrates: 35 g
- Fiber: 2 g
- Protein: 5 g
- Cholesterol: 125 mg

Leave a Reply