There's something truly magical about the crisp chocolate-mint combo in this Homemade Thin Mint Cookies Recipe that reminds me of cozy afternoons and holiday baking sessions with family. These cookies offer that perfect balance of minty freshness and rich cocoa flavor, all wrapped up in a delicate crunch you'll want to bake again and again.

Jump to:
Why You'll Love This Recipe
I’ve been making this Homemade Thin Mint Cookies Recipe for years now, and it’s hands down one of my favorites when I want that mint-chocolate fix without buying the boxed version. The homemade element lets you control how bold that peppermint flavor hits, and the crunch is simply unbeatable.
- Authentic Flavor: The combination of real peppermint extract and cocoa powder gives you that iconic Thin Mint taste from scratch.
- Perfect Texture: Lightly crisp edges with just the right softness in the center, so every bite melts in your mouth.
- Customizable: You can tweak the mint intensity or chocolate coating to suit how you like it best.
- Holiday Favorite: These cookies make wonderful gifts or a festive treat to share with friends and family.
Ingredients & Why They Work
Each ingredient in this Homemade Thin Mint Cookies Recipe plays its part in creating that perfect balance of flavor and texture. I always recommend using high-quality cocoa powder and peppermint extract because they truly elevate the end result.
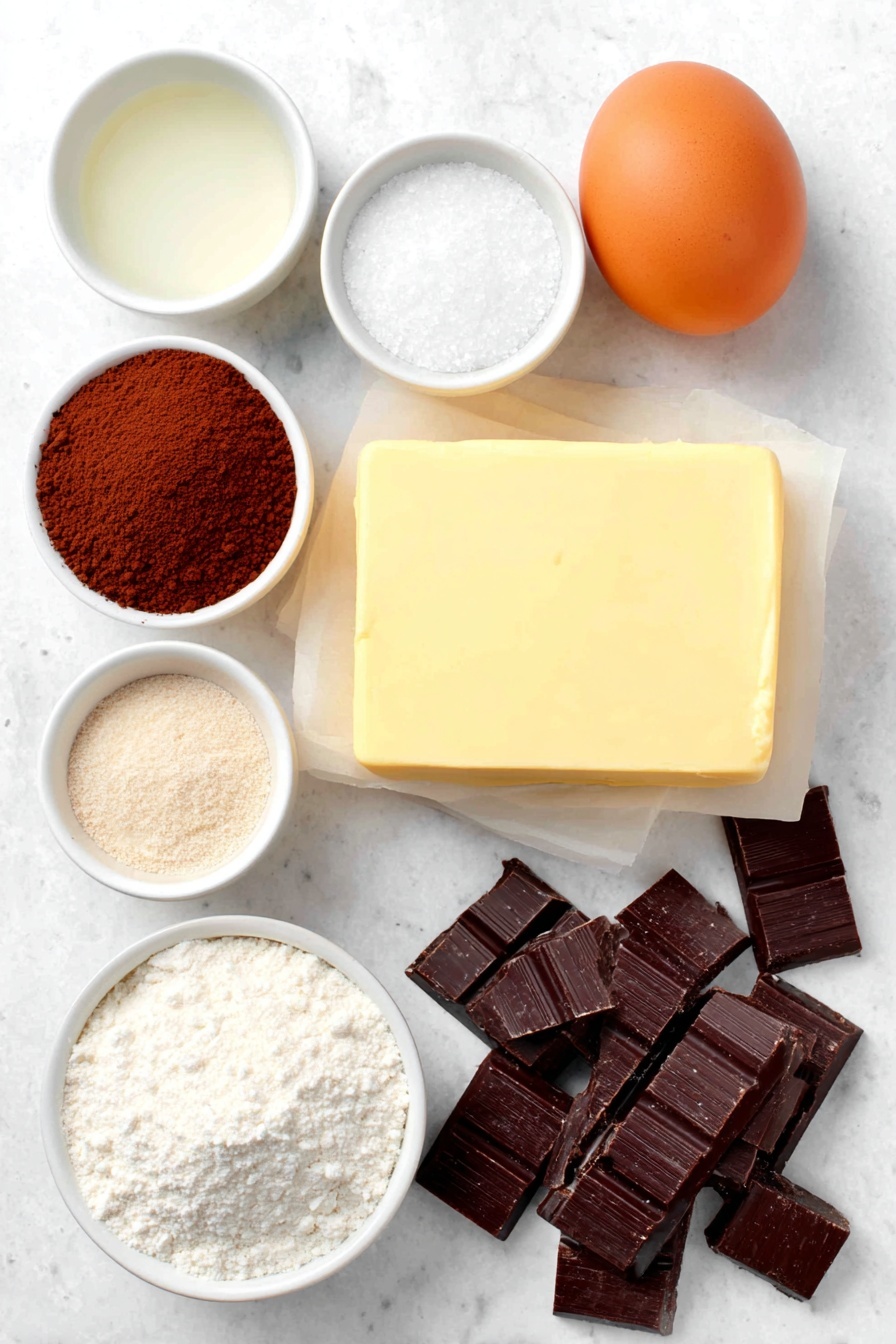
- Unsalted Butter: Softened to room temperature for easy creaming; this gives the cookies a tender crumb and rich flavor.
- Granulated Sugar: Adds sweetness and helps achieve that slight crispness on the cookie edges.
- Egg: Binds everything together and contributes moisture for the perfect bite.
- Vanilla Extract: Enhances the chocolate and mint flavors subtly without overpowering them.
- Peppermint Extract: The star of the show, lending that cool, refreshing mint flavor essential for authentic Thin Mints.
- All-Purpose Flour: Provides the necessary structure; spooning and leveling your flour ensures the right texture.
- Cocoa Powder: I prefer natural or Dutch-processed for a deep chocolate flavor that’s rich but never bitter.
- Baking Powder: Adds a slight lift, so your cookies are light instead of dense.
- Salt: Balances sweetness and intensifies the chocolate notes.
- Semi-sweet Chocolate: Melted for dipping to create that smooth, shiny coating with a hint of sweetness.
- Canola or Vegetable Oil: Mixed into the chocolate to help it melt smoothly and set with that perfect sheen.
Make It Your Way
I love how versatile this Homemade Thin Mint Cookies Recipe is — you can dial the peppermint up for a wintery blast or tone it down for a gentler touch. Plus, I sometimes try adding a little espresso powder for a mocha twist, which surprisingly works wonders.
- Variation: One time I swapped semi-sweet chocolate for dark chocolate in the coating — it gave the cookies a more sophisticated bitterness that my friends adored.
- Dietary Tip: You can experiment with gluten-free flour blends if you want to adapt this recipe, but be mindful that it may slightly change the texture.
- Slice & Bake: For a quicker option, try rolling dough into logs and slicing before baking — a neat way to save time without sacrificing flavor.
Step-by-Step: How I Make Homemade Thin Mint Cookies Recipe
Step 1: Cream Butter and Sugar until Fluffy
Start by beating your softened butter on medium speed for about a minute until it’s smooth and creamy. Then add granulated sugar and beat on medium-high until the mixture looks light and fluffy. This step is key for the perfect cookie texture—you’ll notice the batter lighten as you go, and that’s exactly what you want!
Step 2: Mix in Egg and Extracts
Next, beat in the egg along with the vanilla and peppermint extracts on high speed. I like to scrape down the bowl midway to make sure everything combines evenly. That peppermint extract is where this recipe really comes to life, so don’t skimp!
Step 3: Combine Dry Ingredients and Incorporate Gently
In a separate bowl, sift together your flour, cocoa powder, baking powder, and salt. Whisk to mix thoroughly. Then slowly add this dry mix to the wet ingredients on low speed. Mixing gently here avoids tough cookies — you want just combined dough.
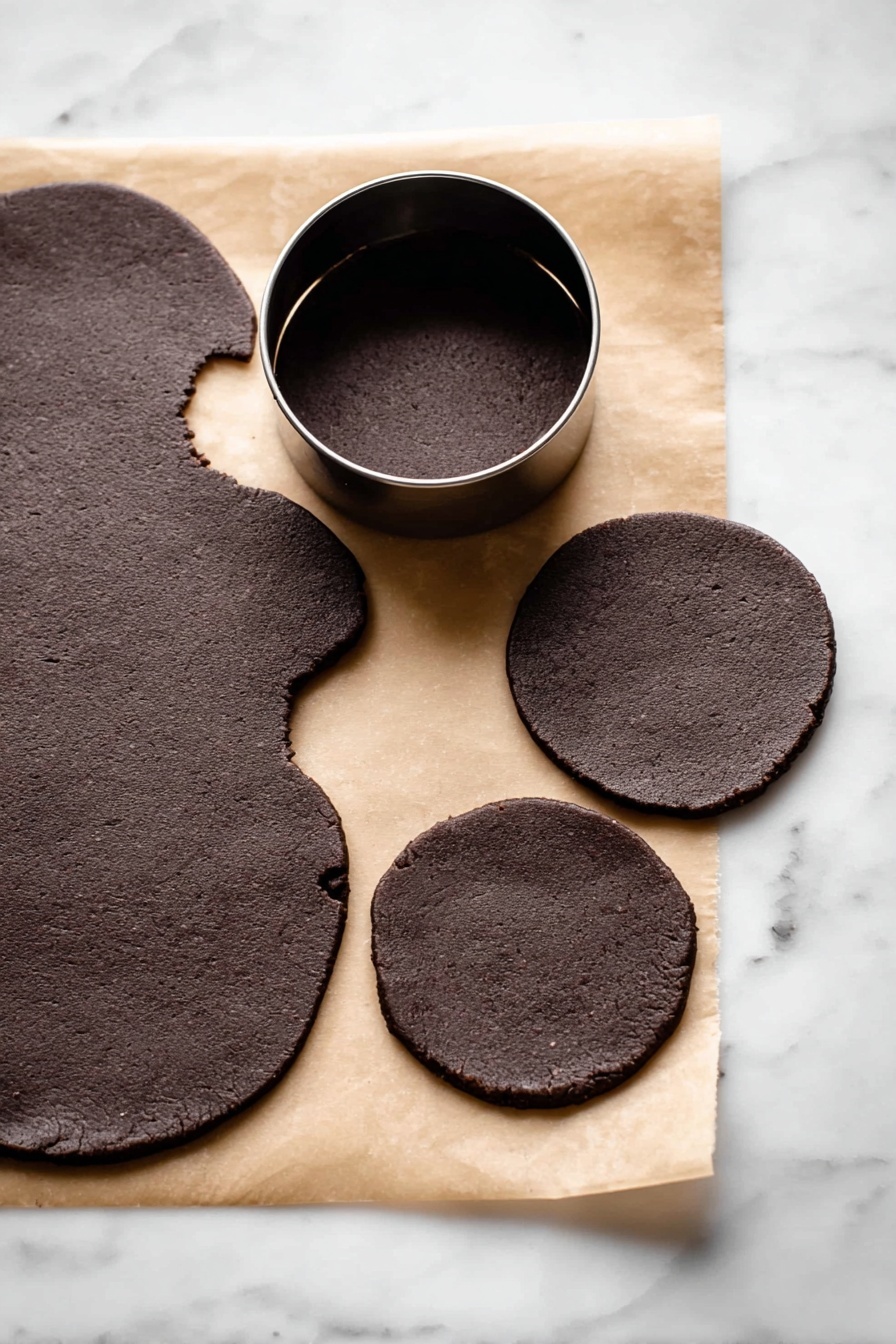
Step 4: Roll Out and Chill the Dough
I split the dough into two portions, rolling each between sheets of parchment to about ¼-inch thick. This chilling step is mandatory — it firms up the dough for crisp edges and makes cutting easier. I usually let it rest in the fridge for at least an hour, often overnight if I’m planning ahead.
Step 5: Cut, Bake, and Cool
Once chilled, preheat your oven to 350°F (177°C). Use a 2-inch round cookie cutter to cut shapes, then transfer them carefully to lined baking sheets. Remember to bake for 8 to 10 minutes until edges are set but centers are still soft. This is important because these cookies firm up on cooling. Rotate your baking sheets halfway through baking for evenness.
Step 6: Dip in Chocolate and Set
After cookies cool completely, melt your semi-sweet chocolate with a little canola oil to smooth it out. Stir in peppermint extract for that final minty kick. Dip each cookie fully, letting extra drip off before placing on parchment to set in the fridge. Watching these dry to a shiny finish feels so rewarding!
Top Tip
Making Homemade Thin Mint Cookies for me always involves a couple of little tricks I swear by — they make all the difference between a good cookie and a fantastic one.
- Soft Butter is Key: Never skip bringing the butter to room temperature; it blends better with sugar and creates a lighter dough.
- Don't Overmix After Adding Flour: Mixing until just combined keeps the cookies tender rather than tough.
- Mandatory Chilling: Chilling the dough for at least an hour helps keep the cookies from spreading and intensifies flavor.
- Even Chocolate Coating: Adding a bit of oil to your chocolate dip ensures a smooth finish that doesn’t crack or dull.
How to Serve Homemade Thin Mint Cookies Recipe

Garnishes
For me, these cookies are perfect just as they are, but I sometimes dust a tiny bit of crushed peppermint candy on top of the chocolate before it sets for an extra festive flair and crunchy surprise. It’s also fun to sprinkle a pinch of sea salt for a subtle salty-sweet balance.
Side Dishes
Pair these Homemade Thin Mint Cookies with a warm cup of peppermint tea or classic hot cocoa for the ultimate cozy treat experience. I also love serving them alongside a chilled glass of milk — it’s a timeless combo that never gets old.
Creative Ways to Present
During holidays, I've wrapped stacks of these cookies with festive ribbons and included them in clear cookie jars alongside sprigs of fresh mint leaves. They make charming gifts or beautiful additions to dessert tables when arranged on decorative platters.
Make Ahead and Storage
Storing Leftovers
I keep leftover Homemade Thin Mint Cookies at room temperature in an airtight container for up to 3 days — the chocolate stays firm but still melts delightfully in your mouth. If I want them longer-lasting, I pop the container in the fridge where they keep well for about a week, though I find the chilled version tastes especially refreshing.
Freezing
These cookies freeze beautifully. I place them in a single layer in a freezer-safe container with parchment paper between layers to prevent sticking. They keep for up to 3 months, and when I’m ready, I thaw them overnight in the fridge or eat them straight from the freezer — yes, they’re that good cold!
Reheating
If you want that freshly baked warmth, I gently reheat the cookies in a 300°F oven for just a few minutes — enough to warm without melting the chocolate coating too much. This hint of warmth brings out the mint and chocolate flavors wonderfully without making the cookies soft.
Frequently Asked Questions:
I recommend sticking with peppermint extract for this recipe because it has a cooler, fresher flavor that pairs perfectly with chocolate. Mint extract often tastes more like spearmint and can be overpowering or closer to toothpaste flavor, which isn’t quite what you want for Thin Mints.
Stored in an airtight container at room temperature, these cookies stay fresh for about 2 to 3 days. For longer storage, refrigerate them up to one week. They also freeze very well for up to 3 months.
Absolutely! The dough can be refrigerated for up to 2 days before rolling and baking. You can also freeze the dough in logs for up to 3 months, then thaw in the refrigerator overnight before slicing and baking.
Use a double boiler or microwave to melt quality semi-sweet chocolate with a bit of vegetable or canola oil. This makes the chocolate smoother and shinier. Dip cooled cookies completely, use a fork to lift them out, then gently tap the fork so excess chocolate drips off before setting the cookies on parchment to chill.
Final Thoughts
Making this Homemade Thin Mint Cookies Recipe is one of those baking joys I keep coming back to, especially when I want a treat that tastes like a homemade hug. I hope you find the same satisfaction baking (and munching!) on these cookies as I do. Seriously, once you try them, you might never look at store-bought Thin Mints the same way again — trust me, they're worth every delicious step.
Print
Homemade Thin Mint Cookies Recipe
- Prep Time: 2 hours 15 minutes
- Cook Time: 10 minutes
- Total Time: 3 hours 15 minutes
- Yield: 36 cookies
- Category: Dessert
- Method: Baking
- Cuisine: American
- Diet: Vegetarian
Description
Homemade Thin Mint Cookies are a delightful chocolatey treat infused with refreshing peppermint flavor. These crisp yet tender cookies are dipped in smooth semi-sweet chocolate with peppermint oil, capturing the essence of classic Thin Mints. Perfect for serving at parties, gifting, or enjoying as a special homemade snack.
Ingredients
Cookie Dough
- ¾ cup unsalted butter, softened to room temperature
- 1 cup granulated sugar
- 1 large egg, at room temperature
- 1 teaspoon pure vanilla extract
- ¼ teaspoon peppermint extract
- 1 and ½ cups all-purpose flour (spooned & leveled)
- ¾ cup unsweetened natural cocoa powder
- 1 teaspoon baking powder
- ⅛ teaspoon salt
Topping
- 14 ounces quality semi-sweet chocolate, coarsely chopped
- ½ teaspoon canola or vegetable oil
- ¼ teaspoon peppermint extract
Instructions
- Prepare the dough: In a large bowl, beat the softened butter using a handheld or stand mixer fitted with a paddle attachment on medium speed for 1 minute until smooth and creamy.
- Add sugar and flavorings: Add granulated sugar and beat on medium-high speed until fluffy and light in color. Mix in the egg, vanilla extract, and peppermint extract on high speed. Scrape down the bowl as needed to combine evenly.
- Combine dry ingredients: Sift together flour and cocoa powder in a medium bowl, then whisk in baking powder and salt until well combined.
- Mix dry into wet: Slowly add the dry mixture to the wet ingredients on low speed, mixing just until combined to form the cookie dough.
- Chill the dough: Divide dough into two equal parts, roll each into about ¼ inch thickness between parchment papers, stack with parchment between, place on a baking sheet, and refrigerate for at least 1 hour. Cover the top piece with parchment if chilling more than a couple hours, up to 2 days.
- Preheat oven and cut cookies: Preheat oven to 350°F (177°C). Line 2-3 baking sheets with parchment or silicone mats. Remove one dough piece from fridge and use a 2-inch round cookie cutter to cut circles, transferring to prepared baking sheets. Re-roll scraps for more cookies.
- Bake cookies: Bake for 10 minutes until edges appear set but centers remain soft. Rotate baking sheets halfway through. Let cookies cool on the sheet for 5 minutes, then transfer to wire racks to cool completely.
- Melt chocolate topping: Melt chopped semi-sweet chocolate with oil in a double boiler or microwave in 15-second increments, stirring until smooth. Stir in peppermint extract.
- Dip cookies: Dip each cooled cookie completely in chocolate, lift with fork and tap off excess. Place on parchment-lined sheet and refrigerate until chocolate sets.
- Store and enjoy: Store cookies covered at room temperature for 2-3 days or refrigerated for up to 1 week. Cookies can be enjoyed cold or straight from the freezer.
Notes
- Cookies freeze well up to 3 months; thaw overnight in refrigerator.
- Cookie dough can be chilled up to 2 days before baking or frozen for 3 months.
- Use peppermint extract, not mint extract, for authentic cool mint flavor.
- Slice ’n’ bake option: roll dough into 2-3 inch logs, chill, slice into 16-18 pieces, then bake.
- Use parchment paper or silicone mats to prevent sticking.
- Rotate baking sheets halfway for even baking.
Nutrition
- Serving Size: 1 cookie
- Calories: 150 kcal
- Sugar: 12 g
- Sodium: 50 mg
- Fat: 9 g
- Saturated Fat: 5 g
- Unsaturated Fat: 3 g
- Trans Fat: 0 g
- Carbohydrates: 17 g
- Fiber: 2 g
- Protein: 2 g
- Cholesterol: 20 mg


Leave a Reply