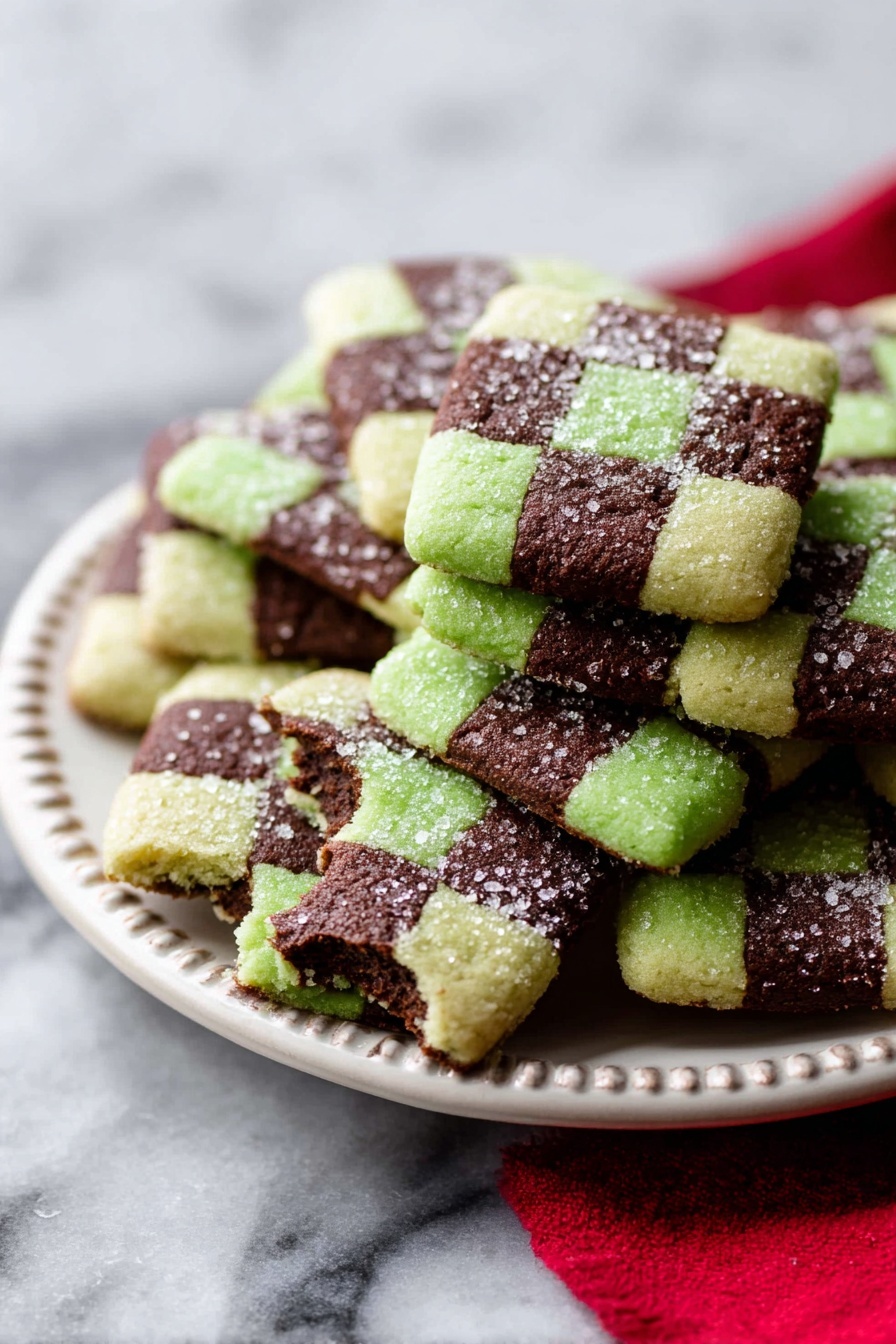
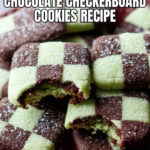
There’s something absolutely charming about those perfectly patterned treats that catch your eye and your heart, and that’s exactly why I love sharing this Mint Chocolate Checkerboard Cookies Recipe with you. These cookies blend fresh minty flavor with rich chocolate wrapped in a fun checkerboard design that’s as delightful to look at as it is to eat.

Jump to:
- Why You'll Love This Recipe
- Ingredients & Why They Work
- Make It Your Way
- Step-by-Step: How I Make Mint Chocolate Checkerboard Cookies Recipe
- Top Tip
- How to Serve Mint Chocolate Checkerboard Cookies Recipe
- Make Ahead and Storage
- Frequently Asked Questions:
- Final Thoughts
- Mint Chocolate Checkerboard Cookies Recipe
Why You'll Love This Recipe
I have to say, making these cookies is such a joyful experience. There’s this cool satisfaction in creating that checkerboard pattern, and the flavor combo of refreshing mint with deep chocolate is a total winner. Plus, they’re sturdy enough to hold up well—great for sharing or gifting.
- Striking Visual Appeal: The checkerboard pattern is impressive but not intimidating once you follow the steps carefully.
- Perfect Flavor Balance: Mint and chocolate come together in a way that’s refreshing without being overpowering.
- Flexible Dough Handling: The dough is pliable enough to shape easily, which helps in creating those clean edges you see.
- Great for All Occasions: Whether it’s a holiday party or a quiet afternoon treat, these cookies fit right in.
Ingredients & Why They Work
Every ingredient in this Mint Chocolate Checkerboard Cookies Recipe plays a starring role—some for texture, some for taste, and a few for that magical visual flair. Here’s a quick rundown on why each one matters and tips for picking the best versions when you shop.
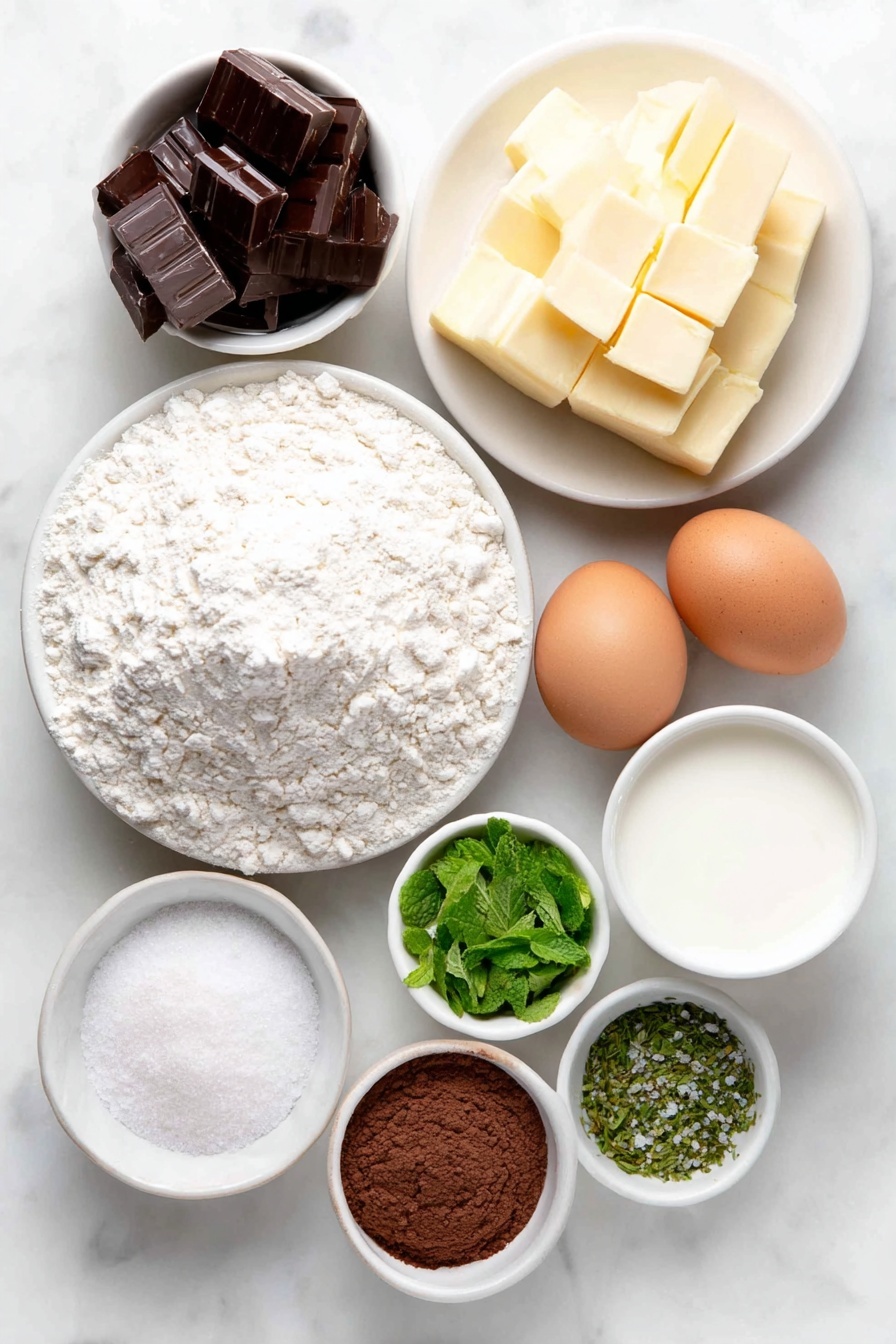
- All-purpose flour: The sturdy base that gives these cookies their classic texture — make sure to spoon and level for accuracy.
- Baking powder: Just a pinch to lend a subtle lift without affecting the texture.
- Salt: Crucial for balancing sweetness and enhancing all the flavors.
- Unsalted butter: Softened to room temperature for smooth creaming — quality butter here makes a world of difference.
- Granulated sugar: For sweetness and helping create those slightly crisp edges.
- Egg + egg yolk: Adds richness and binds everything together while keeping the cookies tender.
- Vanilla extract: Deepens flavor and complements both mint and chocolate brilliantly.
- Peppermint extract: The star for that unmistakable minty kick — start with a teaspoon and adjust if you like.
- Green food dye (optional): Adds that classic minty color, but you can skip if you prefer natural-looking cookies.
- Cocoa powder: Use good quality unsweetened cocoa for rich chocolate flavor; Dutch-process adds a smoother taste.
- Milk: Helps soften the chocolate dough for easy shaping and better texture.
- Espresso powder (optional): Enhances the chocolate notes subtly—trust me, it’s worth it!
Make It Your Way
One of the joys of this Mint Chocolate Checkerboard Cookies Recipe is how easy it is to make it your own. Whether you want to dial up the minty freshness or add your favorite twist, I've found a few ways to play around and still nail the classic checkerboard look.
- More Mint, Please: I sometimes add an extra half teaspoon of peppermint extract when I want a sharper mint flavor, especially during winter holidays. Just don’t go overboard or the mint can overpower the chocolate.
- Chocolate Variations: Swap cocoa powder for melted dark chocolate in the dough for a fudgier texture—though it makes shaping a bit trickier.
- Natural Coloring: Instead of artificial food coloring, try finely chopped fresh mint or a bit of spirulina powder for a green hue without additives.
- Dietary Tweaks: Using a butter substitute or egg replacer can work if you’re vegan, but expect slight differences in texture and shaping — I recommend chilling a bit longer!
Step-by-Step: How I Make Mint Chocolate Checkerboard Cookies Recipe
Step 1: Whisk Dry Ingredients & Cream Butter
I start by whisking the flour, baking powder, and salt together—this keeps everything airy and evenly mixed. Then, in my stand mixer, I beat the softened butter and granulated sugar on medium-high for about three minutes until it’s light and fluffy. This step is super important; properly creamed butter and sugar mean a tender, melt-in-your-mouth cookie, so don’t rush it!
Step 2: Mix Wet Ingredients & Combine the Dough
Next, I add the whole egg, egg yolk, and vanilla extract, blending everything well for about a minute. Then I slowly add in those dry ingredients on low speed. The dough will get thick and sticky, which is perfect—this texture holds together well when shaping the checkerboard.
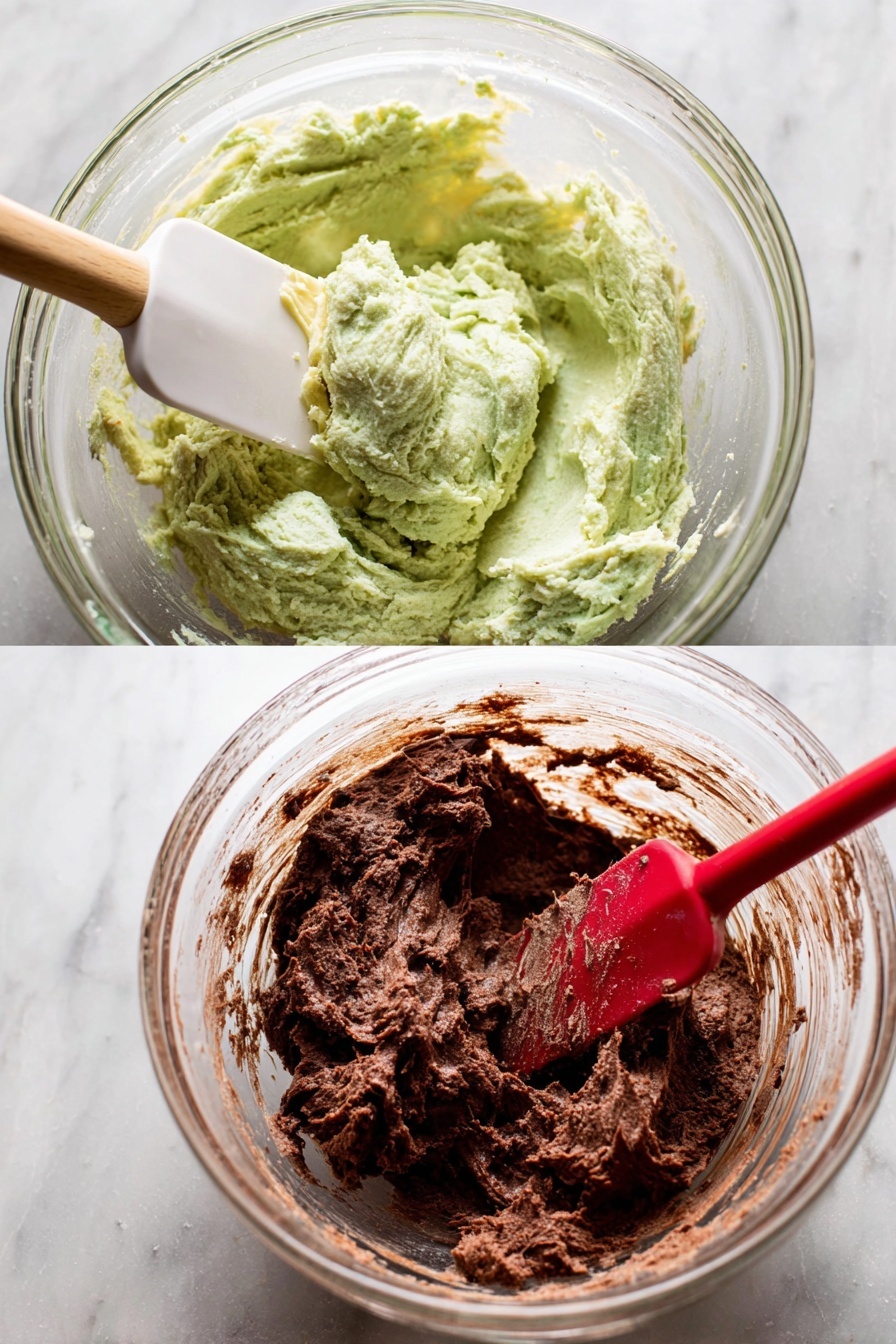
Step 3: Divide & Add Mint and Chocolate Flavors
I divide the dough into two halves. One half goes back into the bowl for peppermint extract and a drop or two of green food dye. I mix it gently until that vibrant shade appears and the mint is evenly distributed. The other half becomes chocolate dough with cocoa powder, milk, and optional espresso powder added. Make sure to beat gently so the dough stays soft.
Step 4: Shape, Chill, and Trim
This step is a bit sticky (literally!), but forming each dough into a 6-inch by 2-inch by 2-inch rectangle is key. Wrap each in plastic wrap and chill for exactly one hour—just until they’re less sticky but still pliable. If you chill too long, they get hard to shape. After slicing into strips, I trim edges to keep the pattern clean, pressing strips tightly so the checkerboard looks crisp.
Step 5: Final Chill & Bake
After assembling your checkerboard blocks, refrigerate them for at least two hours to set. Then slice into ½-inch cookies (or thinner if you prefer) and arrange on lined sheets. A quick brush with egg wash and a sprinkle of coarse sugar on top gives a glossy, sparkly finish. Bake at 350°F for 12–14 minutes until the edges are just starting to brown.
Top Tip
Over the years, I’ve learned a few tricks that really make a difference when making this Mint Chocolate Checkerboard Cookies Recipe. If you want those clean, sharp checkerboard edges and a rich mint-chocolate flavor combo, these tips will save you some frustration.
- Perfect Dough Chill: Don’t skip the one-hour chill for the initial dough rectangles and the two-hour chill after assembling the checkerboard. Both steps make slicing easier and help the pattern stay intact.
- Trim Carefully: I always trim those rounded edges after cutting strips and again after slicing the cookies. It might seem tedious, but the neat squares make the final cookies look pro-level.
- Use an Egg Wash: That simple brush of egg white mixed with water before baking gives your cookies a beautiful gloss and a subtle crunch with the coarse sugar topping.
- Handle Dough Gently: The dough should be pliable, not cold and stiff. If it’s too hard, let it sit at room temperature for 15–30 minutes before shaping.
How to Serve Mint Chocolate Checkerboard Cookies Recipe
Garnishes
When I serve these cookies, I usually keep it simple—just a sprinkle of coarse sugar on the cookie tops before baking lends that sparkling finish. Sometimes I add a tiny mint leaf beside the plate for that fresh touch, but honestly, the checkerboard pattern steals the show all on its own!
Side Dishes
I love pairing these mint chocolate cookies with a cup of strong black coffee or a creamy hot chocolate—the flavor combos are wonderful. For parties, a simple bowl of fresh berries provides a light, tart contrast that balances the richness perfectly.
Creative Ways to Present
For holiday gatherings, I’ve arranged these cookies on a platter lined with fresh mint sprigs and interspersed with chocolate curls. Another fun way I tried was stacking them like miniature checkerboard cakes—just add a little mint chocolate buttercream between layers for an extra-special treat.
Make Ahead and Storage
Storing Leftovers
These cookies stay fresh for up to a week stored in an airtight container at room temperature. I usually keep mine in a cool, dry spot away from sunlight, and they maintain their texture and flavor perfectly.
Freezing
I’ve frozen both the baked cookies and the shaped checkerboard dough blocks with great results. For dough blocks, wrap well in plastic and freeze up to three months. When you’re ready, thaw overnight in the fridge before slicing and baking. Baked cookies freeze well too—just thaw slowly for best taste and texture.
Reheating
To bring frozen cookies back to life, I reheat them in a 300°F oven for about 5 minutes. This refreshes their crunch and warms up those mint and chocolate flavors without drying them out.
Frequently Asked Questions:
Absolutely! While this Mint Chocolate Checkerboard Cookies Recipe is classic, you can swap the mint dough for vanilla or lemon and the chocolate for almond or coffee dough. Just keep the dough firm and pliable for best results.
If your dough feels too sticky after chilling, let it sit at room temperature for 15-30 minutes before shaping. You can also lightly flour your hands and surface but avoid over-flouring, which can dry out the dough and affect the texture.
Trimming the edges isn’t required, but it definitely helps with that neat, professional look. I recommend trimming any rounded dough edges after slicing the strips and again after forming the blocks. The leftover dough scraps can be re-rolled and baked separately!
Yes, you can absolutely skip the green food coloring! The dough will look more natural or like pale mint, and the flavor will be exactly the same. Some people prefer the subtle look, and it’s a nice choice if you're avoiding artificial dyes.
Final Thoughts
I truly enjoy making this Mint Chocolate Checkerboard Cookies Recipe whenever I want to impress without stress. The mix of fresh mint and rich chocolate blended into those whimsical checkerboard designs always makes people smile. Give it a try—you’ll find it’s fun to make, delicious to eat, and perfect for sharing with friends over coffee or gifting during special moments.
Print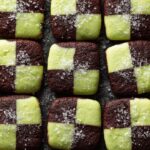
Mint Chocolate Checkerboard Cookies Recipe
- Prep Time: 4 hours 45 minutes
- Cook Time: 13 minutes
- Total Time: 5 hours
- Yield: 24 cookies
- Category: Dessert
- Method: Baking
- Cuisine: American
- Diet: Vegetarian
Description
Mint Chocolate Checkerboard Cookies are an eye-catching and delicious treat featuring alternating strips of mint-flavored and chocolate dough formed into a checkerboard pattern. These buttery, soft cookies with a hint of peppermint and rich cocoa are perfect for holiday gifting or special occasions. The dough is only chilled briefly to maintain pliability for shaping, then sliced and baked to golden perfection.
Ingredients
Base Cookie Dough
- 2 and ½ cups (313g) all-purpose flour (spooned & leveled)
- ½ teaspoon baking powder
- ½ teaspoon salt
- 1 cup (16 Tbsp; 226g) unsalted butter, softened to room temperature
- 1 cup (200g) granulated sugar
- 1 large egg + 1 egg yolk, at room temperature (save extra egg white)
- 1 and ½ teaspoons pure vanilla extract
- Optional for topping: 1 Tablespoon (15ml) water
- Optional for topping: ¼ cup (50g) coarse sugar
Mint Dough Additions
- 1 teaspoon peppermint extract
- Optional: 1 drop green food dye (leaf green gel recommended)
Chocolate Dough Additions
- 2 Tablespoons (10g) unsweetened natural or dutch-process cocoa powder
- 1 Tablespoon (15ml) milk
- Optional: 1 teaspoon espresso powder
Instructions
- Make the dry mix: Whisk together the all-purpose flour, baking powder, and salt in a medium bowl. Set aside.
- Cream butter and sugar: In a large bowl, use a hand mixer or stand mixer with paddle attachment to beat the softened butter and granulated sugar on medium-high speed until light and fluffy, about 3 minutes.
- Add eggs and vanilla: Add the large egg, egg yolk, and vanilla extract to the creamed mixture and beat on high speed until fully combined, about 1 minute. Scrape down the bowl as needed.
- Combine dough: Gradually add the dry ingredients to the wet ingredients and mix on low speed until just combined. The dough will be thick and sticky. Remove dough from the mixing bowl.
- Divide dough into halves: Divide the dough into two equal portions, about 2 cups each.
- Prepare mint dough: Place one half of the dough back into the mixing bowl. Add peppermint extract and green food dye (starting with 1 drop) and beat on low speed until evenly combined. Add another drop of food dye if desired. Remove from bowl.
- Prepare chocolate dough: Place the other half of the dough back into the mixing bowl. Add cocoa powder, milk, and optional espresso powder. Beat on low speed until combined.
- Shape and chill dough blocks: On a lightly floured surface, form each dough half into a 6-inch long rectangular block approximately 2 inches wide and 2 inches tall. Wrap separately with plastic wrap or cover and refrigerate for 1 hour until dough is less sticky but still pliable.
- Cut strips and assemble checkerboard: Remove dough from refrigerator. Slice each block lengthwise into 3 equal strips, then cut each strip into thirds crosswise to create 9 strips per block. Trim rounded edges for neatness. Assemble checkerboards by alternating mint and chocolate strips tightly together into blocks, pressing to eliminate gaps. Create two checkerboard blocks, starting one with mint and the other with chocolate strips.
- Chill assembled blocks: Wrap the checkerboard dough blocks and refrigerate for 2 more hours, up to 4 days.
- Preheat oven and prepare baking sheets: Preheat oven to 350°F (177°C). Line two baking sheets with parchment paper or silicone mats.
- Slice and bake cookies: Slice each block into 12 cookies about ½ inch thick, or 18 cookies about ⅓ inch thick for thinner slices (reduce bake time by 1 minute if thinner). Optionally trim edges for neat squares. Arrange cookies 2-3 inches apart on baking sheets. Optional: brush lightly with egg wash made from reserved egg white mixed with 1 tablespoon water and sprinkle with coarse sugar. Bake 12-14 minutes or until edges are lightly browned.
- Cool cookies: Remove from oven and cool on baking sheets for 5 minutes before transferring to wire racks to cool completely. Store covered at room temperature for up to 1 week.
Notes
- Make Ahead: The baked cookies freeze well up to 3 months. Thaw overnight in refrigerator and bring to room temperature before serving.
- You can shape the checkerboard dough blocks and refrigerate for up to 4 days, or freeze blocks for up to 3 months. Thaw overnight in refrigerator before slicing and baking.
- For a sparkling finish, brush cookies lightly with egg wash made from reserved egg white and water, then sprinkle with coarse sugar before baking.
- Trim excess dough strips and cookie edges for a neat checkerboard appearance. Leftover dough scraps can be rolled out and cut into shapes to bake.
- Use leaf green gel food coloring for vibrant mint dough color without affecting texture.
Nutrition
- Serving Size: 1 cookie
- Calories: 150 kcal
- Sugar: 10 g
- Sodium: 85 mg
- Fat: 8 g
- Saturated Fat: 5 g
- Unsaturated Fat: 2 g
- Trans Fat: 0 g
- Carbohydrates: 18 g
- Fiber: 1 g
- Protein: 2 g
- Cholesterol: 35 mg


Leave a Reply