There’s something undeniably fun and festive about these sweet treats, and I can’t get enough of how charming they look on a dessert tray. The Oreo Polar Bear Paws Recipe combines creamy white chocolate with Oreos and a pop of candy details to create the cutest, most delicious snack that’s perfect for parties or just a cozy night in.

Jump to:
Why You'll Love This Recipe
Honestly, I got hooked on this recipe the first time I made it for a family gathering—the way the buttery crunch of Oreo meets the smooth, sweet white chocolate is just so good. Plus, the fun shape and colorful candies make it a hit with both kids and grown-ups alike.
- Super Simple: Just a few ingredients and no baking required—perfect for busy days or last-minute guests.
- Visually Delightful: These polar bear paws look so adorable, they almost steal the show at dessert tables.
- Versatile Treat: Great for holiday parties, classroom snacks, or anytime you want to bring a smile.
- Customizable: You can tweak the candies to match holidays or your favorite colors without losing the charm.
Ingredients & Why They Work
Each element in the Oreo Polar Bear Paws Recipe has a purpose, from the crispy Oreos that give you a classic cookie base to the melting white chocolate, which acts like glue and adds that creamy sweetness. The candies don’t just dress things up—they add texture and those paw-shaped details that are the whole point!

- White chocolate: I prefer melting wafers because they melt smoothly and harden with a nice shine, making your paws look professional and appetizing.
- Oreos: Classic Oreo cookies are ideal here for their crunchy texture and rich chocolate flavor that pairs beautifully with white chocolate.
- Junior Mints: These serve as the “pad” of the bear paw, giving a smooth, minty contrast and a perfect shape for the paw’s center.
- Mini brown M&Ms: They create the “toes” around the Junior Mint and add a little pop of color and crunch; their size is just right for this detail work.
- Sanding sugar: Sprinkling this over the finished paws adds sparkle and an extra layer of sweetness that catches the eye.
Make It Your Way
What I love most about making the Oreo Polar Bear Paws Recipe is that you can easily play around with the candy toppings to suit your mood or occasion. I often swap out the brown M&Ms for colorful ones during holidays or use peppermint candies for a fresh twist.
- Variation: For a chocolate lover’s version, try using dark chocolate melting wafers instead of white chocolate—it changes the vibe but keeps that fun paw shape.
- Dietary tweaks: I’ve experimented with dairy-free white chocolate, which works well if you’re avoiding dairy, just be sure it melts smoothly like the wafers.
- Seasonal twists: Around Halloween, I use orange sanding sugar and black mini candies for spooky paws!
Step-by-Step: How I Make Oreo Polar Bear Paws Recipe

Step 1: Melt the Chocolate Gently
Start by lining a large sheet pan with parchment paper—this keeps everything from sticking and makes cleanup a breeze. Place your white chocolate wafers in a microwave-safe bowl and heat in 30-second increments, stirring every time to prevent overheating and clumps. I usually need about 1-2 minutes total, depending on my microwave. The chocolate should be silky smooth, without lumps, before moving on.
Step 2: Coat Each Oreo
Using a fork, dip an Oreo into the melted white chocolate. Flip it carefully to coat all sides evenly. Then, lift it out and gently shake off any excess chocolate, scraping the bottom of the fork against the bowl’s edge to avoid dripping puddles underneath. This step helps your paws look neat and professional.
Step 3: Create the Polar Bear Paw Details
Place your coated Oreo onto the parchment paper. While it’s still wet, press one Junior Mint onto the bottom center of the Oreo to act as the paw’s pad. Then arrange four mini brown M&Ms above it as the “toes.” This part is what makes these treats so charming and instantly recognizable.
Step 4: Add Sparkle and Set
Sprinkle the entire paw generously with sanding sugar for that extra bit of sparkle and texture. I find it easiest to dip and decorate about five Oreos at a time, then pop the whole tray into the freezer for 5-10 minutes. This quick chill helps the chocolate harden firmly and keeps everything in place.
Step 5: Store and Enjoy
Once set, store your Oreo Polar Bear Paws in an airtight container at room temperature. They stay perfect for about a week, making them great for prepping in advance for events or just having a sweet stash on hand.
Top Tip
From the dozens of times I’ve whipped up this recipe, a few simple tips have helped me nail these adorable paws every time, and I want you to get the same great result with minimal fuss.
- Temper Your Chocolate: Stirring constantly in short bursts avoids burning and ensures smooth coating.
- Don’t Overload Chocolate: Shaking off excess chocolate helps avoid lumps and puddles that can ruin the paw shape.
- Work Quickly: The candy details stick best when you add them immediately after coating before the chocolate firms up.
- Freeze Briefly: Setting your paws in the freezer speeds up hardening but watch the time carefully to prevent condensation forming.
How to Serve Oreo Polar Bear Paws Recipe

Garnishes
I usually serve these with just a light dusting of extra sanding sugar or a few sprigs of fresh mint nearby for a pop of green and freshness. Sometimes I scatter a few extra mini M&Ms around the plate to add color and fun.
Side Dishes
Pair these polar bear paws with hot cocoa or a cold glass of milk for a classic combo that kids adore. They also go surprisingly well alongside simple fruit like strawberries or sliced apples if you want to add a bit of brightness to your dessert spread.
Creative Ways to Present
For holiday parties, I’ve arranged these paws around a centerpiece of snow-dusted pinecones and twinkling lights. Another time, I placed them inside a clear jar with a ribbon for an easy, giftable treat. Don’t hesitate to get creative—these candies are basically mini edible decorations!
Make Ahead and Storage
Storing Leftovers
I keep leftover Oreo Polar Bear Paws stored in an airtight container at room temperature—not the fridge—to preserve that great crunchy texture. They generally stay fresh and delicious for up to one week.
Freezing
I tried freezing them once, but I noticed the mini M&Ms lost their vibrant color upon thawing, which is a bit of a bummer since they’re part of the fun look. So, I recommend enjoying them fresh or refrigerating instead if you want to keep them longer.
Reheating
Since these are no-bake cookies coated in chocolate, reheating isn’t necessary. Just bring them to room temperature if stored in the fridge, and they’ll be ready to munch without losing their texture or charm.
Frequently Asked Questions:
Absolutely! While Oreos are classic and have that perfect texture, you can experiment with other chocolate sandwich cookies or even gluten-free varieties if needed. Just choose something that holds up to the chocolate coating.
Not at all! The candies are there to mimic the paw shape, so feel free to get creative with what you have. Small round candies, chocolate chips, or even mini marshmallows can work well as alternatives.
Stored in an airtight container at room temperature, these treats stay fresh for about a week. Refrigeration can extend their life to two weeks, but I recommend bringing them back to room temperature before serving for the best taste and texture.
Make sure the chocolate is fully set before handling or stacking. Cooling them briefly in the freezer for 5-10 minutes helps harden the coating quickly. Also, store them in a cool, dry place away from direct sunlight and humidity.
Final Thoughts
These Oreo Polar Bear Paws have become my go-to festive treat whenever I want something festive, fun, and fuss-free. They never fail to bring a smile, whether shared with family or gifted to friends. Give this recipe a try—I bet they’ll become a sweet staple in your kitchen, too!
Print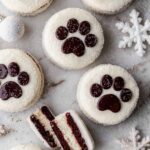
Oreo Polar Bear Paws Recipe
- Prep Time: 20 minutes
- Cook Time: 0 minutes
- Total Time: 20 minutes
- Yield: 35 servings
- Category: Dessert
- Method: No-Cook
- Cuisine: American
Description
Create adorable Oreo Polar Bear Paws by coating Oreos in melted white chocolate, then decorating with Junior Mints, mini brown M&Ms, and sanding sugar for a fun and festive treat perfect for parties and holidays.
Ingredients
Chocolate Coating
- 20 ounces white chocolate melting wafers
Cookies and Decorations
- 1 13.9-ounce package Oreos
- 1 box Junior Mints
- 100 mini brown M&Ms (from 1 family size package of mini M&Ms)
- Sanding sugar, as needed
Instructions
- Prepare workspace: Line a large sheet pan with parchment paper to set the decorated Oreos on later.
- Melt the white chocolate: Place the white chocolate wafers in a microwave-safe bowl and microwave in 30 second increments, stirring between each until smooth and fully melted.
- Coat Oreos: Drop one Oreo into the melted white chocolate and use a fork to flip it over, coating all sides evenly. Lift it out and shake off excess chocolate, scraping the bottom across the edge of the bowl to prevent pooling.
- Decorate Oreos: Place the chocolate-coated Oreo on the parchment paper. Use one Junior Mint to form the center pad of the paw at the bottom of the Oreo and arrange four mini brown M&Ms around the top as the toes. Generously sprinkle sanding sugar over the cookie.
- Repeat: Dip and decorate five Oreos at a time, repeating the coating and decorating process with remaining cookies and decorations.
- Set the treats: Transfer the decorated Oreos to the freezer for 5-10 minutes to allow the white chocolate to set completely.
- Store: Store completed Oreo Polar Bear Paws in an airtight container at room temperature for up to 1 week. Note that the decorated Oreos freeze well, but the M&Ms may lose color upon thawing.
Notes
- Store the decorated Oreos in an airtight container at room temperature for up to 1 week or refrigerate for up to 2 weeks for extended freshness.
- Freezing is not recommended if you want to preserve the color of the M&Ms, as they may bleed or lose vibrancy when thawed.
- Work with small batches of Oreos at a time (about 5) to ensure the melted chocolate does not harden before decorating.
- Use sanding sugar for a festive, sparkling finish but you can substitute with colored sugar crystals or sprinkles for variation.
Nutrition
- Serving Size: 1 cookie
- Calories: 150 kcal
- Sugar: 18 g
- Sodium: 90 mg
- Fat: 8 g
- Saturated Fat: 5 g
- Unsaturated Fat: 2 g
- Trans Fat: 0 g
- Carbohydrates: 20 g
- Fiber: 1 g
- Protein: 1 g
- Cholesterol: 0 mg

Leave a Reply