There's something utterly magical about biting into a cookie that’s buttery, crumbly, and bursts with festive peppermint flavor — that's exactly what this Peppermint Snowball Cookies Recipe delivers. These delicate little snowballs melt in your mouth and bring a joyful crunch from crushed candy canes. I always find myself reaching for just one more!

Jump to:
Why You'll Love This Recipe
This Peppermint Snowball Cookies Recipe has become my go-to holiday treat not just because of its simple ingredients, but because it's such a joyful experience to bake and share. The peppermint extract plus crushed candy canes give these cookies a perfect seasonal twist that feels both refreshing and cozy.
- Perfectly Soft and Crumbly Texture: The use of room temperature butter and thorough creaming creates that melt-in-your-mouth tenderness you want in a snowball cookie.
- Easy Peppermint Kick: Combining peppermint extract with crushed candy canes means the flavor is layered and not overpowering, giving each bite a festive sparkle.
- No-Fuss Coating Process: Rolling the warm cookies twice in confectioners’ sugar creates that iconic snowy look and delicate sweetness.
- Make Ahead Friendly: You can chill the dough or freeze baked cookies, which is perfect for holiday prep or last-minute guests.

Ingredients & Why They Work
Every ingredient here plays a job to bring these cookies to snowy, peppermint perfection. Using softened butter ensures you get a silky dough that bakes into softness, while confectioners' sugar creates that smoothness right in the batter and for the coating. The peppermint extract adds warmth and aroma, and crushed candy canes give texture and that refreshing crunch. Picking fresh, high-quality ingredients makes all the difference.

- Unsalted Butter: Softened to room temperature for easy creaming without melting; controls salt level so you can adjust seasoning precisely.
- Confectioners’ Sugar: Adds sweetness and a delicate texture both inside the dough and as the iconic snowball coating.
- Pure Vanilla Extract: Balances the peppermint with warm, mellow notes.
- Peppermint Extract: Gives that unmistakable, cool peppermint flavor that makes these cookies festive and refreshing.
- All-Purpose Flour: The sturdy backbone for your cookie dough, provides structure without heaviness.
- Salt: Enhances flavor and balances sweetness, vital for bringing out the best in your dough.
- Crushed Candy Canes: Adds both crunch and bursts of sweet, minty flavor that are fun and festive.
Make It Your Way
I like to tweak this Peppermint Snowball Cookies Recipe to suit the occasion or mood—sometimes I add a few extra drops of peppermint extract if I'm feeling festive, or swap out candy canes for mini peppermint chips for smoother texture. Feel free to experiment, you’ll find these cookies are quite forgiving and fun to personalize!
- Variation: One winter, I substituted crushed peppermint bark instead of candy canes—those bites had a richer chocolate-peppermint flavor that our family adored.
- Gluten-Free Option: You can swap the flour for a 1:1 gluten-free baking blend; just be sure to check consistency and chill dough longer if needed.
- Lower Sugar: I’ve reduced the confectioners’ sugar in the coating marginally for less sweetness, though the snowball look is slightly less pronounced.
- Nutty Twist: Adding finely chopped toasted pecans into the dough gives another layer of texture that pairs beautifully with peppermint.
Step-by-Step: How I Make Peppermint Snowball Cookies Recipe
Step 1: Cream the Butter and Sugar Until Velvety
Start by beating your softened butter on medium speed with a mixer. I do this for about a minute until it’s smooth and creamy—no lumps! Then add the confectioners’ sugar and beat first on low to incorporate it without a sugar cloud, then speed it up to medium-high for a luscious, fluffy texture. Scraping the bowl down midway is key to even mixing.
Step 2: Add Your Extracts for That Peppermint Burst
Next, mix in pure vanilla and peppermint extracts. This little combo is how these cookies get their signature sweet and minty aroma. Don’t skimp on the peppermint—it gives the cookies their festive personality without being overpowering.
Step 3: Mix in the Dry Ingredients into a Dough
Add flour and salt while running your mixer on low speed. The dough might look crumbly or dry at first, but once all the flour is incorporated, crank the mixer to high briefly. The dough will come together beautifully. Finish by folding in the crushed candy canes—you want those minty bits dispersed evenly for every bite.
Step 4: Chill the Dough for Easier Handling
Wrap your dough tightly and chill it in the fridge for at least 30 minutes, up to 3 days. If you've been patient and chilled it longer, bring it back to room temperature for about 30 minutes before shaping so it's easier to roll. Trust me, patience here pays off with perfectly shaped cookies.
Step 5: Scoop, Bake, and Coat Your Cookies
Preheat your oven to 350°F (177°C) and prepare your baking sheets. I line mine with parchment to keep things simple. Scoop about 1 tablespoon of dough per cookie, roll it into balls, and space them at least 2 inches apart—you don’t want your snowballs to fuse into one giant nap!
Bake for 15 minutes until just golden on the edges with barely a tint on top—that’s the sweet spot for that tender crumb.
Right out of the oven, let the cookies cool on the baking sheet for 5 minutes, then gently roll each warm cookie in confectioners’ sugar. Place on a wire rack to cool completely, then roll them in sugar again for that classic snowy coating that sticks and melts just perfectly.
Top Tip
From my own baking experiments, a few tweaks really boost these cookies and make the process smooth and enjoyable for you.
- Soft Butter is Essential: Using room temperature butter (not melted!) ensures your dough has the perfect texture and your cookies melt in your mouth.
- Don’t Skip the Two Sugar Coatings: The first coat sticks because the sugar gently melts on the warm cookie, and the second coat really seals in that signature look and sweetness.
- Be Gentle Rolling Coated Cookies: They’re delicate after baking, so roll carefully or you’ll lose that pretty snowball shape.
- Use Fresh Crushed Candy Canes: Freshly crushed ones create the best crunch and flavor—old candy canes can get soft or stale.
How to Serve Peppermint Snowball Cookies Recipe

Garnishes
I typically stick with the classic confectioners’ sugar coating since it gives the cookies that enchanting “snowy” effect. But for a little extra flair, I sometimes drizzle melted white chocolate over the top or sprinkle some more finely crushed candy canes just before the second sugar coating dries. It looks beautiful and adds a bit more crunch!
Side Dishes
These cookies pair wonderfully with a warm cup of hot chocolate or peppermint-spiced coffee. They also make a delightful dessert alongside simple vanilla ice cream or a creamy eggnog for those holiday gatherings.
Creative Ways to Present
For special occasions, I love arranging these Peppermint Snowball Cookies in a festive tin layered with red tissue paper, tied up with a velvet ribbon. Another fun idea is stacking them like little snowy towers on a holiday dessert platter or even using clear cellophane bags with a peppermint bow as charming gifts for friends and family.
Make Ahead and Storage
Storing Leftovers
I usually keep leftover cookies in an airtight container at room temperature, layered with parchment paper so they don’t stick together. They stay fresh and delightfully soft for up to a week—enough time to enjoy a few with your morning coffee!
Freezing
These cookies freeze beautifully—both the baked cookies and unbaked dough balls. I portion the dough into balls, freeze them on a tray, then store in a freezer bag. When ready, bake straight from frozen by adding an extra minute or two to the bake time. It’s a real time saver during busy holiday seasons.
Reheating
If you want that fresh-baked warmth, pop your stored cookies in a 300°F oven for about 5 minutes. This refreshes the texture and flavor without drying them out. Avoid microwaving, as it can turn the delicate cookies rubbery.
Frequently Asked Questions:
Peppermint oil is much more concentrated than peppermint extract, so if you use it, start with just a drop and taste the dough before adding more. Too much oil can make the cookies bitter, so it’s safer to use peppermint extract unless you’re experienced with oils.
The first sugar coating is applied while the cookies are still warm, allowing it to slightly melt and stick to the surface. After cooling, rolling them in sugar again ensures the coating clings well and creates the iconic snowy appearance these cookies are known for.
Yes! To make this Peppermint Snowball Cookies Recipe dairy-free, swap the unsalted butter for a high-quality dairy-free butter substitute that works well for baking. Just be sure to use the same amount and ensure the substitute is softened for proper creaming.
Stored properly in an airtight container at room temperature, these peppermint snowballs will stay fresh for up to one week. For longer storage, you can freeze the baked cookies for up to three months without losing flavor or texture.
Final Thoughts
This Peppermint Snowball Cookies Recipe isn’t just another cookie—it's a little winter celebration in every bite. I love making a big batch to share with friends and relatives every holiday season, knowing these cookies create smiles and laughter around the table. Give them a try; I promise you’ll be hooked on that wonderful peppermint crunch and tender crumble. Happy baking, friend!
Print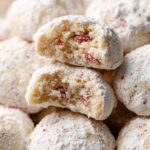
Peppermint Snowball Cookies Recipe
- Prep Time: 45 minutes
- Cook Time: 15 minutes
- Total Time: 1 hour
- Yield: 36 cookies
- Category: Dessert
- Method: Baking
- Cuisine: American
- Diet: Vegetarian
Description
Delight in the festive flavors of Peppermint Snowball Cookies, soft buttery treats infused with peppermint extract and crushed candy canes, coated generously in confectioners' sugar for a snowy finish perfect for holiday celebrations.
Ingredients
Dough
- 1 cup (16 Tbsp; 226g) unsalted butter, softened to room temperature
- ¾ cup (90g) confectioners’ sugar
- 1 teaspoon pure vanilla extract
- 1 teaspoon peppermint extract
- 2 and ¼ cups (281g) all-purpose flour (spooned & leveled)
- ⅛ teaspoon salt
- ⅓ cup (40g) crushed candy canes (about 3–4 regular-size candy canes)
Coating
- 1 and ¼ cups (150g) confectioners’ sugar
Instructions
- Prepare the butter mixture: In a large bowl using a handheld mixer or stand mixer fitted with a paddle attachment, beat the softened butter for 1 minute on medium speed until completely smooth and creamy.
- Add sugar and extract: Add ¾ cup confectioners’ sugar and beat on low speed until incorporated, then increase to medium-high speed and beat until combined and creamy. Scrape down the bowl as needed. Beat in vanilla and peppermint extracts on medium-high speed until combined.
- Incorporate dry ingredients: Add the flour and salt and beat on low speed. Though the dough looks dry initially, continue mixing and gradually increase to high speed until the dough comes together. Beat in the crushed candy canes thoroughly.
- Chill the dough: Cover the dough tightly and chill in the refrigerator for at least 30 minutes and up to 3 days. If chilling more than 3 hours, let dough sit at room temperature for 30 minutes before shaping.
- Preheat and prepare baking sheets: Preheat the oven to 350°F (177°C). Line two large baking sheets with parchment paper or silicone baking mats and set aside. Pour the confectioners’ sugar for coating into a shallow bowl.
- Shape and bake cookies: Scoop or roll 1 tablespoon (20g) of dough per cookie into balls and place them on baking sheets at least 2 inches apart. Bake for about 15 minutes until golden brown on the bottom edges and slightly browned on top.
- First coat with confectioners’ sugar: Cool the cookies on the baking sheet for 5 minutes. Then gently roll each cookie in the confectioners’ sugar to coat completely. Transfer to wire racks to cool completely. The sugar coating will be sticky at this stage.
- Second coat for finish: Once completely cooled, roll the cookies again in confectioners’ sugar to set the coating firmly.
- Storage: Store the cookies covered at room temperature for up to one week to maintain freshness.
Notes
- Baked cookies can be frozen for up to 3 months; thaw in the refrigerator or at room temperature before serving.
- Unbaked cookie dough balls also freeze well for up to 3 months; bake frozen dough balls adding an extra minute to the baking time with no thawing needed.
- This recipe requires an electric mixer, baking sheets, silicone baking mats or parchment paper, mixing bowl, and cooling rack for best results.
Nutrition
- Serving Size: 1 cookie
- Calories: 120 kcal
- Sugar: 8 g
- Sodium: 30 mg
- Fat: 7 g
- Saturated Fat: 4 g
- Unsaturated Fat: 3 g
- Trans Fat: 0 g
- Carbohydrates: 14 g
- Fiber: 0.5 g
- Protein: 1 g
- Cholesterol: 20 mg


Leave a Reply