Nothing says celebration quite like the rich colors and flavors of a holiday dessert, and this Red Velvet Oreo Cheesecake Recipe is the perfect marriage of creamy cheesecake with the fun crunch of Oreos and the depth of red velvet flavor. Trust me, it’s as stunning to look at as it is delicious to eat, and I find it’s always the star of any gathering once it’s sliced and served.

Jump to:
Why You'll Love This Recipe
This Red Velvet Oreo Cheesecake Recipe holds a special place in my recipe box because it’s not just a dessert; it’s a festive experience. Each bite brings together luscious cream cheese, vibrant red velvet flavor, and those beloved Oreo cookies — creating a showstopper that’s surprisingly simple to pull off.
- Decadent Texture: Creamy cheesecake meets the perfect Oreo crumb crust for an irresistible texture contrast.
- Beautiful Presentation: The rich red color with Oreo accents makes it a festive centerpiece for holiday tables and special occasions.
- Easy to Customize: You can tweak toppings and even add a splash of peppermint or other flavors to make it your own.
- Make Ahead Friendly: It chills beautifully and tastes even better the next day, making party prep stress-free.

Ingredients & Why They Work
Let’s chat about the ingredients—because their quality and balance really make this Red Velvet Oreo Cheesecake Recipe shine. Each chosen component plays a vital role in flavor, texture, and even presentation.

- Chocolate sandwich cookie crumbs: Using Oreo crumbs delivers that classic cookie flavor and crunchy base, anchoring the cheesecake perfectly.
- Unsalted butter: This binds the crust crumbs and adds richness without overpowering the other flavors.
- Full-fat cream cheese: The heart of cheesecakes everywhere — it ensures a smooth, creamy texture. Make sure it’s room temperature for best mixing results.
- Granulated sugar: Sweetens without adding moisture; it blends seamlessly.
- Full-fat sour cream: Adds moisture and a subtle tang, balancing the richness and keeping the cheesecake from being too dense.
- Eggs: Provide structure and help the cheesecake set properly; keeping them room temperature prevents lumps.
- Unsweetened cocoa powder: Gives a mild chocolate note that enhances the red velvet essence without overwhelming it.
- Liquid red food coloring: This is what gives the cheesecake its signature vibrant hue — I recommend brands like McCormick for consistent color.
- Vanilla extract: Adds warmth and depth, rounding out the flavors beautifully.
- Cream Cheese Whipped Cream: The perfect topping to lighten and complement the dense richness below — I like making a small batch for freshness.
Make It Your Way
One of the things I adore about this Red Velvet Oreo Cheesecake Recipe is how versatile it is. I enjoy switching up the toppings or folding in different mix-ins to keep it feeling fresh every time I make it—your palate will thank you for experimenting.
- Variation: Once I tried adding chopped peppermint candies on top and swirling a tiny bit of peppermint extract into the batter — it gave the cheesecake a festive holiday twist that guests loved!
- Dietary modification: For a lighter version, you can try low-fat cream cheese, but expect a slightly less creamy texture. Also, gluten-free Oreo crumbs work great for gluten sensitivities.
- Seasonal change: Swap the Oreo crust for crushed ginger snaps or graham crackers for a bit of warmth and spice during the colder months.
Step-by-Step: How I Make Red Velvet Oreo Cheesecake Recipe
Step 1: Prep the Crust for a Perfect Base
First things first: preheat your oven to 325°F and give the outside of your 6-inch springform pan a thorough foil wrap—this little trick keeps water from sneaking in during the water bath bake (more on that later). Mix together the Oreo crumbs with melted butter until it feels like damp sand, then press it firmly and evenly into the pan’s bottom. Bake it for 10 minutes—this sets the crust and locks in that crunchy texture you want under all the creamy goodness.
Step 2: Create the Luscious Red Velvet Cheesecake Batter
In a large mixing bowl fitted with a paddle attachment (or you can use a hand mixer), beat the cream cheese, sugar, and sour cream together on medium-high speed until the mixture is light and fluffy—this usually takes about 2 to 3 minutes. Don’t skip scraping down the bowl; you want everything fully incorporated with no lumps. Then, add eggs one at a time, beating each for a full minute to ensure smoothness but be careful not to overbeat. Scrape down again, then gently fold in the cocoa powder, red food coloring, and vanilla extract until the batter is uniform and stunningly red.
Step 3: Bake in a Water Bath for a Silky Texture
Pour the batter over your already baked crust. Set the springform pan inside a larger pan (like an 8x8 inch) and carefully pour hot water into the outer pan until it reaches halfway up the side of your cheesecake pan. The water bath provides gentle, even cooking and prevents cracks. Bake for 65-75 minutes, watching for when the edges are set and turning a light golden brown, the center is mostly set but still wobbles slightly, and the internal temperature reaches 150°F.
Step 4: Cool, Chill, and Finish
Remove the cheesecake from the oven and carefully run a knife around the edges to loosen it from the pan — this helps prevent cracks as it cools. Let it sit in the water bath for 15 minutes, then remove the pan and cool to room temperature for about an hour before popping it into the fridge to chill for at least 4 hours or overnight. Top with cream cheese whipped cream just before serving for that extra-special finish.
Top Tip
Having made this Red Velvet Oreo Cheesecake Recipe many times, I’ve learned a few tricks that make all the difference between a good cake and a truly unforgettable one. Here are the nuggets I wish I knew when I started.
- Room temperature ingredients: It sounds simple, but letting your cream cheese, sour cream, and eggs come to room temp before mixing avoids lumps and gives you a smooth batter every time.
- Water bath magic: Wrapping the pan in foil and baking it in a water bath ensures that silky texture and helps reduce cracks on top.
- Patience is key: Resist the urge to open the oven early and trust the internal temperature — cheesecake takes its time to set perfectly!
- Knife at the ready: Running a knife around the edge right out of the oven prevents sudden cooling shrinkage from cracking your beautifully smooth top.
How to Serve Red Velvet Oreo Cheesecake Recipe

Garnishes
I usually top mine with a generous swirl of cream cheese whipped cream for that tangy, light balance to the rich cake. Then, I sprinkle crushed Oreo pieces right on top — it’s a little extra cookie crunch that makes every bite exciting. If I’m feeling festive, I’ll add a few red sprinkles or even some white chocolate shavings for a classy touch.
Side Dishes
This cheesecake pairs wonderfully with simple fruit like raspberries or fresh strawberries, which add brightness and cut through the richness. I also like serving it alongside a scoop of vanilla bean ice cream or a dollop of lightly sweetened whipped cream for indulgence.
Creative Ways to Present
For holiday dinners, I’ve decorated mine with edible glitter and fresh mint leaves to make the red really pop. Serving it on a white cake stand with little holiday ornaments around adds an instant festive vibe. If you’re taking it to a party, consider slicing into pretty triangles and plating each with a drizzle of chocolate sauce.
Make Ahead and Storage
Storing Leftovers
I store leftover cheesecake in an airtight container in the fridge where it stays creamy and fresh for up to a week. It’s perfect for planning ahead when you want to impress without last-minute hassle.
Freezing
Freezing cheesecake is totally doable! I wrap it tightly in plastic wrap followed by foil and freeze for up to three months. When it’s thawed in the fridge overnight, the texture is surprisingly close to fresh-baked, especially if you add whipped cream after thawing instead of before freezing.
Reheating
I generally don’t reheat cheesecake because it’s best served chilled, but if you prefer, bring just a slice to room temperature for about 20 minutes. This wakes up the flavors while keeping the texture perfect.
Frequently Asked Questions:
Absolutely! While Oreos are classic and delicious, you can substitute with other chocolate sandwich cookies, graham crackers, or even ginger snaps to change the flavor profile slightly.
Full-fat cream cheese provides the richest, creamiest texture and best flavor. Using reduced-fat or whipped types can make your cheesecake watery or less stable during baking.
Yes! You can make a 7-inch springform pan version without adjusting baking time much. For a 9-inch pan, see the recipe notes for some ingredient tweaks to keep the texture balanced.
Using a water bath, wrapping the pan in foil to prevent leaks, baking at a moderate temperature, and running a knife around the edges immediately after baking are key steps I use to keep my cheesecake crack-free. Cooling it slowly also helps!
Final Thoughts
This Red Velvet Oreo Cheesecake Recipe is truly one of those desserts I turn to when I want to impress but still keep things manageable in my kitchen. The balance of rich cream cheese, bold red velvet color, and Oreo crunch is a crowd-pleaser every time. Give it a try—you’ll be amazed at how festive and fabulous it tastes, and your friends will be asking for the recipe before the last slice is gone!
Print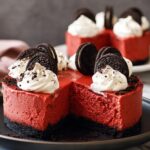
Red Velvet Oreo Cheesecake Recipe
- Prep Time: 20 minutes
- Cook Time: 1 hour 15 minutes
- Total Time: 6 hours 35 minutes
- Yield: 6 servings
- Category: Dessert
- Method: Baking
- Cuisine: American
- Diet: Vegetarian
Description
This festive Christmas Red Velvet Oreo Cheesecake combines the rich creaminess of classic cheesecake with the indulgent flavors of red velvet and crunchy Oreo crumbs. Perfect for holiday celebrations, this small-batch cheesecake features a luscious chocolate cookie crust, vibrant red food coloring, and a velvety texture that is complemented by a smooth whipped cream topping.
Ingredients
Crust
- 1 cup chocolate sandwich cookie crumbs, such as Oreo
- 2 tablespoons unsalted butter, melted
Cheesecake Filling
- 16 ounces (2 blocks or 16 tablespoons) full-fat cream cheese, room temperature and not cold to the touch
- ½ cup granulated sugar
- 2 tablespoons full-fat sour cream, room temperature and not cold to the touch
- 2 eggs, room temperature and not cold to the touch
- 1 tablespoon unsweetened cocoa powder
- 2 teaspoons liquid red food coloring (McCormick brand or similar)
- 1 teaspoon vanilla extract
Topping
- Cream Cheese Whipped Cream or Small Batch Whipped Cream (quantity as desired)
Instructions
- Preheat and Prepare Pan: Preheat your oven to 325 degrees Fahrenheit. Wrap the outside of a 6x2 or 6x3 inch springform pan with foil to prevent water from leaking in during the water bath. Lightly grease the inside of the pan to ensure easy release.
- Make the Crust: In a large bowl, combine the chocolate sandwich cookie crumbs and melted butter until well mixed. Press the mixture firmly into the bottom of the prepared springform pan. Bake the crust for 10 minutes to set.
- Prepare Cheesecake Batter: Using a stand mixer fitted with a paddle attachment or an electric mixer, beat the cream cheese, granulated sugar, and sour cream on medium-high speed until light and fluffy, about 2 to 3 minutes. Scrape down the bowl to ensure even mixing.
- Add Eggs: Beat in the eggs one at a time, mixing each for 1 minute until fully incorporated and smooth. Be careful not to overbeat, which can cause cracking.
- Incorporate Flavorings: Scrape down the bowl again, then beat in the unsweetened cocoa powder, red food coloring, and vanilla extract until thoroughly combined and the batter is smooth and vibrant red.
- Assemble for Baking: Pour the batter over the warm crust in the springform pan. Place this pan inside a larger 8x8 inch or bigger baking pan. Pour hot water into the outer pan until it reaches halfway up the side of the springform pan, creating a water bath to ensure even baking and prevent cracking. Take care to avoid water entering the cheesecake pan.
- Bake the Cheesecake: Bake for 75 minutes or until the edges are set and slightly browned, the center jiggles gently, and an internal temperature of 150 degrees Fahrenheit is reached. This slow gentle bake ensures a creamy texture.
- Cool in Water Bath: Remove the cheesecake carefully from the oven and gently run a knife around the edges to loosen it from the pan. Let it cool in the water bath for 15 minutes.
- Cool at Room Temperature: Remove the pan from the water bath and allow the cheesecake to cool completely at room temperature for 1 hour to prevent condensation forming.
- Chill the Cheesecake: Cover the cheesecake tightly and refrigerate for at least 4 hours or preferably overnight to fully set before adding the whipped cream or frosting topping.
- Serve and Store: Top with cream cheese whipped cream or small batch whipped cream just before serving. Store leftovers in an airtight container in the refrigerator for up to 5 to 7 days.
Notes
- For larger cheesecakes, use a 9-inch pan and adjust the recipe by omitting chocolate, then adding ¼ cup sour cream, 2 tablespoons cocoa powder, and 1 tablespoon red food coloring.
- To prevent cracks, avoid overmixing the batter and bake with a water bath.
- Room temperature ingredients ensure a smooth, creamy texture without lumps.
- Whipped cream topping can be substituted with your preferred frosting or served plain.
- Explore other small cheesecake recipes or red velvet desserts for variety.
Nutrition
- Serving Size: 1 slice
- Calories: 450 kcal
- Sugar: 35 g
- Sodium: 350 mg
- Fat: 30 g
- Saturated Fat: 18 g
- Unsaturated Fat: 10 g
- Trans Fat: 0 g
- Carbohydrates: 35 g
- Fiber: 1 g
- Protein: 7 g
- Cholesterol: 110 mg


Leave a Reply