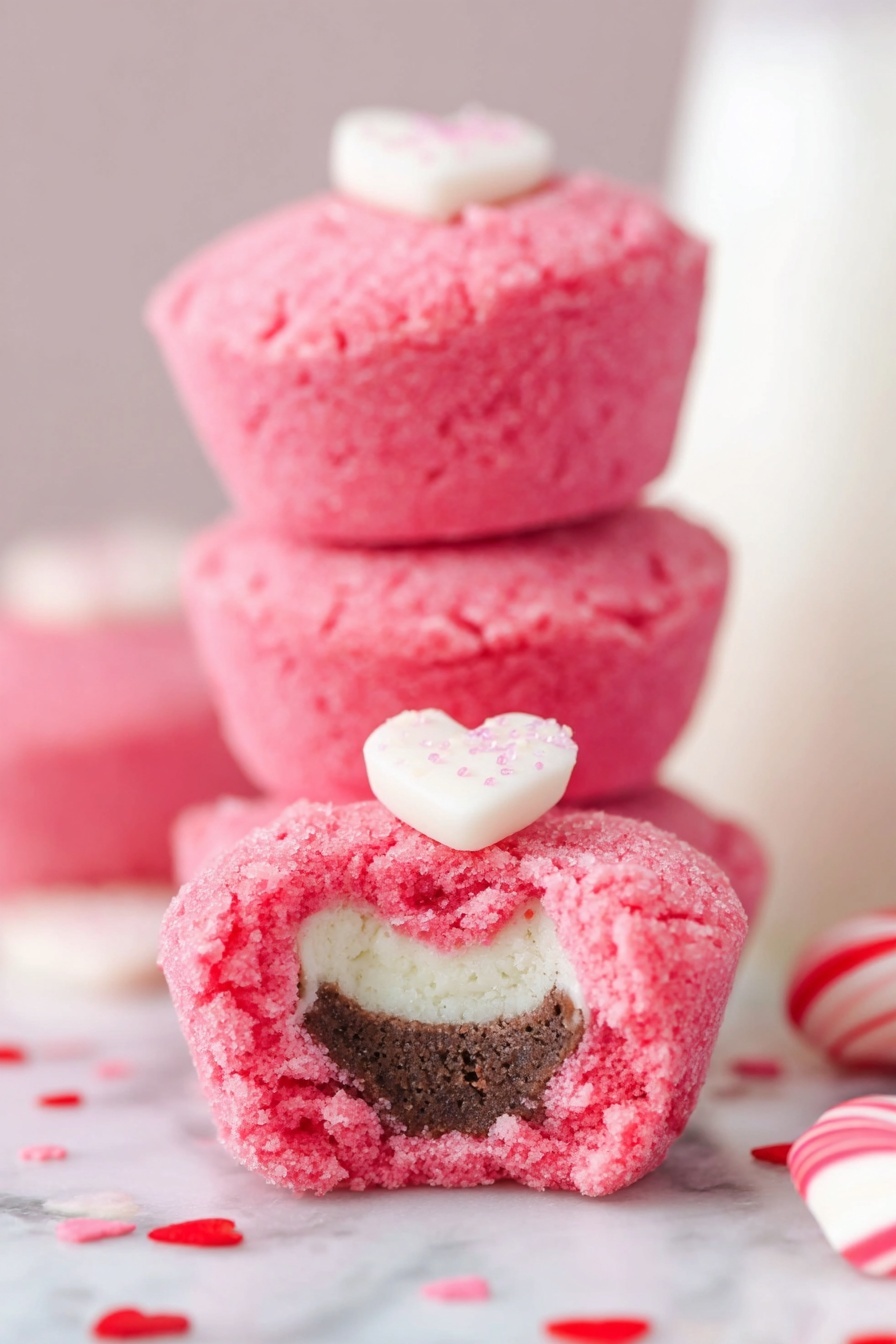
Nothing says love like sweets, and these adorable Valentine’s Day Cookie Cups with Hershey’s Hugs Recipe are exactly the treat to brighten your heart (and your kitchen!). Imagine a soft, chewy sugar cookie hiding a melty Hershey’s Hug in every bite—pure magic!

Jump to:
- Why You'll Love This Recipe
- Ingredients & Why They Work
- Make It Your Way
- Step-by-Step: How I Make Valentine’s Day Cookie Cups with Hershey’s Hugs Recipe
- Top Tip
- How to Serve Valentine’s Day Cookie Cups with Hershey’s Hugs Recipe
- Make Ahead and Storage
- Frequently Asked Questions:
- Final Thoughts
- Valentine’s Day Cookie Cups with Hershey’s Hugs Recipe
Why You'll Love This Recipe
Honestly, I’ve made these Valentine’s Day cookie cups more times than I can count. They’re a crowd-pleaser, super fun to make with kids, and perfect for gifting or just sneaking a few yourself!
- So Easy and Quick: These cookie cups bake in just about 10 to 12 minutes—ideal for last-minute Valentine’s treats.
- Sweet Surprise Inside: The Hershey’s Hugs melty center is the best hidden gem that adds a new flavor twist.
- Perfectly Portable: Bite-sized and sturdy enough for sharing or packing in lunchboxes.
- Festive and Fun: Dress them up with sprinkles for a charming and colorful presentation.
Ingredients & Why They Work
Before you dive in, gather your ingredients carefully. I like using a quality sugar cookie mix as a base—it takes the guesswork out of baking and ensures consistency. And of course, don’t skimp on those Hershey’s Hugs; their creamy center is the magic touch!
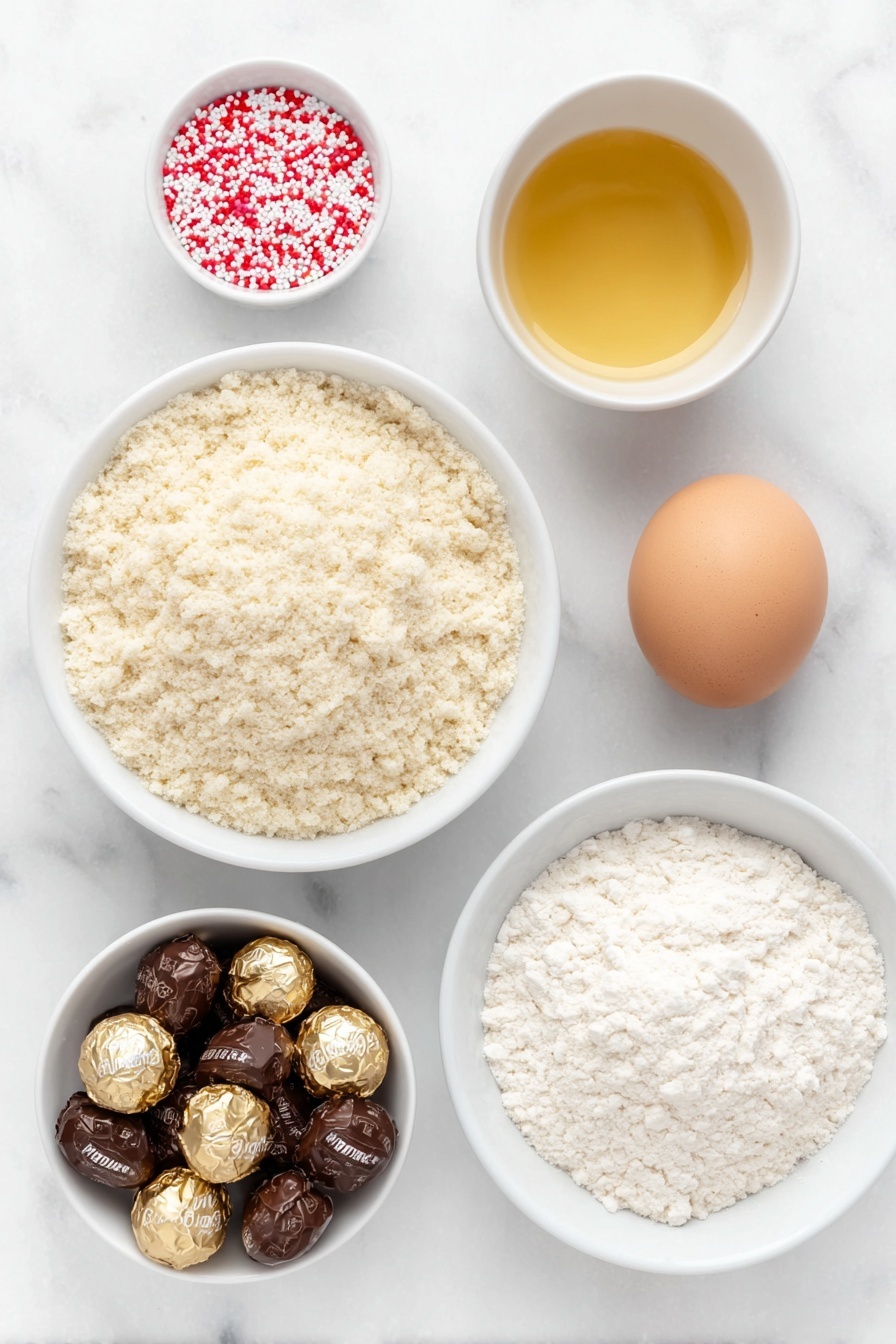
- Sugar cookie mix: The backbone of our cookie cups, providing that classic buttery-sweet flavor and chewy texture.
- Salted butter: Melted for easy mixing and adds rich flavor and moisture to the dough.
- All-purpose flour: Helps give the dough structure and keeps it from spreading too much during baking.
- Egg: Binds the ingredients together and gives the dough a tender crumb.
- Pink or red food coloring: Brings in festive Valentine’s vibes and makes these cookie cups extra special.
- Hershey’s Hugs: The star of the show—gooey and sweet, tucked inside each cookie cup.
- Decorative sprinkles (optional): For that final charming touch, because cute cookies just taste better.
Make It Your Way
One of the best things about this Valentine’s Day Cookie Cups with Hershey’s Hugs recipe is how easy it is to personalize! Whether you want to add a festive twist or accommodate dietary preferences, these cookie cups offer so many fun ways to make them your own.
- Gluten-Free Variation: I swapped the sugar cookie mix for a gluten-free blend and it worked beautifully! The texture stayed soft and the cookie cups held their shape just as well. Perfect for sharing with friends who avoid gluten.
- Flavor Boost: Adding a teaspoon of vanilla or almond extract to the dough gave it a delicious extra layer of flavor that paired wonderfully with the Hershey’s Hugs center.
- Seasonal Colors: Beyond pink and red, I experimented with pastel food coloring to make these cookie cups charming for spring or Easter celebrations. It’s such a simple way to match the theme!
- Decorative Options: I love swapping out sprinkles depending on the occasion—heart-shaped for Valentine’s Day or rainbow sprinkles for a fun birthday twist. The sprinkles really pop on those warm, soft tops.
Step-by-Step: How I Make Valentine’s Day Cookie Cups with Hershey’s Hugs Recipe

Step 1: Prep Your Pan and Oven
First things first, give your mini cupcake pan a good spray with cooking spray to keep those cookie cups from sticking. Then preheat your oven to 350°F so it’s perfectly hot and ready when your dough is shaped and filled.
Step 2: Mix Your Cookie Dough
In a large bowl, beat together the sugar cookie mix, melted butter, all-purpose flour, egg, and your chosen pink or red food coloring. Mix until just combined—don’t overwork it! If you want a deeper color, add a little more food coloring a drop at a time. The dough should be soft but easy to handle.
Step 3: Shape Dough and Add Candy Center
Take about 1 tablespoon of dough and flatten it with your hand or a rolling pin to roughly the size of your palm. Place one unwrapped Hershey’s Hug right in the center, then gently wrap the dough all around it, forming a ball. If any cracks appear in the dough, simply smooth them over with your fingers to completely enclose the hug. This step makes sure the sweet chocolate center stays perfectly hidden inside.
Step 4: Fill Your Pan
Place each filled dough ball upright into individual cavities of the mini cupcake pan. Keep repeating until all your dough is used up. This upright position helps the cookie cups bake evenly and hold their shape beautifully.
Step 5: Bake to Perfection
Bake your cookie cups for 10 to 12 minutes, or until the edges are set and the dough looks cooked but still soft inside. You’ll notice a lovely golden tint around the edges—that’s your cue to pull them from the oven. They’ll continue to firm up as they cool.
Step 6: Add Your Sprinkles
Right after you take the cookie cups out of the oven, press your chosen decorative sprinkles gently onto the tops while they’re still warm. This helps the sprinkles stick nicely and gives a beautiful festive look. Heart shapes, flowers, or any colorful sprinkle will make these treats truly special.
Step 7: Cool and Serve
Allow the cookie cups to cool in the pan for about 15 minutes before carefully removing them. This little cooling break helps them firm up so they don’t fall apart when you take them out. Once cooled, they’re perfect for sharing sweet love in every bite!
Top Tip
Making Valentine’s Day Cookie Cups with Hershey’s Hugs Recipe is a breeze when you keep a few helpful tips in mind. These little nuggets of sweetness are as much about the process as they are the final result!
- Wrap with Care: When you’re enclosing the Hershey’s Hugs with dough, you might notice cracks forming—that’s totally normal. Just gently press and smooth with your fingers to seal those cracks and keep your cookie cups intact.
- Timing is Everything: Let the cookie cups cool in the pan for 15 minutes before popping them out. This cooling time helps them set up so they don’t fall apart when you serve.
- Sprinkles for Show: Press colorful sprinkles into the cookie tops while they’re still warm right out of the oven. This little trick ensures they stick beautifully and add the perfect festive touch.
- Temperature Know-How: Preheat your oven fully to 350°F before baking. An even, consistent temperature helps the cookie cups bake uniformly, keeping the outsides set and the centers soft and chewy.
How to Serve Valentine’s Day Cookie Cups with Hershey’s Hugs Recipe
Garnishes
For a charming presentation, sprinkle your cookie cups with heart-shaped, red or pink decorative sprinkles, or edible glitter right after baking. You can also add a light dusting of powdered sugar for a soft, romantic touch. Adding small fresh mint leaves nearby on the plate creates a lovely color contrast.
Side Dishes
Serve these cookie cups alongside a warm cup of hot cocoa or a creamy vanilla chai latte to complement the sweet, buttery flavors. For a festive touch, pair with a small bowl of fresh strawberries or raspberries to keep that Valentine’s Day vibe going strong.
Make Ahead and Storage
Storing Leftovers
Keep your Valentine’s Day Cookie Cups fresh by storing them in an airtight container at room temperature. They’ll stay delicious and soft for up to two weeks—perfect for making ahead of your celebration.
Freezing
If you want to savor these treats over time, freeze them individually wrapped, then place all wrapped cookie cups in a freezer-safe container or bag. They’ll maintain their flavor and texture for 5 to 6 months in the freezer.
Reheating
To enjoy thawed cookie cups warm, let them sit at room temperature for about 20 minutes, or gently warm them in a preheated 300°F oven for 5 minutes. This reactivates that gooey, melty Hershey’s Hugs center without drying out the cookie.
Frequently Asked Questions:
Absolutely! While Hershey’s Hugs provide a perfect creamy and minty center, you can experiment with other chocolates like mini peanut butter cups, truffles, or even colorful chocolate melts for different flavors and surprises.
To avoid cracks, make sure the dough is well combined and slightly pliable. When wrapping around the chocolate, gently press and smooth any cracks with your fingers before baking. Also, ensure not to over-bake to keep them soft and chewy.
Definitely! The food coloring is optional and mainly adds a festive pink or red hue for Valentine’s Day. The cookie cups will still taste fantastic without it, just a classic buttery sugar cookie color.
Yes, you can use homemade sugar cookie dough as a substitute. Just make sure your dough isn’t too sticky and has enough flour to handle wrapping. Adjust the dough moisture if needed to get a shapable consistency like the mix.
Final Thoughts
There’s something truly special about Valentine’s Day Cookie Cups with Hershey’s Hugs Recipe — they’re small bites packed with big love and sweetness. The process of wrapping that chocolate surprise in soft, buttery dough is as rewarding as the moment you take your first delicious bite. Whether you’re baking them for family, friends, or a romantic someone, these cookie cups bring a heartfelt touch to any celebration. So go ahead, get messy with your hands, add those sprinkles, and watch faces light up with every melt-in-your-mouth treat. Happy baking and Happy Valentine’s Day!
Print
Valentine’s Day Cookie Cups with Hershey’s Hugs Recipe
- Prep Time: 25 minutes
- Cooling Time: 15 minutes
- Cook Time: 12 minutes
- Total Time: 37 minutes
- Yield: 25 servings
- Category: Dessert
- Method: Baking
- Cuisine: American
- Diet: Vegetarian
Description
Valentine’s Day Cookie Cups are delightful bite-sized treats featuring a soft, chewy, buttery sugar cookie base wrapped around a sweet Hershey’s hug center. Perfect for sharing love and sweetness, these festive cookie cups are easy to make and beautifully decorated with sprinkles.
Ingredients
Cookie Dough
- 17.5 ounce package sugar cookie mix
- 0.5 cup salted butter, melted (1 stick)
- 3 tablespoons all-purpose flour
- 1 large egg, room temperature
- Pink or red food coloring, as needed
Filling and Decoration
- 24 to 26 Hershey’s hugs, unwrapped
- Decorative sprinkles, optional
Instructions
- Prepare Pan and Oven: Spray a mini cupcake pan with cooking spray to prevent sticking. Preheat your oven to 350 degrees Fahrenheit to ensure it’s ready for baking.
- Mix Dough: In a large bowl, beat together the sugar cookie mix, melted butter, all-purpose flour, egg, and food coloring until just combined. Add more food coloring if a stronger pink or red color is desired.
- Shape Dough: Take about 1 tablespoon of cookie dough and flatten it with your hand or rolling pin to roughly the size of your palm, preparing it to wrap the candy center.
- Add Candy Center: Place one unwrapped Hershey’s hug in the center of the flattened dough. Carefully wrap the dough around the hug, shaping it into a ball. Fix any cracks in the dough using your hands to ensure it encloses the hug completely.
- Fill Pan: Place each filled dough ball upright into a cavity of the mini cupcake pan. Repeat this process until all dough has been used.
- Bake: Bake the cookie cups for 10 to 12 minutes, or until the edges are set and the cookie looks cooked but soft inside.
- Add Sprinkles: Remove from the oven and immediately press decorative sprinkles onto the tops while the cookie cups are still warm to help them stick.
- Cool: Let the cookie cups cool in the pan for 15 minutes before removing and serving, allowing them to firm up to prevent breaking.
Notes
- Allow cookie cups to cool for about 15 minutes in the pan before removing to help them hold their shape and prevent falling apart.
- Fix cracks that form when wrapping dough around Hershey’s hugs by gently pressing and molding the dough with your hands.
- Use cute decorative sprinkles such as hearts or flowers pressed into warm cookie cups right after baking for festive presentation.
- Store cookie cups in an airtight container at room temperature for up to two weeks.
- To freeze, wrap cookie cups individually, place them in a freezer-safe container or bag, and freeze for 5 to 6 months.
Nutrition
- Serving Size: 1 cookie cup
- Calories: 120 kcal
- Sugar: 10 g
- Sodium: 90 mg
- Fat: 6 g
- Saturated Fat: 3.5 g
- Unsaturated Fat: 2 g
- Trans Fat: 0 g
- Carbohydrates: 15 g
- Fiber: 0.5 g
- Protein: 1 g
- Cholesterol: 15 mg


Leave a Reply